When working in roofing estimation and insurance claims, learning How To Pit Roof On Top Of House On Xactimate is essential for creating accurate and reliable project estimates. Xactimate is a widely used software for insurance adjusters, contractors, and roofing professionals to estimate repair and replacement costs efficiently. Correctly modeling a roof, especially a complex pitched or hip roof, ensures proper pricing and smooth claims processing.
In this guide, we’ll cover how to properly pit a roof in Xactimate, tips for precise measurements, common pitfalls, and best practices to optimize your roofing estimates.
Understanding Xactimate Roof Estimating
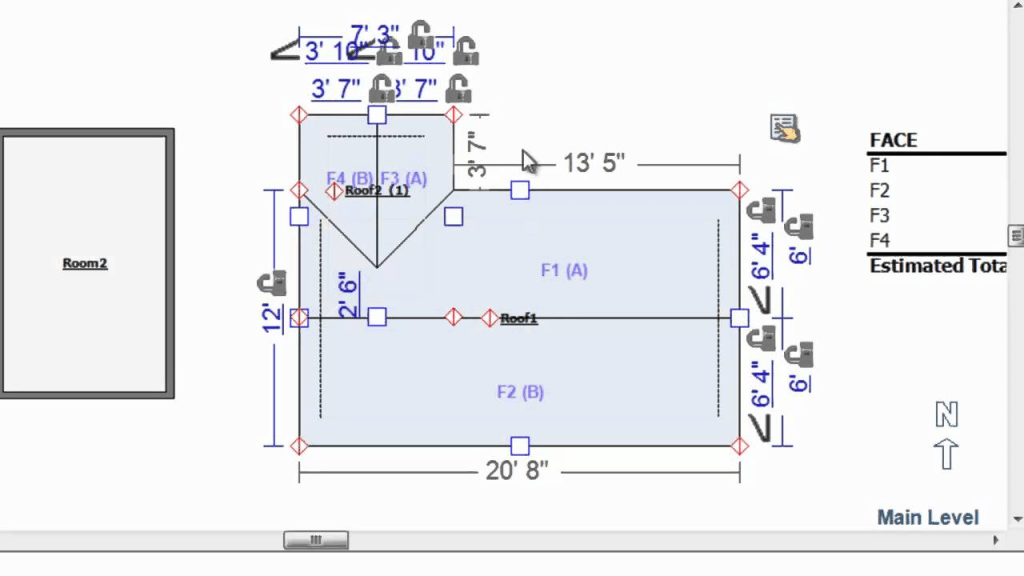
Xactimate allows users to model roofs using dimensions, pitch, and slope. Pitting a roof refers to placing the roof over a digital footprint of the house and defining its geometry, pitch, and ridges for accurate material calculations. Key elements include:
- Roof footprint: The house’s perimeter and shape.
- Pitch/slope: The rise over run ratio for each roof section.
- Hips and valleys: Critical for material calculations and waste estimation.
- Material layers: Shingles, underlayment, flashing, and accessories.
Mastering roof pitting ensures that estimates reflect actual repair or replacement costs, reducing discrepancies in claims.
Tools and Materials Needed
To successfully pit a roof on top of a house in Xactimate, gather the following:
- A computer with Xactimate installed
- House dimensions and sketches (length, width, and height)
- Roof pitch and slope measurements
- Roofing material details (shingles, underlayment, flashing)
- A calculator for manual checks
- Optional: Satellite images or photos for reference
Having accurate measurements is critical for reliable estimates.
Read too: Is It Reasonable to Ask the Seller to Replace the Roof?
Step-by-Step Guide: How To Pit Roof On Top Of House On Xactimate
Step 1: Open Xactimate and Create a New Project
- Launch Xactimate and start a new project for the property.
- Enter basic property information such as address, square footage, and number of stories.
Step 2: Draw the House Footprint
- Use the Xactimate sketch tool to outline the exterior walls of the house.
- Include overhangs and extensions to reflect the true roof footprint.
- Double-check measurements to ensure accuracy.
Step 3: Add Roof Elements
- Click on the roof icon in the sketch mode.
- Select the type of roof (hip, gable, mansard, etc.).
- Define roof planes by drawing lines from eaves to ridges.
- Ensure all hips, valleys, and ridges are represented.
Step 4: Enter Roof Pitch
- Measure the slope of each roof section using rise over run.
- Input the pitch into Xactimate for each roof plane.
- Verify that the software automatically calculates the surface area based on pitch.
Step 5: Place the Roof on Top of the House
- Once all planes and pitch values are entered, Xactimate will generate a 3D roof overlay on the house footprint.
- Adjust alignment and intersections to ensure accuracy.
- Confirm that ridges meet correctly and hips/valleys are accurately modeled.
Step 6: Assign Roofing Materials
- Select roofing materials such as shingles, underlayment, and drip edges.
- Assign materials to each roof plane individually if necessary.
- Include additional items like skylights, vents, and chimneys.
Step 7: Check Material Quantities
- Review calculated areas for shingles, underlayment, and accessories.
- Include waste factors (typically 10–15%) for cuts and overlaps.
- Ensure all sections, including hips, valleys, and dormers, are accounted for.
Step 8: Review and Adjust
- Double-check all roof measurements against real-world dimensions.
- Adjust any discrepancies and ensure material quantities match the roof’s complexity.
- Use Xactimate’s 3D preview to confirm the roof appears correct visually.
Step 9: Export or Use in Estimate
- Once the roof is accurately pitted, you can use it in the overall estimate for repair or replacement.
- Export reports, drawings, and material lists for submission to insurance companies or contractors.
Common Mistakes When Pitting Roofs
- Incorrect pitch input: Always measure slope carefully; wrong pitch affects surface area and materials.
- Omitting hips or valleys: Leads to underestimation of shingles and other roofing materials.
- Ignoring waste factors: Cutting and overlapping shingles require additional material.
- Miscalculating footprint: Ensure all extensions, overhangs, and dormers are included.
- Not verifying 3D alignment: Misaligned planes can distort measurements and estimates.
Avoiding these mistakes ensures accurate cost estimation and smoother claims processing.
Tips for Efficient Roof Estimation on Xactimate
- Use satellite imagery: Confirm roof layout before on-site measurements.
- Measure on-site: For complex roofs, take actual dimensions and verify pitch with tools.
- Label roof planes: Keep organized notes for each section.
- Update Xactimate regularly: Ensure you have the latest software version with accurate pricing databases.
- Leverage templates: For common roof styles, use Xactimate templates to save time.
Benefits of Accurate Roof Pitting
- Ensures proper material ordering
- Reduces errors and financial discrepancies
- Provides clear documentation for insurance claims
- Facilitates faster approval from adjusters and contractors
- Improves client trust and project efficiency
Accurate roof pitting is essential for contractors and adjusters to provide reliable and professional estimates.
Advanced Features
- 3D Visualization: Allows virtual inspection of complex roofs.
- Slope-specific pricing: Adjusts material cost based on steepness.
- Integration with drone imagery: Use aerial photos to measure and validate roof planes.
- Layered materials: Model multiple layers such as underlayment, insulation, and shingles.
Using these advanced features in Xactimate improves accuracy, reduces errors, and speeds up estimation.
Conclusion
Learning How To Pit Roof On Top Of House On Xactimate is critical for roofing professionals, insurance adjusters, and contractors. Accurate roof pitting ensures correct material calculations, prevents costly errors, and facilitates smooth insurance claims.
By following the step-by-step guide—drawing the house footprint, adding roof planes, entering pitch, assigning materials, and reviewing the estimate—you can create precise, reliable roof models in Xactimate. Proper attention to detail, avoiding common mistakes, and leveraging advanced features enhances your workflow and ensures professional-grade estimates every time.


Leave a Reply