When building or upgrading a dog house, the roof is one of the most important features to consider. It shields your pet from the sun, rain, snow, and wind while also adding durability and style to the structure. Many pet owners are now turning to metal roofing for its strength and longevity. But one common question arises: How To Put A Metal Roof On A Dog House in the right way?
This comprehensive guide explains everything you need to know about choosing materials, preparing the structure, and installing a metal roof for your dog’s home.
Read too: Hail Damage Roof Repair: Essential Guide to Restoring Your Home’s Protection
Why Choose Metal Roofing for a Dog House?
Before learning How To Put A Metal Roof On A Dog House, it’s worth considering why metal is an excellent choice compared to alternatives like wood, shingles, or plastic.
- Durability: Metal roofs can last decades without warping or rotting.
- Weather Protection: Effective against rain, snow, hail, and UV rays.
- Energy Efficiency: Reflects sunlight, helping keep the dog house cooler in summer.
- Low Maintenance: Requires less upkeep than traditional roofing materials.
- Aesthetic Appeal: Gives the dog house a modern, polished look.
- Eco-Friendly: Metal roofing is often made from recycled materials and is fully recyclable.
Tools and Materials You’ll Need
Before starting, gather all essential tools and supplies. Having everything ready makes the project smoother.
- Metal roofing sheets (galvanized steel or aluminum)
- Measuring tape
- Metal snips or a circular saw with a metal blade
- Drill or screwdriver
- Roofing screws with rubber washers
- Safety gloves and goggles
- Framing wood (if adjustments are needed)
- Underlayment (optional but recommended)
Optional extras include paint or sealant if you want to customize the roof’s appearance or add extra weatherproofing.
Planning the Roof Design
When deciding How To Put A Metal Roof On A Dog House, the design is just as important as the material. Consider the following:
- Roof Pitch: A sloped or gable roof is ideal since it allows water, snow, and debris to slide off easily.
- Panel Size: Cut panels to fit the roof dimensions with at least a 1–2 inch overhang for water runoff.
- Ventilation: Ensure there’s enough airflow so your dog stays comfortable.
Preparing the Dog House
Preparation ensures that your project runs smoothly. Follow these steps:
- Inspect the Dog House Frame
- Check that the walls and roof frame are sturdy and level. Reinforce weak areas with additional wood if necessary.
- Remove Old Roofing
- If replacing shingles or plywood, strip away the old materials to expose the bare roof frame.
- Add Underlayment (Optional)
- A waterproof barrier under the metal panels can reduce condensation and increase insulation.
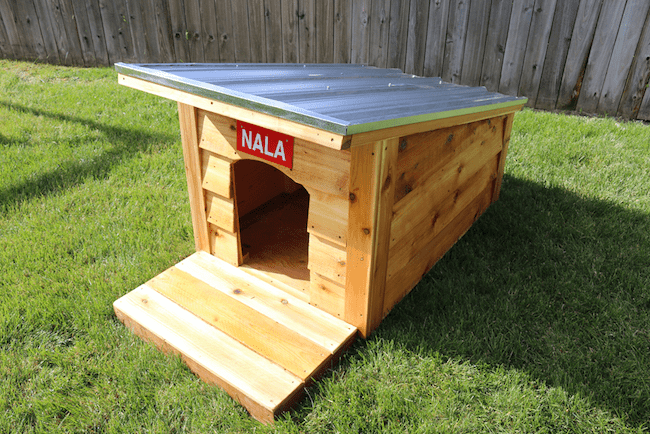
Step-by-Step Guide: How To Put A Metal Roof On A Dog House
Here’s the process broken down into simple steps:
Step 1: Measure the Roof
Use a measuring tape to get accurate dimensions of the roof frame. Add an extra inch on all sides for overhang.
Step 2: Cut Metal Panels
Using metal snips or a saw with a metal blade, cut panels to match the roof size. Always wear gloves and goggles for safety.
Step 3: Position the Panels
Lay the first panel on one side of the roof, starting at the bottom edge. Make sure it overhangs slightly to allow water to drip off rather than run down the walls.
Step 4: Secure the Panels
Use roofing screws with rubber washers to fasten the panel to the wooden frame. Place screws every 6–8 inches along the edges and every 12–16 inches across the panel.
Step 5: Overlap Panels
If using multiple panels, overlap them by at least one ridge to prevent leaks.
Step 6: Install Ridge Cap (Optional)
For gable roofs, install a ridge cap at the peak to seal the top seam.
Step 7: Repeat on the Other Side
Follow the same process on the opposite side of the roof.
Safety Tips During Installation
When learning How To Put A Metal Roof On A Dog House, safety should always come first—even for small projects:
- Wear gloves to avoid sharp edges.
- Use protective eyewear when cutting metal.
- Secure panels tightly to prevent them from lifting in strong winds.
- Keep tools out of reach of pets during installation.
Common Mistakes to Avoid
- Incorrect Measurements: Always double-check measurements to avoid gaps.
- Too Few Fasteners: Skimping on screws can cause the panels to loosen over time.
- Skipping Overhang: Without overhang, water may leak into the walls.
- Not Using Rubber Washers: Washers prevent water from seeping through screw holes.
- Using the Wrong Tools: Cutting metal with improper blades can warp or damage panels.
Maintenance Tips for Metal Dog House Roofs
A metal roof requires minimal upkeep, but small steps ensure it lasts for years:
- Inspect Annually: Check for loose screws or damaged panels.
- Clean Debris: Remove leaves or branches that may collect on the roof.
- Check for Rust: Apply anti-rust spray or touch-up paint if needed.
- Repaint or Seal: Refresh the finish every few years to maintain aesthetics and durability.
Advantages of DIY vs Professional Installation
Since dog houses are small structures, installing a metal roof is a perfect DIY project:
- DIY Benefits: Saves money, quick to complete, and allows customization.
- Professional Benefits: If you’re uncomfortable with tools or working with metal, hiring help ensures accuracy and safety.
Eco-Friendly and Stylish Options
If you want your project to be both practical and stylish, here are some ideas:
- Paint the roof in bright colors for a fun, cheerful look.
- Use recycled metal sheets for a budget-friendly, eco-conscious choice.
- Add solar-powered lights to make the dog house visible at night.
- Coordinate the dog house roof with your home’s roofing for a unified appearance.
Final Thoughts
Learning How To Put A Metal Roof On A Dog House is a rewarding project that combines practicality with style. Metal roofing offers excellent protection, durability, and a polished appearance for your pet’s home. By measuring accurately, using the right tools, and securing panels properly, you’ll create a dog house roof that lasts for years.
Whether you’re upgrading an old dog house or building one from scratch, this project is straightforward, budget-friendly, and ensures your furry friend stays comfortable in all weather conditions.


Leave a Reply