When it comes to maintaining the integrity of your roof, proper flashing installation is crucial. One essential type of flashing is kickout flashing, which is specifically designed to direct water away from roof intersections and prevent leaks. This article will guide you through the process of installing kickout flashing on an existing roof, explaining its importance, and offering practical tips for a successful installation.
What is Kickout Flashing?
Understanding Kickout Flashing
Kickout flashing, also known as diverter flashing, is a specialized component used to channel water away from roof-to-wall intersections. Its primary purpose is to prevent water from infiltrating the wall and causing damage to the structure.
- Design: Kickout flashing is typically L-shaped, with one leg attached to the roof and the other extending outwards to direct water away from the wall.
- Material: It can be made from various materials, including aluminum, copper, or galvanized steel, depending on your roof’s requirements.
Importance of Kickout Flashing
Proper installation of kickout flashing is crucial for:
- Preventing Water Damage: Ensures that water is directed away from vulnerable areas, reducing the risk of leaks and structural damage.
- Protecting Walls: Keeps water from seeping behind siding or into wall cavities, which can lead to mold and rot.
Read too: How To Replace A Mobile Home Roof: Step-by-Step Guide for Homeowners
Why Install Kickout Flashing on an Existing Roof?
Common Roof Issues Addressed
Installing kickout flashing on an existing roof is often necessary due to:
- Poor Initial Installation: Inadequate or missing flashing during the original roof installation can lead to leaks and water damage.
- Roof Modifications: Changes or repairs to the roof structure may require the addition of kickout flashing to maintain proper water diversion.
Benefits of Upgrading
- Enhanced Protection: Improves the roof’s ability to prevent water damage and extend the lifespan of your roofing system.
- Cost Savings: Prevents costly repairs and water damage that could result from inadequate flashing.
How to Install Kickout Flashing on an Existing Roof
Tools and Materials Needed
Before you begin, gather the following tools and materials:
- Kickout Flashing Kit: Includes pre-formed flashing pieces.
- Tools: Hammer, roofing nails, utility knife, roofing adhesive, sealant.
- Safety Gear: Ladder, safety harness, gloves, and goggles.
Step-by-Step Installation Guide
1. Inspect the Roof
- Check for Damage: Inspect the existing roof and wall intersection for any signs of damage or wear. Repair any issues before proceeding.
- Measure and Plan: Determine the placement of the kickout flashing based on the roof’s slope and wall intersection.
2. Remove Old Flashing (If Applicable)
- Remove Existing Flashing: Carefully remove any old or damaged flashing from the roof-to-wall intersection. Be cautious not to damage the surrounding roofing materials.
3. Prepare the Area
- Clean the Surface: Ensure the area where the kickout flashing will be installed is clean and free of debris. This helps ensure a secure bond with the roofing materials.
- Cut and Shape: If necessary, trim the kickout flashing to fit the dimensions of the roof and wall intersection.
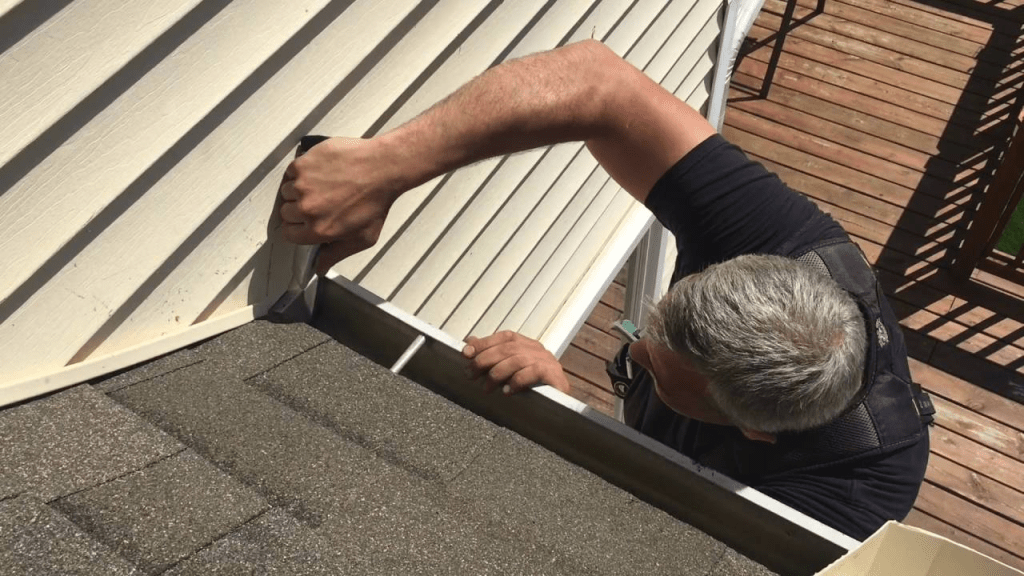
4. Install the Kickout Flashing
- Position the Flashing: Place the kickout flashing so that it directs water away from the wall and onto the roof. The horizontal leg should be flush with the wall, and the vertical leg should extend over the roof.
- Secure with Nails: Nail the flashing into place along the top edge and vertical leg, ensuring it is firmly attached to both the roof and wall.
- Apply Sealant: Use roofing adhesive or sealant to seal any gaps between the flashing and the roofing materials. This prevents water from seeping underneath the flashing.
5. Final Checks
- Inspect Installation: Ensure that the kickout flashing is properly aligned and securely attached. Check for any gaps or areas where water could potentially infiltrate.
- Clean Up: Remove any excess sealant and debris from the installation area.
Tips for Successful Installation
Ensuring a Proper Fit
- Measure Accurately: Proper measurements ensure that the kickout flashing fits perfectly and functions effectively.
- Custom Fit: In some cases, custom-fabricated flashing may be necessary to accommodate unique roof and wall configurations.
Working with Different Roofing Materials
- Compatibility: Ensure that the kickout flashing material is compatible with your existing roofing material to avoid any potential issues.
- Consult Professionals: If you’re unsure about the compatibility or installation process, consider consulting a roofing professional.
Safety Precautions
- Use Proper Safety Gear: Always use a ladder, safety harness, and other protective gear to ensure a safe installation process.
- Work Carefully: Take your time and work carefully to avoid accidents and ensure a high-quality installation.
Conclusion
Installing kickout flashing on an existing roof is a vital step in protecting your home from water damage and ensuring the longevity of your roofing system. By following the steps outlined in this guide and taking the necessary precautions, you can effectively install kickout flashing and enhance the performance of your roof. Remember to inspect your roof regularly and address any issues promptly to maintain a watertight seal and protect your home.


Leave a Reply