Creating a thatched roof for a model house is an exciting and rewarding project that adds authenticity and charm to your miniature scene. Whether you’re working on a model for a diorama, a mini village, or just creating a detailed architectural piece, a thatched roof can make all the difference in achieving realistic aesthetics. But how do you go about creating a thatched roof that mimics the traditional appearance of real thatch?
In this article, we will walk you through the entire process of how to make a thatched roof for a model house, providing you with useful tips, techniques, and materials that will help you craft a beautiful, authentic-looking thatched roof. Whether you’re a beginner or an experienced modeler, this guide will give you all the knowledge you need to get started.
What Is a Thatched Roof?
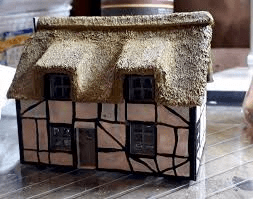
A thatched roof is a traditional roofing style made from dried plant materials, usually reed, straw, or rushes, layered in a way that provides waterproofing and insulation. This technique has been used for centuries in various cultures and remains popular in some areas today due to its natural look and effective insulation properties.
Read too: Is It Reasonable to Ask the Seller to Replace the Roof?
For model houses, creating a thatched roof is not only about aesthetics; it’s also about texture, layering, and attention to detail. A well-crafted thatched roof can bring life to your model, offering a stunning visual effect that can transport viewers into a miniature world.
How To Make A Thatched Roof For A Model House: Materials You’ll Need
Before we dive into the step-by-step process, let’s review the materials you’ll need to create a thatched roof for a model house:
- Base material for the roof: You’ll need a sturdy base for the roof, such as a piece of foam board, cardboard, or balsa wood.
- Thatched material: For the actual thatch, you can use a variety of materials, such as dried grass, reeds, straw, or synthetic alternatives like sisal twine or model grass. The choice of material depends on the size of your model and the effect you want to achieve.
- Scissors or wire cutters: For cutting your materials to the desired length.
- Glue: Use strong craft glue that will hold the thatch in place. PVA glue or hot glue is recommended for model projects.
- Ruler or measuring tape: For measuring the length of thatching materials and ensuring uniformity in size.
- Tweezers: Helpful for placing small pieces of thatch in place, especially for detailed sections of the roof.
- Paint (optional): You can use brown or green paint to color your thatch materials if you want to add a more realistic tone.
- Roof frame: If you’re constructing a roof with a pitched or gabled design, create a frame from wood or plastic to provide structural support.
Now that you’ve gathered your materials, let’s break down the steps for creating your thatched roof.
Step-by-Step Guide on How To Make A Thatched Roof For A Model House
1. Prepare the Roof Base
The first step in creating a thatched roof is to prepare the base structure of your roof. This will form the foundation for your thatch. Depending on the design of your model house, you might have a flat roof, a pitched roof, or even a gabled roof.
- Cut your base material: If you’re using foam board, cardboard, or balsa wood, cut it to the correct shape and size to match your model house. If you’re creating a pitched roof, measure and cut the materials accordingly to create the correct angle.
- Create the roof frame: If your model house has a frame that supports the roof, assemble it using balsa wood or plastic strips. You can use glue to secure the frame and ensure the roof structure is sturdy.
2. Cut and Prepare the Thatched Material
The next step is to cut your thatching material into strips. This process will give you manageable lengths that you can easily work with when applying them to the roof.
- Measure and cut: Using your ruler, measure the length you want for each strip of thatch, ensuring they’re all roughly the same size for uniformity. You can adjust the length based on the scale of your model house. For small-scale models, thinner, shorter pieces will likely work best.
- Prepare the material: If you’re using dried grasses, reeds, or straw, trim them to the appropriate size. If you’re using synthetic materials like sisal twine or model grass, cut them into pieces that match the length of your strips. For a more natural look, you can fray or fluff the ends of the material slightly to simulate the appearance of real thatch.
3. Apply the Thatched Material
Once your thatch pieces are ready, it’s time to begin attaching them to the roof base. This is where the magic happens, as you’ll start layering the thatch to create the signature “thick” and textured look.
- Start at the bottom: Begin applying the thatched material at the bottom edge of the roof, working upwards. This ensures that the layers of thatch will overlap, creating a natural, waterproofing effect.
- Glue the strips in place: Using craft glue or hot glue, attach each strip of thatch to the roof base. Press each piece down gently to ensure it sticks securely. You may need to hold each piece for a few seconds to let the glue set before moving on to the next piece.
- Overlap the thatch: As you work your way up the roof, ensure each new layer of thatch overlaps the previous one by about a quarter of its length. This creates the characteristic “layered” effect found in real thatched roofs.Tip: If you want to add more texture to your roof, you can experiment with varying the thickness of the thatching strips. Alternating between thicker and thinner pieces can help mimic the uneven texture of real thatch.
4. Secure the Top of the Roof
When you reach the top of the roof, you’ll need to secure the last layer of thatch to ensure it stays in place. This can be tricky, especially if you’re working with a steeply pitched roof.
- Trim excess material: If necessary, trim any excess thatch at the top of the roof to create a clean edge.
- Attach the final pieces: Glue the final pieces of thatch at the peak of the roof, pressing them securely into place. Depending on the roof’s design, you may need to shape the thatch slightly to ensure it fits the contours of the roof.
5. Add Final Touches for Realism
To make your thatched roof even more realistic, you can add a few finishing touches.
- Weather the thatch: Use a brown or green paint to add a natural, weathered look to your thatch. Lightly brush paint over the thatch to give it a slightly aged, sun-bleached appearance.
- Add small details: If your model house is part of a diorama or village scene, consider adding moss, vines, or small flowers around the base of the roof to create a more rustic, overgrown look.
6. Allow to Dry and Set
Once you’ve finished attaching all the thatch and adding any final details, allow the roof to fully dry. Depending on the type of glue used, this may take a few hours to overnight. Ensure everything is securely attached before moving on to any further steps.
Troubleshooting Tips
- Uneven roof texture: If your thatched roof doesn’t have the texture you’re looking for, don’t be afraid to add more layers of thatch. The beauty of this project is that you can always layer more material to achieve the perfect effect.
- Thatched material doesn’t stick: If you’re having trouble getting the thatch to stay in place, consider using a stronger adhesive or try securing the material with small pins while the glue dries.
Conclusion
Learning how to make a thatched roof for a model house requires patience, attention to detail, and the right materials. However, with the right approach, you can create a stunning and realistic thatched roof that will elevate your model house to new heights. Whether you’re building a miniature village, a model for a diorama, or simply want to create a unique architectural piece, this step-by-step guide provides all the tips and techniques you need to create an authentic-looking thatched roof for your model house.


Leave a Reply