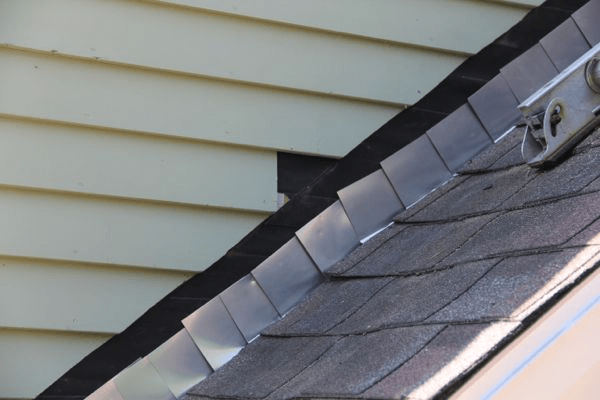
One of the most vulnerable areas in a home’s roofing system is the intersection where the roof meets the side of the house—often referred to as a roof-to-wall junction. If not properly waterproofed, this area becomes a prime location for water infiltration, leading to interior leaks, mold, wood rot, and expensive structural repairs.
So, how do you waterproof where roof meets side of house? The answer involves understanding flashing, sealants, siding overlaps, and proper installation techniques. In this detailed guide, we’ll walk you through the best practices, common pitfalls, and the tools you need to protect your home from water damage.
Read too: Is It Reasonable to Ask the Seller to Replace the Roof?
Why Waterproofing at Roof-to-Wall Intersections Is Critical
The point where the roof meets the siding is exposed to constant stress from wind-driven rain, melting snow, and freeze-thaw cycles. Water naturally flows toward this joint, especially in sloped roof systems. Without effective waterproofing, moisture can penetrate behind siding or under shingles, often going unnoticed until substantial damage has occurred.
Waterproofing this area not only safeguards your roof but also extends the life of your siding, insulation, and underlying structure.
How Do You Waterproof Where Roof Meets Side Of House Safely and Effectively?
Waterproofing this transition area correctly is crucial to maintaining a dry and durable home. Below is a step-by-step breakdown to answer how do you waterproof where roof meets side of house with precision and confidence.
1. Understand the Role of Flashing
Flashing is the primary defense against water intrusion where the roof meets the vertical side of the house. Typically made of aluminum, galvanized steel, or copper, flashing is installed underneath roofing materials and extends up the wall behind the siding.
There are two main types used in this area:
- Step flashing: Installed where the slope of the roof meets a vertical wall, step flashing consists of L-shaped metal pieces layered between each shingle and up against the siding.
- Continuous flashing (or apron flashing): Used on low-slope roofs or where roofing terminates into a wall, continuous flashing provides a single long piece of metal to divert water.
Correct flashing installation is essential for directing water away from this vulnerable intersection.
2. Install Kickout Flashing
Where the roof slope ends and the wall continues downward, kickout flashing should be installed. This small, angled piece of flashing redirects water into the gutter instead of letting it run down the wall.
Without kickout flashing, water can penetrate behind the siding, leading to rot or mold growth—especially behind stucco or wood siding.
3. Use High-Quality Waterproof Membranes
In modern construction, waterproof membranes or house wrap are applied before siding installation to provide an additional moisture barrier. To waterproof roof-to-wall connections:
- Apply self-adhering flashing tape or a waterproof membrane behind the step flashing and beneath the siding.
- Overlap the membrane by several inches at each seam to create a watertight barrier.
- Combine it with ice and water shield underlayment on the roof for extra protection in cold climates.
Membranes help protect areas that might be prone to shifting, expansion, or poor workmanship over time.
4. Correct Siding Installation Over Flashing
When siding is installed too low or overlaps flashing improperly, it creates a trap for water.
Best practices include:
- Leave at least a 1-inch drip gap between the bottom of the siding and the roof surface.
- Make sure the bottom of the siding is not caulked or sealed against the roof; this space allows moisture to escape.
- The siding should always be installed over the flashing, never under it.
These principles allow rainwater to drain freely, instead of becoming trapped behind materials.
5. Seal Vulnerable Gaps with High-Quality Caulk
For minor gaps or transitions that flashing can’t fully protect (like joints or transitions between materials), use a durable, paintable exterior sealant. Choose a caulk that is:
- Waterproof
- UV-resistant
- Compatible with metal and siding materials
Avoid overusing caulk where flashing should be; caulking is a backup sealant, not the primary defense.
6. Inspect and Maintain Regularly
Even a properly waterproofed roof-to-wall intersection can fail over time due to:
- Deterioration of flashing
- Sealant breakdown
- Siding shifts due to settling
Inspect this area twice a year, especially after major storms. Look for:
- Loose or corroded flashing
- Cracked caulk
- Signs of water staining or rot on interior walls
Early detection can save thousands in future repairs.
7. Consider Siding Material and Compatibility
Some siding materials are more prone to water damage at the roof intersection:
- Wood siding can wick moisture and rot.
- Fiber cement siding is water-resistant but still needs clearance from roof materials.
- Vinyl siding must be properly trimmed and vented to avoid trapping moisture.
Knowing your siding type helps you decide what flashing and waterproofing strategies work best.
Tools and Materials You’ll Need
If you’re doing this project yourself, here’s a checklist of essential tools and materials:
- Step flashing (galvanized steel or aluminum)
- Kickout flashing
- Roofing underlayment or ice and water shield
- Self-adhering waterproof membrane
- Roofing nails or screws
- Utility knife, tin snips
- Roofing caulk or polyurethane sealant
- Hammer or nail gun
- Level and tape measure
If you’re unsure about any part of this project, consult a roofing professional to ensure the integrity of your home’s envelope.
Common Mistakes to Avoid
Avoiding these common pitfalls can save you from future leaks:
- Not overlapping flashing properly: Always install flashing shingle by shingle, tucking each piece under the one above.
- Installing siding too low: Siding in contact with the roof encourages moisture intrusion.
- Neglecting kickout flashing: It’s small but incredibly important.
- Relying on caulk alone: Caulk deteriorates faster than flashing.
Benefits of Proper Waterproofing at Roof-Wall Junctions
- ✅ Prevents roof leaks and water damage
- ✅ Enhances insulation performance
- ✅ Protects framing and sheathing from rot
- ✅ Reduces maintenance and repair costs
- ✅ Increases home value and longevity
Should You Hire a Professional?
If your roof has a steep pitch, complex layout, or your home uses sensitive siding materials like stucco or stone veneer, hiring a licensed roofer or waterproofing contractor is wise.
Professionals have access to:
- Code-compliant materials
- Scaffolding or safety equipment
- Infrared tools to detect hidden moisture
An experienced installer will ensure everything is sealed properly, giving you peace of mind.
Final Thoughts: Protect Your Home Where It’s Most Vulnerable
So, how do you waterproof where roof meets side of house? The answer is layered: through quality materials, smart installation techniques, and consistent inspection. This critical junction demands attention, especially in climates with heavy rain, snow, or fluctuating temperatures.
By following the steps in this guide, you’ll ensure that your home remains protected from the elements where it’s most exposed. Whether you’re building new or retrofitting an existing structure, never underestimate the importance of proper waterproofing at the roof-to-wall connection.


Leave a Reply