The holiday season is a time of joy, tradition, and dazzling home decorations. For many, nothing signifies the beginning of the festive season more than hanging Christmas lights on a house with peak of roof. It’s a magical transformation that brings warmth, cheer, and a sense of wonder to your neighborhood.
But installing lights on a house with a peaked or gabled roof can be a real challenge. The steep slopes, high elevations, and angles require extra planning, the right equipment, and most importantly—safe techniques.
This comprehensive guide will walk you through everything you need to know about hanging Christmas lights on a house with peak of roof. From safety tips and best practices to lighting ideas and design inspiration, you’ll learn how to make your holiday lighting both safe and spectacular.
Read too: Is It Reasonable to Ask the Seller to Replace the Roof?
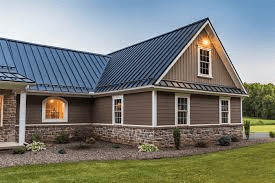
Why Hanging Christmas Lights On A House With Peak Of Roof Is Worth the Effort
If your home has one or more gable roofs (the classic triangle shape), you might be wondering if the effort is worth it. Here’s why hanging Christmas lights on a house with peak of roof is a standout idea:
- Enhanced Visibility: Peaks and gables naturally draw the eye. Lights placed here create a dramatic and attractive focal point.
- Architectural Highlighting: Roof peaks showcase your home’s architecture. Lighting them emphasizes structure, depth, and shape.
- Symmetrical Balance: When done right, lights on peaked roofs offer a clean, symmetrical look that adds sophistication and charm.
While it may require extra preparation, the visual impact is far greater than a basic roofline light setup.
What You Need Before Hanging Christmas Lights on a Peaked Roof
Before climbing any ladder or unspooling light strands, gather the necessary tools and safety equipment:
Essential Tools:
- Heavy-duty ladder or extension ladder
- Light clips designed for gutters or shingles
- Extension cords rated for outdoor use
- Timer or smart plug for automation
- Zip ties or twist ties for securing cords
- Work gloves and non-slip shoes
Lighting Options:
- C9 LED bulbs for bold, classic color
- Icicle lights for a wintery edge
- Mini string lights for subtle sparkle
- Rope lights for outlining sharp edges cleanly
Using LED lights is recommended—they’re energy-efficient, last longer, and stay cool to the touch.
Tips for Hanging Christmas Lights On A House With Peak Of Roof Safely and Effectively
Safety is your top priority. Hanging Christmas lights on a house with peak of roof involves working at heights, on sloped surfaces, and potentially in cold or wet conditions. Here’s how to do it right:
1. Inspect the Roof and Lights First
Before installation:
- Check the roof for damage, loose shingles, or wet spots.
- Test all lights for broken bulbs and electrical issues.
2. Use the Right Ladder and Position It Correctly
Use an extension ladder tall enough to reach the peak comfortably. Place it on level, firm ground and have a spotter if possible.
- Angle rule: The ladder’s base should be 1 foot out for every 4 feet up.
- Never overreach. Move the ladder instead of stretching.
3. Choose Clips Over Nails or Staples
For peaked roofs, use shingle or gutter clips that slide under shingles or attach to gutters. These are:
- Safer for your home
- Easier to remove
- Reusable for next year
Avoid puncturing your roof or fascia boards with nails or staples, which can lead to long-term water damage or leaks.
4. Start From the Bottom and Work Upward
Begin hanging lights at the lowest roofline, moving your way up to the peaks. This helps you maintain control and reduces unnecessary climbing.
- Outline the eaves first
- Then light the gables
- Finish at the roof peaks
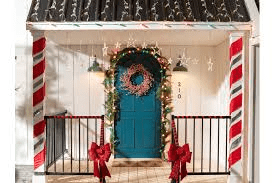
Design Ideas for Hanging Lights on Roof Peaks
The roof peak is a perfect canvas for creativity. Here are popular display styles:
Classic Outline
Use C9 bulbs to trace the roofline, including the base and both angled sides of the triangle. This creates a sharp, clean silhouette.
Twinkling Triangle
Run lights vertically from the base to the peak and back down, forming a triangle of lights inside the gable. Fill with twinkling mini lights for a starry effect.
Icicle Illusion
Hang icicle lights along the bottom edge of the gable only. The dangling effect mimics snow and creates depth.
Roof-to-Ground Cascade
Attach light strands at the peak and anchor them to stakes in the yard. This forms a cascading tree-like effect that looks magical from a distance.
Weather Considerations for Roof Lighting
Your roof is exposed to wind, rain, snow, and ice. Keep these weather safety tips in mind:
- Use weatherproof outdoor-rated lights
- Keep all electrical connections off the ground
- Use ground fault circuit interrupter (GFCI) outlets for added protection
- Avoid installation in wet, icy, or windy conditions
You can also install your lights earlier in the season while the weather is still mild, and use timers to activate them later.
Pro Tips for Hanging Christmas Lights on Tall Peaks
Some homes have very tall roof peaks that require extra planning. Here’s how to manage these heights:
1. Use a Telescoping Pole
A light-hanging pole with a hook can help you install clips and lights from the ground or lower on the ladder.
2. Rent or Borrow a Lift
For two-story peaks or especially steep roofs, a cherry picker or bucket lift can make installation faster and safer.
3. Break the Job Into Sections
Tackle each peak or gable separately to avoid fatigue. Working in shorter sessions also reduces the risk of mistakes or accidents.
Maintenance Tips After Installation
Once your lights are up and glowing, a little maintenance can help keep them shining all season:
- Check weekly for burned-out bulbs or drooping sections
- Secure clips and adjust as needed after high winds
- Unplug and inspect lights after major snow or storms
- Keep pathways and walkways clear of extension cords
Eco-Friendly Options for Roofline Lighting
Looking for sustainability while hanging Christmas lights on a house with peak of roof? Try these tips:
- Choose solar-powered lights for accent lighting in the yard or porch area
- Use LED lights to reduce energy consumption
- Set lights on timers to limit energy use to a few hours per night
This approach not only helps the environment but also reduces your utility bills during the holiday season.
After the Holidays: Safe Removal and Storage
Removing lights is just as important as installing them safely. Here’s how to take them down properly:
- Wait for a dry, calm day
- Unclip lights carefully—never yank or pull
- Coil each strand neatly and label them by section (e.g., “garage gable” or “main peak”)
- Store in weatherproof bins in a cool, dry space
This preparation makes next year’s installation quicker and easier.
Final Thoughts: Make the Most of Your Roof’s Peak
Hanging Christmas lights on a house with peak of roof is a rewarding project that turns your home into a seasonal showstopper. With the right tools, safety practices, and creative ideas, even the steepest gables become the perfect place for holiday sparkle.
Your peaked roof isn’t just a structural feature—it’s an opportunity to add magic and joy to your home and neighborhood. Embrace the height, highlight the angles, and light up the season with confidence.
Leave a Reply