Re-roofing your home may seem like a big job, but with the right guidance, materials, and a little elbow grease, it’s entirely doable—especially with 3-tab shingles, one of the most beginner-friendly roofing materials available.
So, you’re asking yourself: “How do I re roof my house with 3Tab shingles?” This article will walk you through every stage of the process—from preparation and teardown to installation and cleanup—giving you a full understanding of how to tackle this home improvement project with confidence.
Whether you’re replacing old, worn-out shingles or upgrading the appearance of your home, this step-by-step guide will help you save money, learn a valuable skill, and keep your house protected from the elements.
Read too: Hail Damage Roof Repair: Essential Guide to Restoring Your Home’s Protection
Why Choose 3-Tab Shingles?
Before we get into how do I re roof my house with 3Tab shingles, let’s understand why this type of shingle remains a popular option for homeowners and DIYers.
Benefits of 3-Tab Shingles:
- Cost-Effective: One of the most affordable roofing options.
- Lightweight: Easier to handle than architectural shingles.
- Simple Design: Uniform and easy to install with minimal complexity.
- Decent Lifespan: Generally lasts 15–25 years.
- Variety: Available in many colors and styles.
These qualities make 3-tab shingles a smart choice for DIY roof replacement projects.
Tools & Materials You’ll Need
Tools:
- Roofing nailer or hammer
- Ladder or scaffolding
- Utility knife
- Chalk line
- Pry bar or roofing shovel
- Tape measure
- Safety harness and gloves
- Broom or roof blower
- Tin snips (for flashing)
Materials:
- 3-tab shingles
- Roofing nails
- Roofing felt or synthetic underlayment
- Ice and water shield
- Drip edge
- Roofing cement or caulk
- Starter strip shingles
- Ridge cap shingles
Pro Tip: Always order about 10–15% extra shingles to cover waste and future repairs.
Planning the Job
Step 1: Measure Your Roof
Measure the length and width of each section of your roof and multiply them to get the square footage. Add all sections together for the total area.
Then, divide by 100 to determine how many “squares” (100 square feet = 1 square) of shingles you’ll need.
Step 2: Check the Weather
Pick a stretch of 2–3 dry days with mild weather. Avoid hot days (shingles get soft) and very cold days (shingles get brittle).
How Do I Re Roof My House With 3Tab Shingles?
Let’s dive into the core process and finally answer the question: How do I re roof my house with 3Tab shingles?
Here’s your step-by-step guide:
Step 1: Tear Off the Old Shingles
Use a roofing shovel or pry bar to remove old shingles, nails, and underlayment. It’s tempting to install new shingles over the old ones, but removing the old layer ensures proper installation, avoids excess weight, and allows for a thorough deck inspection.
Inspect the sheathing (plywood underneath) for rot or soft spots. Replace any damaged areas.
Step 2: Install Drip Edge and Underlayment
Start by applying drip edge flashing along the eaves and rakes of the roof. This metal edging prevents water from seeping underneath the shingles and damaging the wood.
Next, roll out your roofing felt or synthetic underlayment, starting at the bottom edge of the roof and working your way upward. Overlap each row by 2–4 inches and nail it down securely.
In colder climates, install ice and water shield along the eaves and valleys for extra protection against freeze-thaw cycles.
Step 3: Lay the Starter Strip
Before installing your 3-tab shingles, you must add a starter strip. You can buy prefabricated starter shingles or cut the tabs off a row of 3-tab shingles.
Align the starter strip along the eaves with about a 1/4″ overhang. This creates a seal and helps prevent wind uplift.
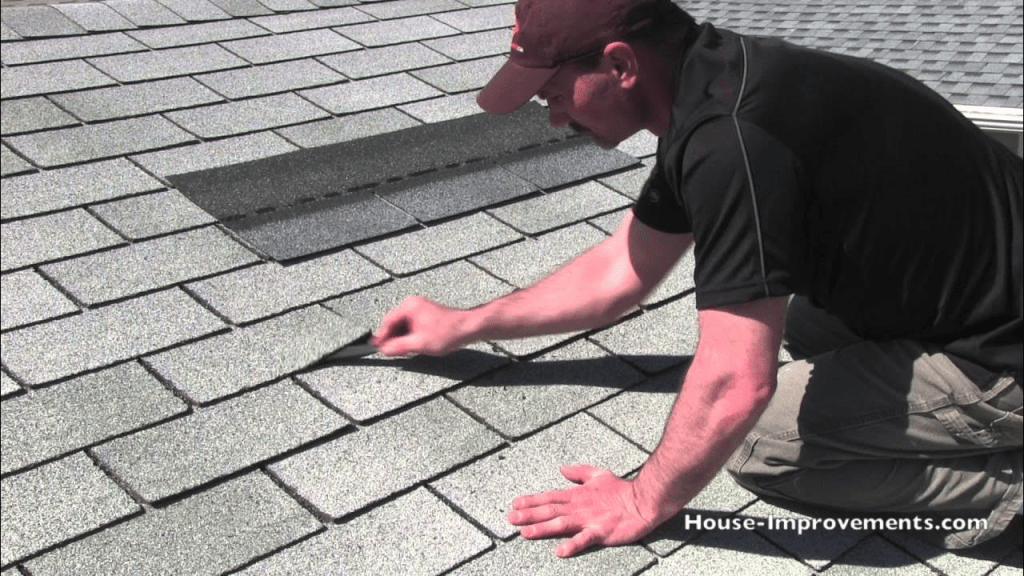
Step 4: Install the 3-Tab Shingles
Now the fun begins.
- Snap a chalk line across the roof to guide your first row.
- Place the first shingle flush with the starter strip, aligning with the chalk line.
- Nail each shingle using four nails per piece (or six for high-wind areas), keeping them about 1 inch above the cutouts.
- Offset the next row by half a tab (6 inches) so the seams don’t align.
Continue working your way across and up the roof, keeping your lines straight and uniform.
Tip: Staggering your shingles correctly is vital to prevent water penetration.
Step 5: Apply Ridge Cap Shingles
Once you’ve completed all the rows and reached the ridge (top peak) of your roof, it’s time to finish with ridge cap shingles.
These cover the seam at the top and protect against water and wind. Fold them over the ridge and nail them down in overlapping fashion, covering nail heads with the next cap until finished.
Step 6: Seal and Inspect
After the shingles are installed:
- Apply roofing cement around chimneys, vents, and flashing.
- Use caulk to seal nail heads where necessary.
- Sweep the roof clean of debris and excess nails.
- Check all flashing for secure installation.
Congratulations! You’ve re-roofed your house with 3-tab shingles.
Common Mistakes to Avoid
Here are pitfalls to watch for:
- Misaligned rows: Always use a chalk line.
- Insufficient nailing: Leads to shingle blow-off.
- Skipping flashing: Causes leaks around chimneys and vents.
- Poor sealing at ridge cap: Results in wind and water penetration.
- Wrong underlayment: Felt can rip easily; synthetics are better.
How Long Will It Take?
For a standard 2,000 sq ft home:
- Tear-off: 1 day with 2–3 people
- Installation: 2–3 days depending on weather and crew size
Total DIY timeline: 2–4 days
Safety First!
Roofing is dangerous. Always follow these safety tips:
- Use a roof harness and anchor system
- Work with a buddy
- Use proper footwear with grip
- Avoid working in high winds or wet conditions
- Keep tools organized and away from roof edges
Cost of Re-Roofing With 3-Tab Shingles
Here’s a breakdown of costs:
| Item | Estimated Cost per Sq Ft |
|---|---|
| 3-tab shingles | $0.90 – $1.20 |
| Underlayment | $0.10 – $0.25 |
| Nails and fasteners | $0.05 – $0.10 |
| Tools (if needed) | $150 – $400 (one-time) |
| Disposal (dumpster) | $200 – $500 |
DIY Total for 2,000 sq ft roof: $2,000–$4,000
Professional Install: $6,000–$9,000+
Maintenance Tips After Installation
Once you’ve completed your 3-tab roof, keep it in good condition by:
- Inspecting shingles after storms
- Cleaning out gutters regularly
- Replacing cracked or curled shingles immediately
- Checking flashing and seals annually
When to Call a Pro
If your roof has:
- A steep pitch (above 6:12)
- Complex structures like dormers or valleys
- Water damage on the deck
- Local code requirements or HOA rules
…it might be worth calling in a professional, even for a consultation or partial help.
Conclusion
So, how do I re roof my house with 3Tab shingles? As you’ve learned, it involves careful planning, the right materials, attention to detail, and a solid commitment to safety. While it’s labor-intensive, it’s also manageable and highly rewarding for homeowners who enjoy hands-on projects.
Not only will you save thousands of dollars, but you’ll also gain new skills and a sense of pride every time you look at your freshly finished roof.
If you’re ready to get started, gather your tools, pick a clear forecast, and use this guide to confidently re-roof your house with 3-tab shingles!
Leave a Reply