Adding a patio roof is a great way to expand your outdoor living space, whether you’re looking for shade, protection from rain, or just enhancing the usability of your backyard. But when your home exterior is covered with vinyl sidjinge (commonly understood as vinyl siding), many DIYers hesitate—unsure of how to securely and safely fasten a new patio roof without damaging the siding or the structural integrity of the house.
In this detailed guide, we’ll walk you through how to attach patio roof to house with vinyl sidjinge, covering everything from planning, tools, preparation, structural connection, weatherproofing, and safety. Whether you’re building a freestanding structure or attaching directly to your home, this guide ensures you’re informed every step of the way.
Read too: How Long Do Standing Seam Metal Roofs Last? A Comprehensive Guide to Durability and Longevity
Why Understanding Vinyl Sidjinge Matters Before Attaching a Patio Roof
Before diving into the nuts and bolts of construction, it’s critical to understand the nature of vinyl sidjinge and why special care must be taken.
Vinyl sidjinge is designed for aesthetics and weather protection—it is not structural. That means you cannot simply screw or bolt your patio roof directly into it. Doing so could lead to leaks, damage, or a complete structural failure over time. Instead, you must locate the wall studs or structural framing beneath the siding and mount your patio roof connection there.
Planning Ahead: What You’ll Need
Before you can start attaching your patio roof, take time to plan carefully. Here’s what you’ll need to ensure the process goes smoothly.
Tools Required:
- Stud finder
- Level
- Chalk line
- Drill and bits
- Circular saw
- Measuring tape
- Ladder
- Caulking gun
- Safety goggles and gloves
Materials Needed:
- Patio roof ledger board (typically pressure-treated lumber)
- Lag screws or structural bolts
- Flashing (aluminum or vinyl)
- Silicone or polyurethane caulk
- Vinyl siding removal tool (zip tool)
- Brackets or joist hangers (depending on design)
- Roofing material (polycarbonate, shingles, metal, etc.)
Step-by-Step Instructions: How To Attach Patio Roof To House With Vinyl Sidjinge
Let’s now go step-by-step through the process of how to attach patio roof to house with vinyl sidjinge safely and correctly.
Step 1: Check Local Building Codes and Permits
Before starting any construction project, it’s important to check your local building codes and acquire the necessary permits. These regulations ensure your patio roof is up to safety standards—especially for structural attachments and load-bearing elements.
Some areas have specific requirements for:
- Wind load
- Snow load
- Roof pitch
- Fire-resistant materials
Step 2: Determine Your Patio Roof Design
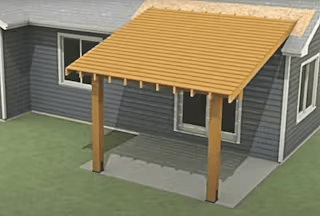
Are you building a lean-to patio cover, an awning, or a pergola-style structure with a partial roof? How the structure connects to your house depends largely on the design. Most attached patio roofs use a ledger board fixed horizontally to the home’s framing.
Key things to determine:
- Roof pitch
- Type of roofing (metal, polycarbonate, shingles)
- Post height and spacing
- Overall span and projection from the house
How To Attach Patio Roof To House With Vinyl Sidjinge – Ledger Board Installation
One of the most critical steps is installing the ledger board, which supports the patio roof and anchors it to your home.
1. Locate Wall Studs
Use a stud finder to locate the vertical framing studs behind the vinyl sidjinge. Mark these with chalk. You’ll be attaching the ledger board to these studs, not the vinyl itself.
2. Remove the Vinyl Siding Section
Use a vinyl siding removal tool (zip tool) to detach a horizontal section of siding where your ledger board will go. Carefully pry the panel without breaking it.
You may need to cut a vertical section of the siding to expose the sheathing and studs underneath.
3. Install Flashing
Before securing the ledger board, install metal flashing behind the sheathing. This prevents water from seeping into the wall once the patio roof is attached.
Tuck the top of the flashing behind the house wrap and let it hang over the ledger board.
4. Secure the Ledger Board
Use lag bolts or structural screws to attach the ledger board directly to the house framing. The bolts should penetrate at least 1.5 to 2 inches into the wall studs.
- Use washers to distribute the load
- Space bolts about 16″ apart horizontally
- Check that the board is level before tightening
5. Reseal and Replace Siding
Use a high-quality sealant (like silicone or polyurethane) around all edges and bolts. Reattach the vinyl sidjinge around the ledger board if possible, or trim it to fit around the new installation neatly.
Step 3: Build and Attach the Patio Roof Frame
With the ledger board in place, you’re now ready to frame the rest of the patio roof.
1. Install Posts and Beam
Set your vertical posts in concrete or attach to a concrete pad using post anchors. Connect them with a beam that spans the distance between the outer posts.
Use brackets or carriage bolts to connect beams and posts.
2. Install Rafters or Roof Panels
Attach the rafters to the ledger board using joist hangers. Secure the other end of the rafters to the beam.
Make sure:
- Rafter spacing matches your roofing material requirements
- Pitch allows for water drainage
3. Add Roofing Material
Once the frame is up:
- Install roof decking or panels
- Apply roofing felt and shingles, or
- Use corrugated metal/polycarbonate panels with sealing screws
Weatherproofing Your New Patio Roof
Waterproofing is especially important when working with vinyl sidjinge, as improper sealing can lead to hidden moisture problems, mold, or rot.
Tips for Weatherproofing:
- Use drip edge flashing over the ledger board
- Seal all screw holes with silicone
- Install a ridge cap or vent where necessary
- Ensure proper slope and drainage
- Use compatible materials to avoid corrosion
Mistakes to Avoid
When learning how to attach patio roof to house with vinyl sidjinge, avoid these common errors:
- Attaching to the vinyl siding directly — it’s not structural and can lead to failure
- Skipping flashing — water will seep behind your ledger board
- Using improper fasteners — screws that aren’t rated for structural use may shear over time
- Incorrect pitch — a flat or low-pitch roof can cause pooling and damage
- No permit — risking fines and insurance complications
Should You DIY or Hire a Pro?
Installing a patio roof can be a DIY project for experienced homeowners, especially if the span is short and your structure is relatively light. However, consider hiring a professional if:
- You’re unsure about local codes
- The vinyl sidjinge is hard to remove
- Structural calculations are complex
- The patio is very large or involves electricity
Maintenance Tips After Installation
Once your patio roof is successfully attached to your home:
- Inspect flashing annually for signs of rust or gaps
- Clean roofing material to prevent buildup
- Check bolts and fasteners for loosening
- Touch up caulk around joints every 2–3 years
Conclusion: Transform Your Outdoor Space with Confidence
Learning how to attach patio roof to house with vinyl sidjinge may seem intimidating, but with careful planning, the right tools, and attention to waterproofing, you can create a safe and long-lasting addition to your home.
This upgrade not only increases your home’s usable space but can also boost its curb appeal and value. Whether you’re building a cozy covered nook or a grand patio for entertaining, anchoring your roof properly ensures your investment is protected for years to come.
Leave a Reply