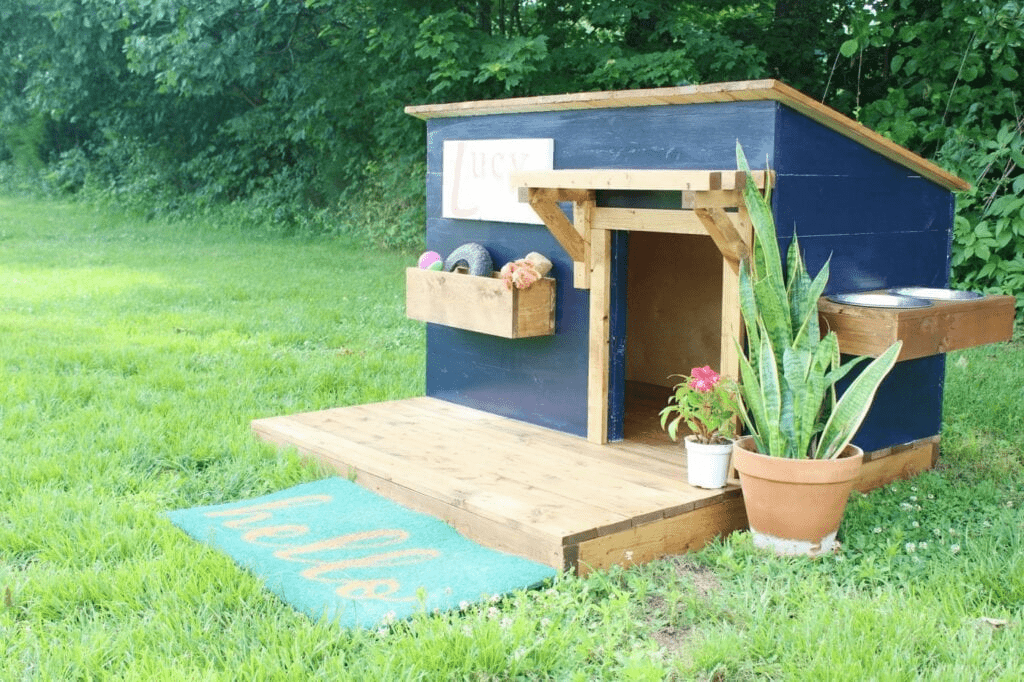
Building a dog house is a rewarding DIY project that provides your furry friend with a safe, comfortable outdoor shelter. If you’re looking for a simple yet effective roof design, learning how to build a dog house with a slanted roof is a great option. A slanted roof offers excellent rain and snow runoff, is easier to construct than other styles, and adds a modern look to your dog’s shelter.
In this comprehensive guide, we will cover everything from planning and materials to detailed construction steps and finishing tips. Whether you’re a beginner or an experienced DIYer, this article will guide you through creating a durable, attractive, and functional dog house with a slanted roof.
Read too: Hail Damage Roof Repair: Essential Guide to Restoring Your Home’s Protection
Why Choose a Slanted Roof for Your Dog House?
Before diving into the building process, it’s important to understand why a slanted roof is beneficial for a dog house:
- Superior Water Drainage: The single slope allows rainwater and snow to quickly run off the roof, preventing leaks and damage.
- Simplified Construction: Compared to complex roof styles like gable or hip roofs, a slanted roof requires fewer cuts and less framing, making it beginner-friendly.
- Better Ventilation: The higher side of the slanted roof creates extra headspace inside, allowing for better airflow and a cooler environment in warm weather.
- Modern and Stylish: Slanted roofs add a sleek, contemporary aesthetic that can complement modern home designs.
How To Build A Dog House With A Slanted Roof: Planning and Preparation
Step 1: Measure Your Dog
Accurate measurements ensure the dog house fits your pet comfortably:
- Length: Measure your dog’s length from nose to tail and add 6 to 8 inches.
- Height: The highest point of the slanted roof should be slightly taller than your dog’s standing height.
- Width: Allow enough room for your dog to turn around comfortably inside the house.
Step 2: Choose Materials and Tools
To build a sturdy dog house with a slanted roof, you will need:
Materials:
- Plywood sheets (for walls, floor, and roof)
- 2×4 lumber (for framing)
- Exterior-grade screws or nails
- Wood glue
- Waterproof roofing material (such as asphalt shingles or roofing felt)
- Weatherproof paint or sealant
- Hinges (optional, if you want a removable roof)
- Sandpaper
- Insulation materials (optional)
Tools:
- Measuring tape
- Saw (circular or hand saw)
- Drill or hammer
- Screwdriver or drill bits
- Paintbrush
- Safety equipment (gloves, goggles)
How To Build A Dog House With A Slanted Roof: Step-by-Step Construction Guide
Step 3: Build the Base Frame
Start by constructing the base frame from 2×4 lumber to provide a strong foundation and keep the dog house elevated from the ground.
- Cut two pieces for the length and two for the width.
- Assemble a rectangular frame using screws or nails at the corners.
- Attach plywood flooring securely to the frame.
Elevating the base helps prevent moisture and pests from entering the dog house.
Step 4: Construct the Walls
Cut plywood panels for the front, back, and sides of the dog house. Because of the slanted roof, the back wall should be taller than the front.
- The front wall should include a dog door cutout:
- Measure and mark the door dimensions, generally about 75% of your dog’s height.
- Use a jigsaw to cut the opening carefully.
- Attach the front and back walls to the base frame with screws.
- Attach the side walls between the front and back, ensuring the slope angle fits perfectly.
Step 5: Frame the Slanted Roof
Create roof rafters by cutting 2×4 lumber to the length of the dog house with an angled cut on one end to create the slope.
- Attach the rafters to the top edges of the front and back walls, securing them tightly with screws.
- Add cross braces or support beams underneath the rafters for added strength.
Step 6: Add Roof Sheathing
Cover the rafters with plywood sheets cut to size, allowing the roof to overhang slightly on all sides to protect the walls from rain.
- Secure plywood with screws.
- Sand edges smooth to avoid splinters.
Step 7: Waterproof the Roof
Apply roofing felt or tar paper over the plywood to create a waterproof barrier, then install asphalt shingles or other weatherproof materials on top.
- Nail shingles starting from the bottom edge and working upwards, overlapping as you go.
- Ensure all edges are sealed to prevent water seepage.
Step 8: Finish and Paint
- Paint or seal the exterior with weatherproof paint to protect the wood from the elements.
- Add trim around the door and roof edges for a clean finish.
- Optionally, install hinges on one side of the roof for easy cleaning access.
- Consider adding insulation inside the walls or floor for cold climates.
Tips for Building a Durable and Comfortable Dog House With a Slanted Roof
- Ventilation: Add small vents near the roof or door for fresh air circulation.
- Elevation: Use bricks or concrete blocks to elevate the base frame off the ground and prevent moisture.
- Materials: Choose non-toxic, pet-safe materials and avoid sharp edges.
- Maintenance: Regularly check and repaint the dog house every few years to maintain weather resistance.
Frequently Asked Questions About How To Build A Dog House With A Slanted Roof
Can I Build This Dog House Without Carpentry Experience?
Yes! The slanted roof design is one of the simplest roof types to build and can be tackled by beginners with basic tools and careful measurements.
How Do I Choose the Right Size?
Measure your dog carefully and add extra space for comfort, but avoid making it too large to ensure the shelter stays warm.
Should I Insulate the Dog House?
If you live in a colder climate, insulation helps maintain warmth. Use foam board insulation or straw bedding inside the dog house.
Conclusion: Building a Weatherproof and Stylish Shelter for Your Dog
Knowing how to build a dog house with a slanted roof empowers you to create a comfortable, weather-resistant shelter that meets your pet’s needs. The slanted roof design is easy to build, ensures excellent water runoff, and adds a modern touch to your outdoor space.
By carefully planning, gathering quality materials, and following step-by-step instructions, you’ll craft a safe and inviting home for your dog that will last for years.
Leave a Reply