If you’re researching How To Connect A Patio Roof To A House, you’re likely planning to create a covered outdoor space that looks seamless and protects against the elements. Proper attachment is critical—not only for appearance but also for structural safety and waterproofing.
A poorly connected patio roof can cause leaks, structural stress, and long-term damage. This detailed guide walks you through materials, structural considerations, flashing techniques, and step-by-step installation methods to ensure your patio roof is secure and weather-resistant.
Read too: Is It Reasonable to Ask the Seller to Replace the Roof?
Why Properly Connecting a Patio Roof Matters
Understanding How To Connect A Patio Roof To A House begins with knowing why it must be done correctly.
Improper attachment can lead to:
- Water intrusion behind siding
- Rotting wall framing
- Structural instability
- Voided home insurance coverage
- Costly repairs
According to building industry data, improper flashing is one of the leading causes of residential water damage. Ensuring correct integration between patio roofing and the home’s structure protects your investment.
For general background on roof structures, visit:
https://en.wikipedia.org/wiki/Roof
What Are the Common Ways to Connect a Patio Roof?
There are three primary attachment methods:
1. Ledger Board Attachment (Most Common)
- Secured directly to house framing
- Uses flashing to prevent leaks
- Suitable for most residential builds
2. Roof-to-Roof Tie-In
- Patio roof integrates under existing shingles
- Requires partial shingle removal
- Provides seamless appearance
3. Free-Standing With Support Posts
- No structural attachment to house
- Lower risk of water damage
- Requires additional support beams
Ledger attachment is the most popular option for DIY projects.
Tools and Materials You’ll Need
Before starting, gather:
Structural Materials
- Pressure-treated ledger board
- Lag bolts (1/2 inch diameter minimum)
- Structural screws
- Flashing (aluminum or galvanized steel)
- Roofing panels or shingles
- Rafters (2×6 or 2×8 lumber)
Tools
- Drill with masonry/wood bits
- Level
- Measuring tape
- Circular saw
- Ladder
- Safety glasses
- Caulk gun
Step-by-Step: How To Connect A Patio Roof To A House
Now let’s break down the process clearly.
Step 1: Determine Roof Pitch
Your patio roof must have proper slope for drainage.
Recommended minimum pitch:
- 1/4 inch per foot for metal roofing
- 2:12 pitch for shingle roofing
Proper slope prevents standing water.
Step 2: Locate Structural Framing
Never attach a ledger board to siding alone.
You must secure it to:
- Wall studs
- Rim joist
- Structural framing behind exterior wall
Use a stud finder to locate framing members.
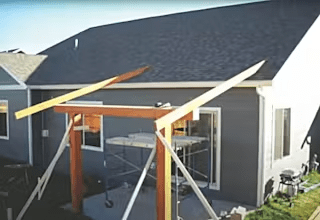
Step 3: Install the Ledger Board
- Remove siding where ledger will sit.
- Position ledger level and aligned.
- Drill pilot holes into studs.
- Install 1/2-inch lag bolts every 16 inches.
- Ensure tight, secure attachment.
Ledger board carries significant load—improper fastening risks collapse.
Step 4: Install Flashing
Flashing prevents water intrusion.
- Slide metal flashing under existing house wrap.
- Position it over the top of the ledger board.
- Secure flashing without puncturing upper protective layers.
- Seal edges with exterior-grade sealant.
Flashing is critical to long-term durability.
Step 5: Attach Rafters
- Install rafter hangers along ledger.
- Insert rafters into hangers.
- Secure with structural nails.
- Ensure consistent spacing (16–24 inches apart).
Rafters create the patio roof framework.
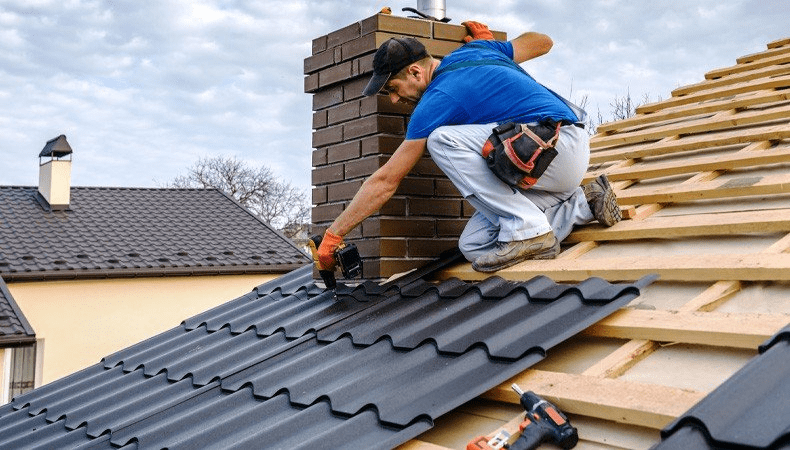
Step 6: Install Roofing Material
Depending on material:
- Metal panels: Overlap by at least 1 ridge.
- Shingles: Follow manufacturer overlap guidelines.
- Polycarbonate panels: Allow for expansion gaps.
Secure panels according to specifications.
Step 7: Seal All Connection Points
Use waterproof sealant at:
- Flashing edges
- Screw penetrations
- Roof intersections
Proper sealing prevents leaks during heavy rain.
Should You Attach a Patio Roof Directly to Siding?
No.
Siding alone cannot support structural load.
Always:
- Remove siding at attachment area
- Anchor directly to structural framing
- Reinstall siding around flashing
Skipping this step can cause serious structural issues.
Structural Load Considerations
Before learning How To Connect A Patio Roof To A House, evaluate:
- Snow load requirements
- Wind load zone
- Local building codes
- Permit requirements
In snow-prone regions, roof structure must support additional weight.
Consult local building authority if unsure.
Pros vs Cons: Attached vs Free-Standing Patio Roof
| Feature | Attached Roof | Free-Standing Roof |
|---|---|---|
| Structural Stability | High | Moderate |
| Leak Risk | Higher if poorly flashed | Lower |
| Cost | Lower | Higher (more posts) |
| Installation Complexity | Moderate | Moderate |
| Appearance | Seamless | Independent look |
Attached roofs offer integrated design but require precise waterproofing.
Case Study: Patio Roof Leak After Improper Installation
A homeowner installed a patio roof without removing siding or installing flashing.
Result:
- Water entered behind siding.
- Wall sheathing rotted within two years.
- Repair cost exceeded $5,000.
Proper flashing installation could have prevented the damage.
Common Mistakes to Avoid
- Attaching ledger over siding
- Skipping flashing
- Using undersized fasteners
- Ignoring roof pitch
- Not checking local codes
- Using untreated lumber
These mistakes can compromise safety.
When to Hire a Professional
Consider professional help if:
- Roof tie-in involves shingle removal
- You’re unsure about load calculations
- Home has brick or masonry exterior
- Building code requires inspection
Structural attachment errors can lead to major liabilities.
Frequently Asked Questions (FAQ)
How To Connect A Patio Roof To A House without causing leaks?
Install flashing correctly and anchor ledger board directly to structural framing.
Do I need a permit?
Many municipalities require permits for structural roof additions. Always check local regulations.
Can I attach a patio roof to a brick house?
Yes, but you must use masonry anchors and proper flashing.
What pitch should a patio roof have?
Minimum 1/4 inch per foot for drainage; steeper for shingle systems.
Is it cheaper to build a free-standing patio roof?
It may require more materials but avoids structural tie-in complexities.
Conclusion
Learning How To Connect A Patio Roof To A House properly ensures your outdoor space is both functional and safe. By securing the ledger board to structural framing, installing proper flashing, and maintaining correct roof pitch, you prevent water damage and structural failure.
Take your time, follow each step carefully, and prioritize waterproofing. If this guide helped you plan your patio roof project, consider sharing it with other homeowners looking to enhance their outdoor living space.

Leave a Reply