Building a dog house for your furry friend can be a rewarding DIY project. A well-framed dog house with a slanted roof not only provides shelter but also ensures proper drainage and durability against the elements. Understanding how to frame a dog house with a slanted roof is essential for creating a safe, comfortable, and long-lasting home for your pet.
This guide provides a comprehensive overview, from selecting materials and planning dimensions to constructing a sturdy frame and assembling the roof. Whether you are an experienced DIYer or a first-time builder, these tips will help you create a high-quality dog house.
Read too: How Long Do Standing Seam Metal Roofs Last? A Comprehensive Guide to Durability and Longevity
How To Frame A Dog House With A Slanted Roof – Planning and Preparation
Before beginning construction, careful planning ensures a successful project.
Step 1: Determine the Size
- Measure your dog to determine appropriate dimensions.
- Consider extra space for bedding, food, and movement.
- Common dimensions: Small dogs (2–3 feet long), Medium dogs (3–4 feet), Large dogs (4–5 feet).
Step 2: Select Materials
- Lumber: Use pressure-treated or exterior-grade plywood for the base and framing. 2x4s are standard for framing walls and roof.
- Roofing Material: Shingles, corrugated metal, or waterproof plywood are suitable.
- Fasteners: Exterior-grade screws or nails to withstand weather.
- Optional Insulation: For colder climates, consider foam boards or reflective insulation.
Step 3: Plan the Slant
- A slanted roof promotes water runoff and prevents pooling.
- Common roof slope: 2–4 inches drop per foot of roof length.
- Decide which side will be higher and which side lower to ensure efficient drainage.
Step 4: Gather Tools
- Circular saw or handsaw
- Drill and screws
- Hammer and nails
- Tape measure
- Carpenter’s square
- Level
- Safety gear: gloves, goggles
Constructing the Base of the Dog House
A sturdy base is crucial for a durable dog house.
- Cut plywood to the desired dimensions.
- Frame the base with 2x4s for added strength.
- Elevate the base slightly with short 2×4 legs or blocks to prevent ground moisture from seeping in.
- Check for level using a carpenter’s level.
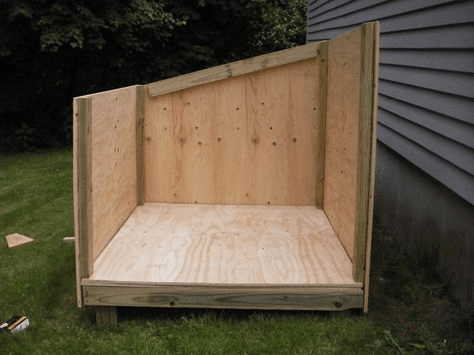
Framing the Walls
Proper wall framing ensures stability and supports the slanted roof.
- Cut 2x4s to the required height for each wall.
- Assemble the side walls first, ensuring they match the slanted roof slope. The front wall should be taller than the back wall to achieve the desired slant.
- Attach horizontal supports (top and bottom plates) to secure vertical studs.
- Include a frame for the door opening, sized appropriately for your dog.
- Use screws or nails to assemble each wall, checking for plumb with a level.
How To Frame A Dog House With A Slanted Roof – Roof Construction
The roof is the defining feature of the slanted design and must be sturdy and weatherproof.
Step 1: Cut Roof Supports
- Cut two long 2x4s for the front and back of the roof.
- Cut rafters from 2x4s to span the width of the dog house. The front side should be slightly longer than the back to achieve the slope.
Step 2: Assemble Roof Frame
- Attach rafters to the top plates of the walls, ensuring proper spacing.
- Secure front and back supports to rafters for stability.
- Check slope with a level and adjust as needed before final fastening.
Step 3: Install Roof Sheathing
- Cut exterior-grade plywood to fit the roof frame.
- Attach the plywood using screws or nails, ensuring edges overhang slightly to direct water away from the walls.
- For added protection, apply waterproof roofing felt or a similar underlayment.
Step 4: Add Roofing Material
- Install shingles, corrugated metal, or other roofing material according to manufacturer instructions.
- Ensure overlap and proper alignment to prevent leaks.
Finishing Touches
A well-finished dog house improves durability and comfort.
- Sand Edges: Smooth any rough edges to prevent injury to your dog.
- Paint or Seal: Use non-toxic exterior paint or sealant to protect against moisture and UV damage.
- Ventilation: Add small vents near the top of walls to improve airflow.
- Door Flap: Install a flap or small door to keep out rain and wind.
- Bedding: Add straw, foam, or weatherproof dog bedding for comfort.
Tips for a Long-Lasting Dog House
- Place the dog house on a flat, elevated surface to prevent water pooling.
- Avoid direct contact with soil to prevent wood rot.
- Inspect roof and walls annually for damage or wear.
- Reinforce corners and joints if needed to improve stability.
- Consider a removable roof for easy cleaning and maintenance.
Benefits of a Slanted Roof Dog House
- Efficient Water Runoff: Prevents leaks and water accumulation.
- Durable Structure: Provides stability and support for your dog’s shelter.
- Weather Resistance: Protects your pet from rain, snow, and wind.
- Enhanced Comfort: Proper insulation and ventilation create a cozy interior.
- Aesthetic Appeal: Slanted roof designs are visually appealing and can complement your backyard décor.
Safety Considerations
- Wear gloves and eye protection when cutting lumber.
- Ensure all screws and nails are fully secured to avoid injury.
- Do not leave tools unattended around pets.
- Use non-toxic paints and sealants to keep your dog safe.
Conclusion
Learning how to frame a dog house with a slanted roof involves careful planning, precise measurements, and proper construction techniques. A slanted roof not only improves drainage but also increases the longevity of the dog house. By selecting the right materials, framing walls and roof correctly, and finishing with durable weatherproofing, you can create a safe, comfortable, and long-lasting shelter for your dog.
This DIY project provides both functionality and aesthetic appeal, ensuring your dog enjoys a secure home while you enjoy the satisfaction of building it yourself. Regular maintenance and attention to detail will ensure your dog house remains a durable and cozy space for years to come.
Leave a Reply