Installing roof trusses on a brick house can feel intimidating—especially if you’re worried about structural integrity, safety, or getting local codes right. Many homeowners and DIY-minded builders search for How To Install Roof Trusses On A Brick House because brick walls behave differently than wood framing and require special care. This guide walks you through the entire process clearly and confidently, so you understand what to do, why it matters, and how to avoid costly mistakes.
What Are Roof Trusses and Why Are They Used?
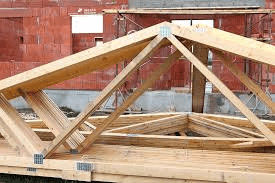
Roof trusses are pre-engineered triangular frameworks—typically made of lumber—that support the roof structure. Unlike traditional stick framing, trusses are designed to distribute loads evenly across bearing walls.
Read too: Is It Reasonable to Ask the Seller to Replace the Roof?
Key benefits of roof trusses
- Structural efficiency: Engineered to handle snow, wind, and dead loads.
- Faster installation: Prebuilt trusses reduce on-site labor time.
- Cost control: Less material waste and predictable pricing.
- Design flexibility: Accommodates wide spans and complex roof shapes.
According to industry data from the Structural Building Components Association, trusses are used in over 70% of new residential roof constructions in the U.S., largely due to speed and reliability.
Is Installing Roof Trusses on a Brick House Different?
Yes—and this distinction is critical.
Brick houses are typically brick veneer or solid masonry over a structural backing. Roof trusses must sit on a load-bearing surface, not just decorative brick.
Key differences to understand
- Brick itself is strong in compression but weak in tension.
- Loads must transfer to bearing walls or bond beams, not unsupported masonry.
- Anchoring methods differ from wood-frame homes.
Failing to account for these differences can lead to cracked masonry, roof sagging, or even structural failure.
What Codes and Engineering Rules Apply?
Before installing roof trusses, check local building codes and engineering requirements. In most U.S. jurisdictions:
- Trusses must be engineer-stamped
- Bearing points must align with load-bearing walls
- Anchoring must meet wind uplift standards (especially in hurricane zones)
For general background on structural framing standards, see the overview on Wikipedia.org under roof construction.
Expert insight: Licensed structural engineers recommend never modifying trusses on-site without written approval. Even small cuts can reduce load capacity by over 50%.
Tools and Materials You’ll Need
Preparing everything in advance keeps the installation smooth and safe.
Essential tools
- Mobile crane or boom lift (rated for truss weight)
- Framing nailer with 16d nails
- Hammer and pry bar
- Spirit level (minimum 48 inches)
- Measuring tape (25 ft or longer)
- Temporary bracing lumber (2×4)
Materials
- Engineered roof trusses (site-specific)
- Steel truss anchors or hurricane ties
- Anchor bolts or masonry straps
- Treated sill plate (if required)
- Safety gear (helmet, gloves, harness)
Step-by-Step: How To Install Roof Trusses On A Brick House
Step 1: Confirm the Bearing Surface
Roof trusses must sit on a structural bearing point, such as:
- Reinforced concrete bond beam
- Steel lintel system
- Load-bearing masonry wall with embedded plate
Never place trusses directly on unsupported brick veneer.
Use a laser level to confirm the wall height variance is less than 6 mm (¼ inch) across the span.
Step 2: Install the Sill Plate or Bearing Plate
If plans require it:
- Place a pressure-treated sill plate on the bond beam.
- Secure with anchor bolts spaced every 1.2–1.8 meters (4–6 ft).
- Tighten nuts to manufacturer torque specs (typically 40–60 Nm).
This plate distributes load evenly and protects masonry from point pressure.
Step 3: Set Layout Lines and Truss Spacing
Standard residential truss spacing is:
- 24 inches on center (610 mm)
Mark spacing clearly along both bearing walls using chalk lines. Accuracy here prevents roof sheathing issues later.
Step 4: Lift and Position the First Truss
- Use a crane to lift the truss vertically.
- Set it at the gable end, aligning with layout marks.
- Temporarily brace it using 2×4 lumber nailed to the wall and ground.
Pro tip: Check plumb on both faces—front-to-back and side-to-side.
Step 5: Install Remaining Trusses Sequentially
- Move inward, one truss at a time.
- Secure each truss with temporary lateral bracing.
- Maintain consistent spacing—variance should not exceed 3 mm (⅛ inch).
A crew of 3–4 people typically installs 20–25 trusses per day under good conditions.
Step 6: Anchor Trusses to the Brick Structure
This step is critical for wind resistance.
Common anchoring methods
- Steel hurricane ties embedded in bond beams
- Masonry straps set into mortar joints
- Expansion anchors rated for uplift loads
Each truss usually requires uplift resistance of 400–900 kg (900–2,000 lbs) depending on region.
Step 7: Permanent Bracing Installation
Follow the truss manufacturer’s bracing diagram exactly.
Typical bracing includes:
- Top chord bracing
- Bottom chord bracing
- Diagonal web bracing
Incorrect bracing is one of the top three causes of truss failure, according to construction safety reports.
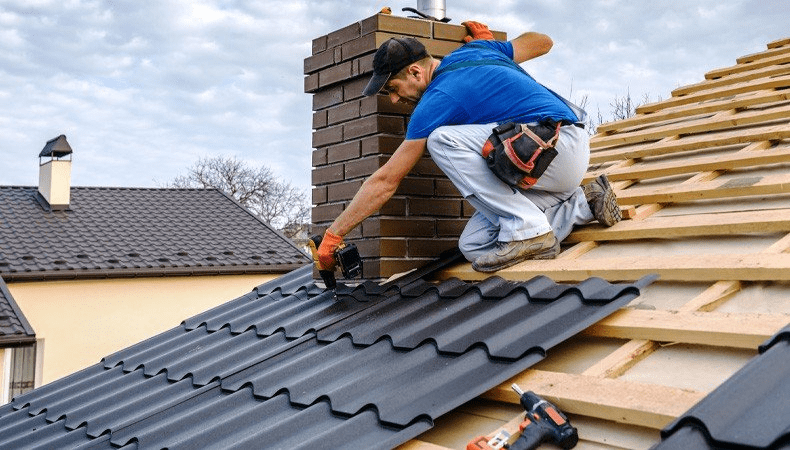
Step 8: Final Inspection Before Roof Decking
Before installing roof sheathing:
- Recheck plumb and alignment
- Verify all anchors are installed
- Remove only unnecessary temporary bracing
Only proceed once approved by the site supervisor or inspector.
Common Mistakes to Avoid
| Mistake | Why It’s Dangerous |
|---|---|
| Placing trusses on veneer brick | Causes cracking and settlement |
| Skipping engineering review | Can void permits and insurance |
| Insufficient anchoring | Roof uplift during storms |
| Removing temporary bracing early | Risk of collapse |
Safety Considerations You Should Never Ignore
- Always use fall protection above 1.8 meters (6 ft)
- Do not work in winds above 25 km/h (15 mph)
- Never overload trusses with stacked materials
- Keep unauthorized people clear of lift zones
Construction safety data shows that proper bracing reduces truss-related accidents by over 60%.
Cost Breakdown: What Should You Expect?
Average U.S. costs (2025 estimates):
| Item | Estimated Cost |
|---|---|
| Roof trusses | $4–$10 per sq ft |
| Crane rental | $150–$300 per hour |
| Labor | $3–$6 per sq ft |
| Anchors & hardware | $200–$600 total |
Brick houses may add 10–20% to installation cost due to specialized anchoring.
Should You DIY or Hire a Professional?
DIY may be possible if:
- You have construction experience
- Trusses are small and simple
- Local codes allow homeowner installation
Hire professionals if:
- Roof spans exceed 30 ft
- You’re in high-wind or seismic zones
- The home is multi-story
When in doubt, professional installation often saves money by preventing structural repairs later.
Frequently Asked Questions (FAQ)
Can roof trusses sit directly on brick walls?
No. Trusses must sit on a structural bearing element like a bond beam or reinforced wall—not decorative brick veneer.
How are roof trusses attached to a brick house?
They are secured using steel anchors, hurricane ties, or masonry straps designed to resist uplift and lateral movement.
What is the standard spacing for roof trusses?
Most residential roofs use 24 inches on center, unless engineering plans specify otherwise.
Do I need a crane to install roof trusses?
For most full-size trusses, yes. Manual lifting is unsafe and often prohibited by safety guidelines.
How long does installation usually take?
A standard single-family home typically takes 1–2 days with a professional crew and proper equipment.
Conclusion
Understanding How To Install Roof Trusses On A Brick House is about more than placing wood on walls—it’s about respecting structural load paths, proper anchoring, and safety. When installed correctly, roof trusses provide long-lasting strength, faster construction, and peace of mind for decades. If this guide helped you, feel free to share it with friends or on social media—it might save someone else time, money, and serious headaches.

Leave a Reply