Thermoplastic Olefin (TPO) roofing has gained popularity for its durability, energy efficiency, and ease of installation. If you’re considering a TPO roof for your building, you might be wondering how to install TPO roofing. In this comprehensive guide, we’ll take you through the step-by-step process of installing a TPO roof, ensuring a watertight and long-lasting roofing solution for your property.
Understanding TPO Roofing
Before we dive into the installation process, let’s take a moment to understand what TPO roofing is and why it’s a popular choice:
- Material Composition: TPO is a single-ply roofing membrane made from a blend of rubber and various fillers, reinforced with polyester. This combination creates a flexible and durable roofing material.
- Energy Efficiency: TPO roofing is known for its high solar reflectance and thermal emittance, making it an energy-efficient option. It reflects the sun’s heat, helping to keep the building cooler and reducing energy costs.
- Durability: TPO roofs have excellent resistance to UV radiation, ozone, and chemical exposure. They are also highly resistant to tears, punctures, and impact damage.
- Easy Installation: One of the key advantages of TPO roofing is its ease of installation, making it a preferred choice for both professional contractors and experienced DIY enthusiasts.
Step-by-Step Guide to Installing TPO Roof
Installing a TPO roof involves several key steps. Here’s a detailed breakdown of the process:
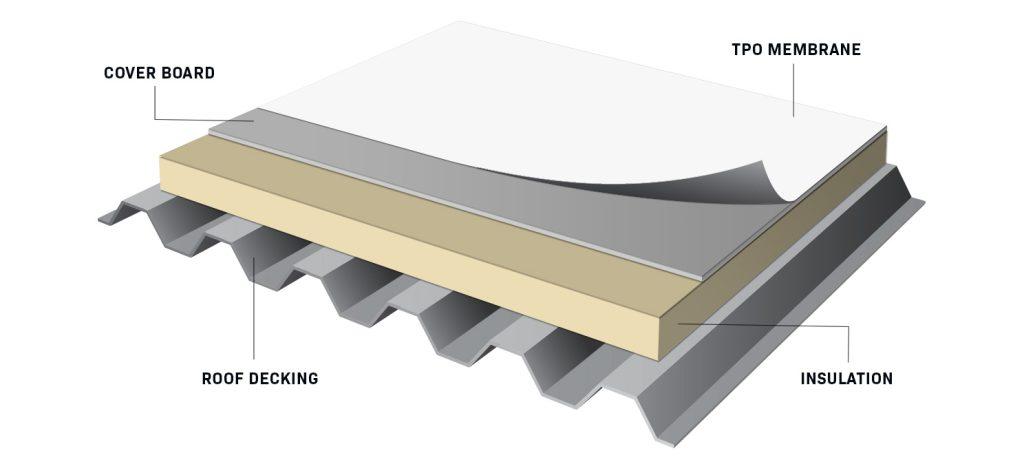
Roof Preparation
- Remove Old Roofing: If you’re replacing an existing roof, remove all the old roofing material, including any old TPO membrane or other roofing types.
- Deck Inspection: Inspect the roof deck for any damage or issues. Repair or replace any damaged sections to ensure a solid foundation.
Roof Insulation
- Add Insulation: Install rigid insulation boards on the roof deck. The type and thickness of insulation will depend on your climate and energy efficiency goals. Proper insulation helps regulate the building’s temperature and reduces energy costs.
TPO Membrane Installation
- Lay the Membrane: Unroll the TPO membrane over the insulation, allowing it to relax for a short period to eliminate any wrinkles. Make sure the membrane overlaps at seams and edges according to the manufacturer’s guidelines.
- Adhering the Membrane: Secure the TPO membrane to the roof deck using adhesive or mechanical fasteners, depending on the project’s requirements. It’s essential to follow the manufacturer’s recommendations for adhesive application and fastener spacing.
Seaming
- Hot Air Welding: TPO seams are typically heat-welded using a hot air gun. The heat softens the membrane’s edges, allowing them to fuse together, creating a watertight seal.
Edge Details and Flashing
- Install Flashing: Apply flashing and edge details around roof penetrations such as vents, skylights, and HVAC units. Proper flashing is crucial to prevent water intrusion.
Final Inspections
- Thorough Inspection: Before considering the job complete, inspect the entire roof for any imperfections, loose seams, or damage. Any issues should be addressed and corrected promptly.
Roof Maintenance
- Regular Maintenance: A well-maintained TPO roof can last for decades. Periodically inspect the roof for damage, clean debris, and check for signs of wear and tear. Timely maintenance will extend the life of your TPO roof.
Conclusion
Installing a TPO roof involves several steps, from roof preparation and insulation to membrane installation, seaming, and flashing. By following this step-by-step guide, you can ensure that your TPO roof is installed correctly, providing your building with a durable and energy-efficient roofing solution. Whether you’re a professional roofer or a DIY enthusiast, TPO roofing offers a straightforward installation process that can benefit both your property and your wallet in the long run.


Leave a Reply