Installing TPO (Thermoplastic Olefin) roofing is an excellent choice for those seeking a durable, energy-efficient roofing solution. TPO roofing is known for its heat reflectivity, resistance to UV rays, and ease of installation. This guide will provide you with a step-by-step approach on how to install TPO roofing, ensuring that you achieve a professional-quality result while understanding the key elements involved in the process.
What is TPO Roofing?
TPO roofing is a type of single-ply roofing membrane made from a blend of thermoplastic materials and elastomers. It combines the best features of EPDM and PVC roofing, offering a versatile solution for both commercial and residential buildings. TPO is praised for its affordability, energy efficiency, and ease of installation, making it a popular choice among contractors and homeowners alike.
Benefits of TPO Roofing
Before diving into the installation process, it’s important to understand why TPO roofing is a valuable choice:
- Energy Efficiency: TPO roofing reflects sunlight, which helps to reduce cooling costs during hot weather. Its reflective properties contribute to lower energy bills and increased comfort inside the building.
- Durability: TPO is resistant to UV rays, ozone, and chemical exposure, which enhances its longevity. It is also less prone to punctures and tears compared to other roofing materials.
- Ease of Installation: TPO roofing is relatively straightforward to install, thanks to its lightweight nature and simple application methods. This can result in reduced labor costs and quicker project completion.
- Environmental Impact: TPO roofing is recyclable, which contributes to a smaller environmental footprint. This makes it an eco-friendly option for those concerned about sustainability.
Read too: How To Replace A Mobile Home Roof: Step-by-Step Guide for Homeowners
How to Install TPO Roofing
1. Preparation and Safety
Before you begin the installation, proper preparation and safety measures are crucial:
- Gather Tools and Materials: You’ll need TPO roofing membrane, TPO adhesives or fasteners, a utility knife, seam roller, and safety gear such as gloves and goggles.
- Inspect the Roof Deck: Ensure that the roof deck is clean, dry, and in good condition. Repair any damaged areas to provide a stable foundation for the TPO membrane.
- Check the Weather: Plan your installation on a dry day with mild temperatures to ensure the adhesives and membranes adhere properly.
2. Measuring and Cutting the TPO Membrane
Accurate measurement and cutting are key to a successful installation:
- Measure the Roof Area: Determine the dimensions of your roof to cut the TPO membrane to the correct size. Allow for a few extra inches around the edges for proper overlap and trimming.
- Cut the Membrane: Using a utility knife, cut the TPO membrane to match the dimensions of your roof. Make sure to keep the cuts straight and clean to ensure a seamless installation.
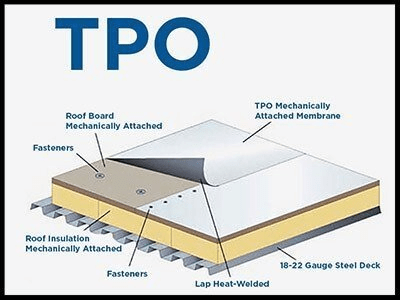
3. Installing the TPO Roofing Membrane
With the preparation complete, follow these steps to install the TPO membrane:
How to Install TPO Roofing
- Lay Out the Membrane: Position the TPO membrane on the roof, starting from one end and working your way across. Ensure that the membrane is aligned properly and that any seams or overlaps are in the correct positions.
- Secure the Membrane: Depending on your chosen method, you can either adhere the membrane using adhesives or fasten it with mechanical fasteners. For adhesive application, apply a uniform layer of TPO adhesive to the roof deck, then roll out the membrane and press it into place. Use a seam roller to ensure a strong bond.
- Seal the Seams: Proper seam sealing is essential for waterproofing. Overlap the edges of adjacent TPO sheets by about 2-3 inches, then use a heat gun to weld the seams together. Apply pressure with a seam roller to ensure a tight seal.
- Trim Excess Membrane: Once the membrane is securely in place, trim any excess material around the edges of the roof. Be careful to cut as close to the edge as possible without damaging the membrane.
4. Finishing Touches
Complete your TPO roofing installation with these final steps:
- Install Flashing and Trim: Add flashing around roof penetrations and edges to provide extra protection against leaks. Secure it in place using appropriate fasteners or adhesives.
- Inspect the Installation: Conduct a thorough inspection to check for any gaps, loose seams, or other issues. Address any problems before considering the project complete.
- Clean Up: Remove any debris or leftover materials from the roof and surrounding area to ensure a clean and professional finish.
Maintenance and Care for TPO Roofing
Proper maintenance is key to extending the life of your TPO roofing:
- Regular Inspections: Periodically inspect your roof for signs of wear, damage, or debris. Address any issues promptly to prevent more serious problems.
- Cleaning: Keep the roof surface clean by removing leaves, dirt, and other debris. Use a mild detergent and water to clean the membrane if needed.
- Check Seams and Flashing: Regularly check the seams and flashing for signs of deterioration or damage. Re-seal any areas that may have come loose.
Conclusion
Installing TPO roofing is a practical choice for homeowners looking for an affordable and durable roofing solution. By following these steps on how to install TPO roofing, you can achieve a professional-quality result that enhances the energy efficiency and longevity of your roof. Proper preparation, accurate installation, and regular maintenance will ensure that your TPO roofing system performs well for years to come.
If you’re unsure about any part of the installation process or prefer professional assistance, don’t hesitate to consult a roofing contractor. They can provide expert guidance and ensure that your TPO roofing is installed correctly and effectively.


Leave a Reply