Fairy houses are enchanting miniature creations that spark imagination, creativity, and joy for children and adults alike. Whether you’re crafting them for a whimsical garden display, a school project, or simply as a fun DIY hobby, the roof often becomes the focal point of the entire design. Many people struggle with how to make a round roof for a fairy house because the shape requires more than just flat panels—it involves creativity, patience, and the right techniques.
In this article, we’ll explore how to build and decorate a round roof for a fairy house step by step. From materials and planning to decorating tips and creative inspiration, you’ll learn everything you need to make your fairy house look magical and sturdy.
Read too: How Long Do Standing Seam Metal Roofs Last? A Comprehensive Guide to Durability and Longevity
Why Focus on the Roof of a Fairy House?
The roof is more than just a cover. In miniature building, the roof determines the “character” of the fairy house. When you understand how to make a round roof for a fairy house, you can bring charm and personality to your creation. Here’s why it matters:
- Visual appeal: A rounded roof gives a softer, whimsical look compared to sharp angles.
- Durability: A sturdy roof ensures your fairy house lasts longer, especially if it will be placed outdoors.
- Storytelling: Rounded roofs evoke fantasy worlds, mushroom-like cottages, or magical woodland dwellings.
- Experimentation: Round roofs let you use unique materials, from clay to fabric, that wouldn’t work as well on square structures.
Materials You’ll Need
Before we dive into the actual steps, let’s prepare the right materials. Depending on the style you want, the materials for how to make a round roof for a fairy house can vary, but here are the essentials:
- Cardboard or cardstock (for the roof base)
- Scissors or craft knife
- Hot glue gun or strong craft glue
- Ruler and pencil
- Natural elements like bark, twigs, pinecones, or moss
- Decorative items like beads, glitter, or small stones
- Optional: air-dry clay, felt, or fabric for extra texture
Step-By-Step: How To Make A Round Roof For A Fairy House
Now let’s get into the detailed process of crafting your roof. Follow these steps to ensure your fairy house has a charming, round roof that fits perfectly.
Step 1: Measure the Top of Your Fairy House
Use a ruler to measure the diameter of your fairy house’s base where the roof will sit. This ensures your roof fits snugly and looks proportionate.
Step 2: Create a Cone Base
The simplest way to build a round roof is by making a cone. Draw a large circle on cardboard, then cut a triangular wedge out of it (like a slice of pie). Bring the cut edges together to form a cone and glue them securely. Adjust the size to match your fairy house.
Step 3: Reinforce the Structure
If you want your roof to be sturdier, line the inside of the cone with another layer of cardboard or cardstock. This step is especially helpful if the roof will be outdoors.
Step 4: Attach the Cone to the House
Once your cone is ready, glue it carefully to the top of the fairy house. Hold it in place until the glue dries to avoid slipping or tilting.
Step 5: Decorate the Roof
This is where the magic happens! Depending on your theme, you can decorate your round roof in countless ways:
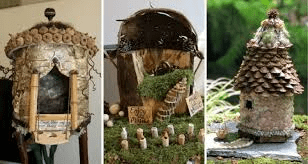
- Natural look: Use bark, twigs, moss, or pinecones to mimic a woodland fairy house.
- Magical look: Paint the roof bright colors, add glitter, or use beads to give it a sparkling fairy-tale style.
- Rustic look: Cover the roof with small pebbles or clay for a stone-cottage appearance.
- Whimsical look: Use fabric like felt to give your roof a soft, colorful texture.
Alternative Methods for Making a Round Roof
While the cone method is the most common, there are other creative ways for how to make a round roof for a fairy house:
- Clay Dome: Mold air-dry clay into a dome shape and let it harden. This creates a sturdy, realistic rounded roof.
- Paper Mâché: Use newspaper strips dipped in glue to form a round dome over a balloon. Once dry, remove the balloon and paint the dome.
- Fabric Roof: Drape felt or cloth over a wireframe or cone base for a soft, cottage-like roof.
- Natural Shell Roof: Use a large shell (like a coconut shell or even a gourd) as a ready-made rounded roof.
Tips for Success
Here are some practical tips to make your round roof-building process easier:
- Plan your theme first: Decide if your fairy house will be rustic, magical, or realistic before choosing materials.
- Use hot glue for sturdiness: Hot glue dries quickly and holds heavier decorations like stones or bark.
- Start simple: If you’re new, begin with the cone method before experimenting with clay or paper mâché.
- Experiment with color: Don’t be afraid to paint your roof in bold or unusual colors for a magical vibe.
Decorating Ideas for a Round Roof Fairy House
Once you’ve built your roof, you can personalize it further:
- Add a chimney made from twigs or clay.
- Create “shingles” from overlapping pieces of bark or cardboard.
- Add fairy lights or glow-in-the-dark paint for an enchanting evening effect.
- Sprinkle artificial snow for a winter-themed fairy house.
Educational and Creative Benefits
Learning how to make a round roof for a fairy house is not just fun—it also offers valuable lessons and skills:
- Problem-solving: Finding the right materials and techniques teaches resourcefulness.
- Artistic skills: Decorating the roof helps develop color sense and creativity.
- Fine motor skills: Cutting, gluing, and shaping materials improves precision.
- Imagination: Creating fairy houses fosters storytelling and fantasy play for kids.
Common Mistakes to Avoid
Many beginners run into small problems when figuring out how to make a round roof for a fairy house. Here are common mistakes and solutions:
- Roof doesn’t fit: Always measure carefully before making your cone or dome.
- Roof collapses: Reinforce thin materials with extra cardboard or glue.
- Messy glue marks: Apply glue sparingly and clean up excess before it dries.
- Too heavy decorations: Avoid piling on heavy stones or bark that might tip the roof.
Final Thoughts
Crafting miniature homes is one of the most rewarding DIY projects, and learning how to make a round roof for a fairy house takes it to the next level. With the right materials, a little patience, and creativity, you can create a charming roof that not only protects the structure but also brings your fairy house to life.
Whether you prefer the simple cone method, a dome made of clay, or whimsical decorations with fabric and glitter, the possibilities are endless. The key is to enjoy the process, experiment with materials, and let your imagination guide you. Once complete, your fairy house will stand out as a magical centerpiece in your garden, home décor, or craft collection.
Leave a Reply