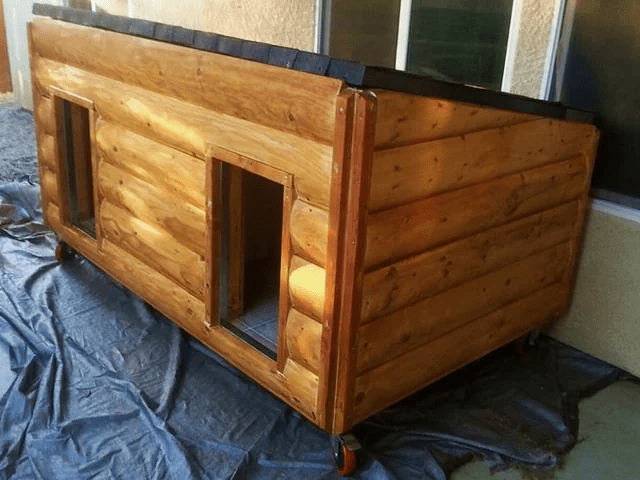
Building a dog house is one of the most rewarding projects for pet owners who want to give their furry friends a safe and cozy space outdoors. However, one challenge many owners face is cleaning and maintaining the inside of the dog house. That’s where a clever design solution comes in—learning how to make your dog house roof flip open up.
This modification allows you to easily access the inside of the dog house for cleaning, inspections, or even adding blankets and toys. In this comprehensive guide, we’ll cover the step-by-step process, the materials you’ll need, the benefits of a flip-up roof, and practical tips to make your project a success.
Read too: Is It Reasonable to Ask the Seller to Replace the Roof?
Why Add a Flip-Up Roof to Your Dog House?
Before diving into how to make your dog house roof flip open up, let’s explore why this feature is so practical:
- Easier Cleaning: No more struggling to reach tight corners. A roof that flips up lets you quickly sweep, disinfect, or replace bedding.
- Better Airflow: In hot climates, temporarily flipping the roof open helps air circulate inside the house.
- Quick Access: If your dog gets sick, injured, or hides inside, you can reach them without stress.
- Maintenance Made Simple: Adding insulation, repairing cracks, or checking for pests becomes effortless.
With these advantages, a flip-up roof isn’t just convenient—it also improves your dog’s overall comfort and hygiene.
Materials and Tools Needed
To start building, gather the following tools and materials. Most are easy to find at hardware stores:
- Dog House (existing or new) – Preferably made of wood.
- Wood Panels – For constructing or reinforcing the roof.
- Piano Hinge or Heavy-Duty Hinges – The key component to make the roof flip open.
- Screws and Drill – For secure assembly.
- Screwdriver – Manual or powered, depending on preference.
- Measuring Tape and Pencil – For accurate measurements.
- Latch or Locking Mechanism – Keeps the roof securely closed when not opened.
- Weatherproof Sealant or Roofing Shingles – To protect against rain and sun.
- Safety Gear – Gloves and goggles to stay safe while working.
Step-by-Step Guide: How To Make Your Dog House Roof Flip Open Up
This section provides a detailed, beginner-friendly approach to the project.
Step 1: Measure the Dog House Roof
Begin by measuring the length and width of your dog house. This ensures the roof panels fit properly. If the dog house already has a roof, measure its size to plan for cutting or replacing it with a flip-up design.
Step 2: Choose the Roof Style
There are two main flip-up roof styles:
- Single-Piece Roof: The entire roof lifts up in one motion.
- Two-Piece Roof (A-frame style): Each side flips up separately, useful for larger houses.
For small to medium dog houses, a single-piece roof is the simplest.
Step 3: Cut or Prepare the Roof Panel
If building from scratch, cut a wooden panel slightly larger than the top frame of the dog house so it overhangs by 1–2 inches. This helps protect against rainwater.
Step 4: Install the Hinges
Attach the piano hinge (or two to three heavy-duty hinges) along the back edge of the roof panel. Secure it to the top edge of the dog house walls. This allows the roof to swing upward when lifted.
Step 5: Add a Latch Mechanism
To prevent the roof from accidentally opening, install a latch or lock at the front. This keeps the roof secure when your dog moves around inside.
Step 6: Weatherproof the Roof
Cover the roof with shingles, waterproof paint, or weatherproof sealant. A flip-up roof should be just as durable as a fixed one, keeping your dog dry and comfortable.
Step 7: Test the Roof
Carefully lift the roof to test the hinge movement. It should open smoothly without resistance. Close it and secure the latch to confirm stability.
By following these steps, you’ve successfully mastered how to make your dog house roof flip open up with a professional finish.
Benefits for You and Your Dog
After completing this project, both you and your pet will enjoy several key benefits:
- Time-Saving Cleaning: Weekly cleanups take minutes instead of hours.
- Healthier Environment: Reduces bacteria buildup, keeping your dog healthier.
- Comfort in All Seasons: Easier to add insulation in winter or improve airflow in summer.
- Peace of Mind: Quick access ensures your dog is always safe and cared for.
Tips for a Long-Lasting Flip-Up Roof
- Use Treated Wood – Prevents rot from outdoor exposure.
- Choose Rust-Proof Hinges – Stainless steel or galvanized hinges resist weather damage.
- Check Latches Regularly – Ensure they remain sturdy to keep the roof shut.
- Apply Sealant Annually – Keeps the roof waterproof year after year.
- Train Your Dog – Help your pet feel comfortable with the sound and motion of the roof opening.
Common Mistakes to Avoid
Even with a simple project, mistakes can happen. Avoid these common pitfalls:
- Weak Hinges: Using lightweight hinges may cause the roof to sag or detach.
- Poor Measurements: An oversized or undersized roof panel can cause instability.
- Skipping Weatherproofing: Without sealing, rain will damage the structure quickly.
- Loose Screws: Always double-check that screws are tight to prevent accidents.
Modern Variations and Creative Add-Ons
While the basic method teaches how to make your dog house roof flip open up, you can personalize the design further:
- Transparent Roofing Panels – Allow sunlight while keeping rain out.
- Insulated Roof Panels – Ideal for colder regions.
- Gas Struts or Hydraulic Arms – Make lifting the roof effortless, similar to car trunk lids.
- Decorative Touches – Add trim, paint, or a custom nameplate for style.
These adaptations make your dog house not only functional but also unique and stylish.
Conclusion
Learning how to make your dog house roof flip open up is a practical DIY project that enhances your dog’s living space while making your life easier. With the right tools, materials, and careful attention to detail, you can create a durable and convenient flip-up roof that improves hygiene, accessibility, and comfort.
Whether you’re an experienced woodworker or a beginner tackling your first project, the satisfaction of building a custom dog house that fits your pet’s needs is unmatched. By following this guide, you’ll create a structure that is safe, durable, and easy to maintain—giving your dog the comfort they deserve.
Leave a Reply