Decorating your home for special occasions or holidays often involves creativity and a touch of boldness. One of the most striking ways to make your house stand out is by placing a giant bow on the roof. It’s a symbol of celebration, whether for Christmas, a new home purchase, a birthday surprise, or even a marriage proposal. However, many people wonder exactly “How To Put A Bow On The Roof Of House” safely and effectively.
This guide will walk you through everything you need to know, from choosing the right type of bow to securing it properly and ensuring your display is both eye-catching and safe.
Read too: Hail Damage Roof Repair: Essential Guide to Restoring Your Home’s Protection
Why Put a Bow on the Roof of a House?
Before we dive into the technical steps of How To Put A Bow On The Roof Of House, it’s worth understanding why this decoration has become so popular:
- Celebration Symbol: Large bows are often used to symbolize a “gift” when a new house or car is purchased.
- Festive Appeal: During Christmas or birthdays, bows add a whimsical and joyful aesthetic.
- Memorable Surprise: For special announcements or proposals, a bow on the roof makes the moment unforgettable.
- Neighborhood Standout: A bold bow decoration sets your home apart during festive seasons.
Materials and Tools You’ll Need
To properly learn How To Put A Bow On The Roof Of House, preparation is crucial. Gather the following items:
- Oversized bow (fabric, vinyl, or weatherproof plastic)
- Mounting base or frame (lightweight wood or PVC pipe)
- Heavy-duty zip ties or bungee cords
- Weather-resistant rope or straps
- Ladder and safety harness
- Hooks or anchors (if needed)
- Tape measure
- Work gloves and non-slip shoes
Optional extras include LED lights or ribbons for additional flair.
Choosing the Right Bow for Your Roof
Not all bows are created equal. When considering How To Put A Bow On The Roof Of House, the size, material, and design matter:
- Size: Large bows (3–8 feet in diameter) work best for roof displays, ensuring they’re visible from a distance.
- Material: Choose weatherproof materials like heavy vinyl or treated fabric that can withstand wind and rain.
- Design: Some bows are pre-lit for nighttime visibility, while others feature detachable ribbons that can be draped down the sides of the house.
Preparing Your Roof for Installation
Safety comes first when tackling How To Put A Bow On The Roof Of House. Here are preparation steps:
- Inspect the Roof: Check for loose shingles or weak areas before climbing.
- Choose the Location: The most common placement is at the center of the roof or above the front entrance for maximum visibility.
- Plan for Anchoring: Decide whether to use hooks, a mounting frame, or ropes to secure the bow.
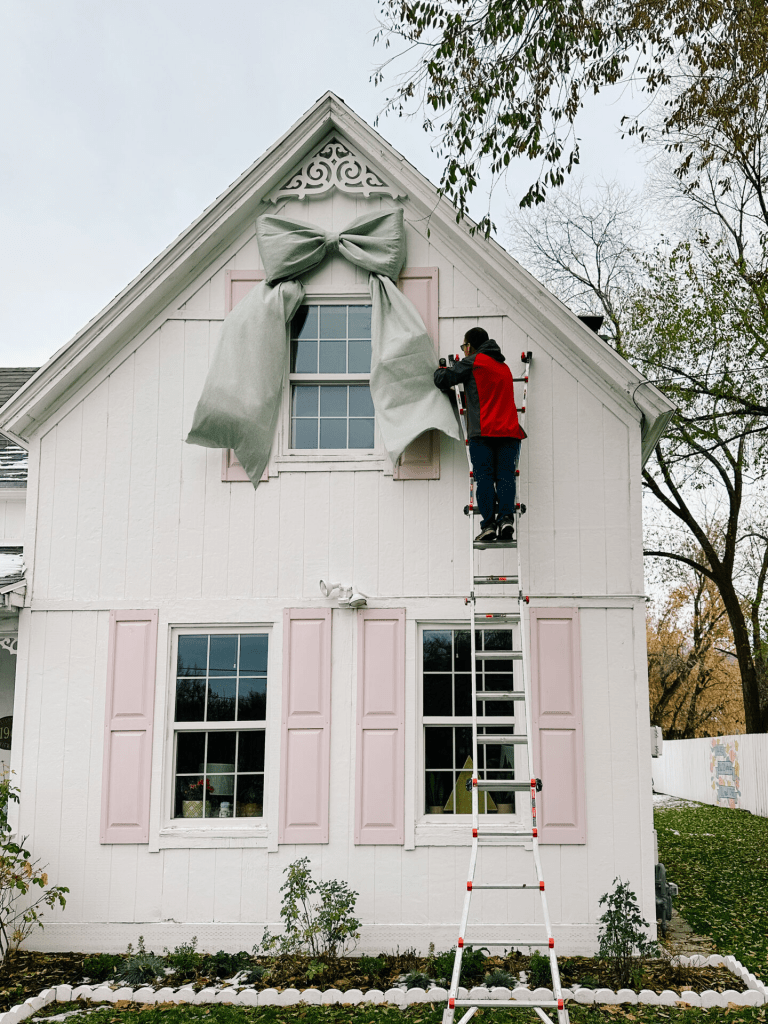
Step-by-Step Guide: How To Put A Bow On The Roof Of House
Here’s a detailed process for installing a bow on your roof safely:
Step 1: Assemble the Bow
If your bow comes in parts, assemble it on the ground first. Attach ribbons or lighting if desired.
Step 2: Prepare the Mounting Frame
For large bows, use a lightweight frame made of PVC or wood. This gives the bow structure and makes it easier to secure.
Step 3: Position the Bow on the Roof
With the help of another person, carefully carry the bow up the ladder. Place it at your chosen location.
Step 4: Secure the Bow
- Use weather-resistant ropes or straps to tie the bow to roof anchors.
- Alternatively, attach it with bungee cords around a chimney or vent pipe if available.
- Make sure it is tight enough to withstand wind but not so tight that it damages the bow or roof.
Step 5: Add Extra Support
For larger bows, use hooks or weights to keep it in place. Double-check the stability by gently tugging on the bow.
Step 6: Final Touches
Drape ribbons down the sides of the house or add LED string lights to make the bow glow at night.
Safety Tips for Roof Decorations
When learning How To Put A Bow On The Roof Of House, safety should always be a top priority:
- Never work alone; always have a partner.
- Use a sturdy ladder with slip-resistant feet.
- Wear a safety harness when working on steep roofs.
- Avoid installation during windy, rainy, or icy conditions.
- Keep tools secured to prevent accidents.
Common Mistakes to Avoid
Many homeowners make small errors that can affect the final look and safety of their display:
- Choosing the Wrong Size Bow: A bow that’s too small won’t be visible; one that’s too large may be hard to secure.
- Ignoring Weather Conditions: Lightweight bows can easily blow away in strong winds.
- Improper Anchoring: Using tape or light strings isn’t enough—always use heavy-duty fasteners.
- Overcomplicating the Setup: Keep the design simple and focus on strong anchoring.
Creative Ideas for Decorating with Roof Bows
Once you know How To Put A Bow On The Roof Of House, you can get creative with your display:
- Pair the bow with large ribbons cascading down the roof.
- Add giant gift tags with a festive message.
- Combine with holiday lights to highlight the bow at night.
- Use multiple bows for a bold, symmetrical effect.
- Match the bow color with your seasonal theme (red for Christmas, gold for anniversaries, blue for birthdays).
Maintenance and Removal Tips
A bow on the roof isn’t meant to be permanent, so proper care is important:
- Check Regularly: Inspect the bow every few days for loose ties or weather damage.
- Re-secure if Needed: High winds can loosen straps—tighten them as required.
- Remove Carefully: Use the same safety measures when taking the bow down. Store it in a cool, dry place for reuse.
Final Thoughts
Learning How To Put A Bow On The Roof Of House is a fun and rewarding project that can transform your home into a celebratory centerpiece. By choosing the right bow, preparing your roof safely, and securing it properly, you’ll create a stunning display that delights neighbors and guests alike.
Whether for Christmas, a new home, or a surprise celebration, a roof bow is an unforgettable decoration. Just remember: safety and preparation are the keys to success.
Leave a Reply