Installing a metal roof is a major home improvement project, but it’s one that can deliver decades of durability and energy savings when done correctly. If you’re researching How To Put A Metal Roof On A House, you’re likely looking for a clear, practical guide that explains the process without unnecessary complexity. This article walks you through every stage—from preparation to final inspection—so you understand what to do, why it matters, and how to avoid costly mistakes.
Why Homeowners Choose Metal Roofing
Metal roofs are no longer limited to barns or industrial buildings. Across the US, more homeowners are choosing metal roofing for residential properties.
Read too: Hail Damage Roof Repair: Essential Guide to Restoring Your Home’s Protection
Key Benefits of Metal Roofs
- Long lifespan: 40–70 years with proper installation
- Weather resistance: Excellent against wind, snow, and fire
- Energy efficiency: Reflects heat, lowering cooling costs
- Low maintenance: Fewer repairs than shingles
According to general roofing and construction principles (see overview on Wikipedia: https://en.wikipedia.org/wiki/Metal_roof), metal roofing performs especially well in regions with extreme weather conditions.
Types of Metal Roofing for Houses
Before learning How To Put A Metal Roof On A House, it’s important to choose the right roofing style.
Common Residential Metal Roof Options
| Type | Description | Best For |
|---|---|---|
| Corrugated panels | Wavy profile, exposed screws | Budget & DIY projects |
| Ribbed panels | Flat panels with raised ribs | Residential DIY installs |
| Standing seam | Hidden fasteners, sleek look | Modern homes |
| Metal shingles | Mimic asphalt or slate | HOA-restricted areas |
👉 This guide focuses on exposed-fastener metal panels, which are the most DIY-friendly and cost-effective.
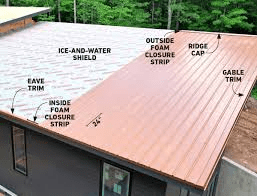
Tools and Materials You’ll Need
Essential Tools
- Drill or impact driver
- Tin snips or metal-cutting saw
- Tape measure
- Chalk line
- Hammer
- Ladder and safety harness
Required Materials
- Metal roofing panels
- Synthetic roofing underlayment
- Ice and water shield
- Roofing screws with neoprene washers
- Drip edge and flashing
- Ridge cap
- Foam closure strips
Having everything ready before starting saves time and prevents mistakes.
Step 1: Check Local Codes and Permits
Before installing a metal roof:
- Check local building codes
- Verify wind and snow load requirements
- Confirm whether a permit is required
Some areas require inspections even for DIY roofing projects.
Step 2: Inspect and Prepare the Roof Deck
A solid roof deck is critical.
Preparation Checklist
- Remove old shingles (recommended)
- Replace any rotted plywood
- Secure loose decking
- Ensure the surface is flat
💡 While metal roofing can sometimes be installed over shingles, removing old roofing allows proper inspection and improves long-term performance.
Step 3: Install Ice & Water Shield and Underlayment
Underlayment protects the house from moisture and condensation.
Installation Order
- Ice & water shield along eaves and valleys
- Synthetic roofing underlayment over the entire roof
- Overlap seams by 4–6 inches
Fasten underlayment with cap nails or staples.
Step 4: Install Drip Edge and Eave Trim
Drip edge directs water away from the fascia and foundation.
Best Practices
- Install eave trim first
- Overlap pieces by 2 inches
- Fasten every 12–16 inches
This step is often skipped, but it greatly improves water control.
Step 5: Plan the Metal Panel Layout
Proper planning ensures a professional-looking result.
Layout Tips
- Measure roof width and length carefully
- Snap chalk lines for straight alignment
- Start from the squarest corner of the roof
- Dry-fit panels before fastening
⚠️ A crooked first panel will throw off the entire roof.
Step 6: Install the First Metal Panel
The first panel is the most important.
Installation Steps
- Align panel square with the roof edge
- Let it overhang the eave trim slightly
- Secure using roofing screws:
- Place screws on flat sections
- Space screws 12–18 inches apart
🔩 Tighten screws until the washer compresses slightly—do not overtighten.
Step 7: Install Remaining Metal Panels
Continue installing panels across the roof.
Panel Overlap Guidelines
- Side overlap: 1 full rib minimum
- End overlap: 6–8 inches
Apply butyl tape or sealant at end laps for added leak protection.
Step 8: Cut Panels and Fit Around Roof Features
Most roofs have penetrations that require precise cutting.
Common Penetrations
- Plumbing vents
- Chimneys
- Skylights
- Exhaust pipes
Use rubber pipe boots and metal flashing designed specifically for metal roofs.
Step 9: Install Ridge Cap and Closure Strips
The ridge cap seals the peak of the roof.
Ridge Installation Steps
- Install foam closure strips on both sides
- Center the ridge cap over the peak
- Secure with screws every 12 inches
Ensure proper ventilation if using a vented ridge system.
Step 10: Final Inspection and Sealing
Before considering the job complete:
Final Checklist
- Inspect all fasteners
- Check flashing and overlaps
- Remove metal shavings (prevents rust stains)
- Seal exposed fasteners if required
A careful final inspection can add years to your roof’s life.
Common Mistakes to Avoid
❌ Overtightening screws
❌ Skipping underlayment
❌ Installing panels out of square
❌ Ignoring thermal expansion
❌ Poor flashing around penetrations
Avoiding these errors is just as important as following the steps correctly.
How Long Does It Take to Put a Metal Roof On a House?
| Installer | Time Estimate |
|---|---|
| DIY beginner | 4–7 days |
| DIY experienced | 2–4 days |
| Professional crew | 1–2 days |
Weather and roof complexity can affect timelines.
Cost Breakdown for Metal Roofing
Average US Costs (Per 100 sq ft)
- Materials: $150–$350
- Tools (if needed): $200–$500
- Professional labor: $300–$600
💡 DIY installation can reduce total cost by 30–50%, but requires careful execution.
Pros and Cons of Metal Roofing
Advantages
- ✔ Extremely durable
- ✔ Energy efficient
- ✔ Fire resistant
- ✔ Lightweight compared to tile
Disadvantages
- ✘ Higher upfront cost
- ✘ Precision required
- ✘ Can be noisy without insulation
Is Installing a Metal Roof DIY-Friendly?
Yes—with the right preparation.
DIY installation is suitable if you:
- Are comfortable working at heights
- Follow manufacturer instructions exactly
- Use proper safety equipment
For steep roofs or complex designs, hiring professionals is safer.
FAQ – How To Put A Metal Roof On A House
Can I put a metal roof over existing shingles?
Sometimes yes, but removing shingles is recommended for inspection and longevity.
Do metal roofs require underlayment?
Yes. Underlayment is essential for moisture and condensation control.
How long does a metal roof last?
Typically 40–70 years, depending on material and installation quality.
Are metal roofs noisy during rain?
With proper underlayment and insulation, noise is minimal.
Do metal roofs increase home value?
Yes, they often improve resale value and energy efficiency.
How often does a metal roof need maintenance?
Only periodic inspections and debris removal.
Conclusion
Learning How To Put A Metal Roof On A House allows homeowners to invest in one of the most durable and energy-efficient roofing systems available today. Success depends on careful preparation, accurate layout, proper fastening, and attention to flashing details. When installed correctly, a metal roof can protect your home for generations.
If this guide helped you plan or complete your metal roofing project, share it on social media so other homeowners can build smarter, safer, and more confidently.

Leave a Reply