Learning How To Roof A House With 3 Tab Shingles can save you thousands of dollars and give you confidence in maintaining your home. While roofing may look intimidating, the process becomes manageable when broken into clear, practical steps.
In this guide, you’ll learn the complete installation process—from preparation to final ridge cap—using professional techniques that improve durability and performance.
What Are 3 Tab Shingles and Why Choose Them?
Before understanding How To Roof A House With 3 Tab Shingles, it’s important to know what they are.
Read too: Is It Reasonable to Ask the Seller to Replace the Roof?
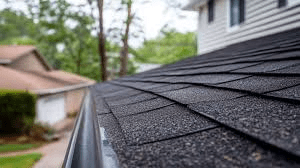
3-tab shingles are flat asphalt shingles with three evenly spaced tabs that create a uniform pattern. According to general roofing principles explained on Wikipedia – Roof Shingle, asphalt shingles are the most widely used roofing material in North America due to affordability and ease of installation.
Why Homeowners Choose 3 Tab Shingles
- Lower cost than architectural shingles
- Lightweight and easy to install
- Clean, traditional appearance
- 20–25 year lifespan (average)
💡 Average cost: $90–$120 per roofing square (100 sq ft).
What Tools and Materials Do You Need?
Proper preparation ensures a smooth roofing process.
Essential Tools
- Roofing hammer or pneumatic nailer
- Utility knife with hook blades
- Chalk line
- Tape measure
- Ladder (rated Type IA, 300 lb capacity)
- Roofing shovel (for tear-off)
Materials Required
- 3-tab shingles
- Roofing nails (1¼ inch galvanized)
- Roofing felt (15 lb or 30 lb)
- Drip edge flashing
- Ice and water shield (for cold climates)
- Ridge cap shingles
How To Prepare the Roof Surface?
Preparation determines long-term durability.
Step 1: Remove Old Roofing (1–2 Days)
- Start at the ridge.
- Use a roofing shovel to lift shingles.
- Remove all nails.
- Sweep debris completely.
Never install over damaged decking.
Step 2: Inspect Roof Deck
Check for:
- Soft spots
- Rot
- Mold
- Warped plywood
Replace damaged plywood sheets (typically ½-inch OSB or plywood).
Step 3: Install Drip Edge (2–3 Hours)
Install drip edge along:
- Eaves first
- Rakes second
Overlap pieces by at least 2 inches.
Step 4: Install Roofing Felt
Roll out felt horizontally.
- Overlap rows by 2–4 inches
- Nail every 12 inches
- Keep surface smooth
This adds moisture protection.
How To Roof A House With 3 Tab Shingles (Installation Process)
Now we move into the main process of How To Roof A House With 3 Tab Shingles.
Step 1: Install Starter Strip (1–2 Hours)
Starter strips prevent wind uplift.
You can:
- Use pre-made starter strips
OR - Cut tabs off standard shingles
Install starter strip flush with drip edge.
Step 2: Snap Chalk Lines (30 Minutes)
Snap horizontal lines every 5 inches (standard shingle exposure).
This ensures straight alignment.
Step 3: Lay the First Course (1–2 Hours)
- Start at lower left corner.
- Align shingle with chalk line.
- Leave ¼ inch overhang past drip edge.
- Nail 4 nails per shingle (6 in high-wind areas).
Nails should sit just below adhesive strip.
Step 4: Offset Each Row (Stagger Pattern)
To avoid vertical seams:
- Cut 6 inches off first shingle in second row
- Cut 12 inches off first shingle in third row
- Continue stagger pattern
This strengthens roof integrity.
Step 5: Continue Upward (1–2 Days)
Work in sections:
- Complete one row at a time
- Maintain straight lines
- Double-check nail placement
Each roofing square typically takes 1–2 hours for experienced DIYers.
Step 6: Install Ridge Cap (2–3 Hours)
At the ridge:
- Cut shingles into individual tabs.
- Bend gently over ridge.
- Nail 1 inch from each edge.
- Overlap each cap by 5 inches.
Proper Nail Placement (Critical for Longevity)
Incorrect nailing is the #1 cause of roof failure.
Correct Nail Position
- 4 nails per shingle (minimum)
- Place just below adhesive strip
- Do not overdrive
- Nail must penetrate decking at least ¾ inch
Improper nailing can reduce lifespan by up to 40%, according to industry contractor reports.
How Long Does It Take to Roof a House?
| Roof Size | Estimated DIY Time |
|---|---|
| 1,000 sq ft | 2–3 days |
| 1,500 sq ft | 3–4 days |
| 2,000 sq ft | 4–5 days |
Weather conditions affect timing.
Ideal temperature: 45°F–85°F
3 Tab Shingles: Advantages vs Disadvantages
Advantages
✔ Affordable
✔ Lightweight
✔ Easy to replace individual shingles
✔ Clean appearance
Disadvantages
✘ Shorter lifespan than architectural shingles
✘ Less wind resistance
✘ Flat visual profile
Common Mistakes to Avoid
- Skipping underlayment
- Nailing too high
- Misaligned starter strip
- Ignoring ventilation
- Working without fall protection
Always use safety harness on roofs above 6/12 pitch.
How Much Does It Cost To Roof With 3 Tab Shingles?
Average Cost Breakdown
| Item | Cost Estimate |
|---|---|
| Materials | $1.50–$3.00 per sq ft |
| Labor (if hired) | $2.00–$5.00 per sq ft |
| Total Installed | $3,500–$7,000 (1,500 sq ft home) |
DIY savings: typically $2,000–$4,000.
When Should You Not DIY?
Avoid DIY roofing if:
- Roof pitch exceeds 7/12
- You lack fall protection
- Structural repairs are needed
- Local code requires permit inspection
Safety always comes first.
FAQ: How To Roof A House With 3 Tab Shingles
1. How many nails per 3 tab shingle?
Use 4 nails minimum. In high-wind zones, use 6 nails.
2. Can I install 3 tab shingles over old shingles?
Yes, but only if existing layer is flat and local code allows one additional layer.
3. How long do 3 tab shingles last?
Typically 20–25 years with proper installation.
4. What is the correct exposure for 3 tab shingles?
Standard exposure is 5 inches.
5. Do I need ice and water shield?
Required in cold climates and recommended near eaves and valleys.
6. What roof pitch is safe for DIY?
Generally 4/12 to 6/12 pitch is manageable with safety precautions.
Conclusion
Learning How To Roof A House With 3 Tab Shingles empowers you to protect your home while saving significant money. With proper preparation, accurate nailing, and careful alignment, you can install a durable roof that lasts decades.
Take your time, prioritize safety, and follow each step carefully. If this guide helped you, consider sharing it on social media to help others tackle their roofing project with confidence.
Leave a Reply