Install Metal Roof Valley. If you’re considering a metal roof for your home, understanding the installation process is crucial for ensuring its longevity and performance. Among the various components of a metal roofing system, the valley is particularly important. The Install Metal Roof Valley is essential for directing water runoff, preventing leaks, and maintaining the structural integrity of your roof. In this article, we will discuss everything you need to know about installing a metal roof valley, from preparation to execution.
What is a Roof Valley?
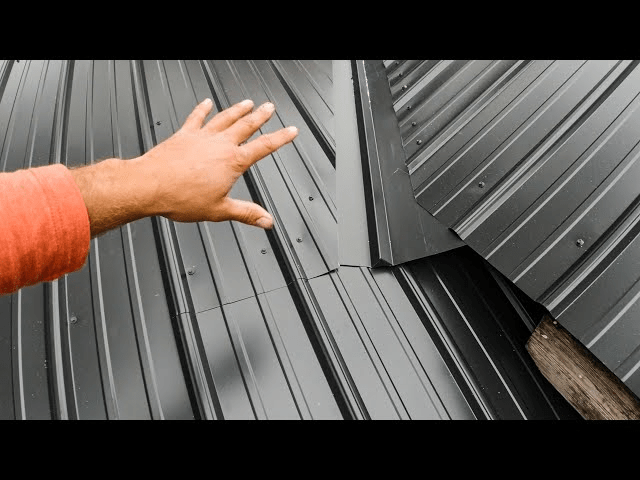
Before diving into the installation process, let’s clarify what a roof valley is. A roof valley is the area where two roof slopes meet, creating a trough that directs water runoff into the gutters. Proper installation of the valley is critical, as it can become a weak point in the roofing system if not done correctly.
Read too: Hail Damage Roof Repair: Essential Guide to Restoring Your Home’s Protection
Types of Roof Valleys
There are two primary types of roof valleys:
- Open Valleys: This type features a visible metal flashing that sits over the shingles or metal panels, allowing for easy drainage of water. Open valleys are commonly used in steeply pitched roofs.
- Closed Valleys: In this design, the shingles or metal panels overlap in the valley area, providing a more seamless appearance. However, closed valleys can be more prone to leaks if not installed properly.
Why Choose Metal Roof Valleys?
Metal roof valleys offer several advantages, including:
- Durability: Metal valleys are less likely to suffer from the wear and tear that other materials endure over time, such as asphalt shingles.
- Longevity: Metal roofs can last for 50 years or more, and well-installed valleys can help extend the life of your roof.
- Aesthetic Appeal: Metal valleys can enhance the overall look of your roof, especially when combined with other metal roofing materials.
Tools and Materials Needed
Before you start the installation process, gather the necessary tools and materials:
Tools
- Tin Snips: For cutting metal panels to size.
- Measuring Tape: To ensure accurate measurements.
- Chalk Line: To mark straight lines on your roofing materials.
- Hammer or Roofing Nail Gun: For securing the metal panels.
- Safety Gear: Such as gloves, goggles, and a hard hat.
Materials
- Metal Valley Flashing: This can be aluminum or galvanized steel, depending on your roofing material.
- Roof Panels: Ensure these are compatible with your valley flashing.
- Roof Underlayment: A waterproof layer to prevent leaks.
- Screws: For securing the flashing and panels.
Step-by-Step Guide to Install Metal Roof Valley
Step 1: Prepare the Roof Surface
Start by removing any old roofing materials in the valley area. If you’re replacing an existing valley, make sure to clear away any debris, nails, and shingles to expose the sheathing.
Step 2: Install the Underlayment
Lay down a waterproof underlayment along the valley area. This layer is critical for preventing leaks and protecting the sheathing from moisture. Overlap the underlayment with any existing layers on your roof, and ensure it extends a few inches up each side of the valley.
Step 3: Measure and Cut the Metal Valley Flashing
Using your measuring tape, measure the length of the valley and mark it on your metal flashing. Use tin snips to cut the flashing to the appropriate length. Ensure that the flashing is long enough to extend beyond the eaves for optimal water runoff.
Step 4: Position the Valley Flashing
Carefully position the valley flashing into the valley area, ensuring it lies flat and overlaps the underlayment. The valley should be centered between the two roof slopes. Use a chalk line to ensure your flashing is straight.
Step 5: Secure the Flashing
Using screws or nails, secure the metal flashing to the roof deck. Space the fasteners approximately every 12 inches along the flashing, ensuring they penetrate the roof sheathing for a solid hold. Make sure not to over-tighten the screws, as this can warp the metal.
Step 6: Install the Metal Roof Panels
Once the flashing is securely in place, you can begin installing the metal roof panels. Start at the bottom of the valley and work your way up. This allows water to flow down over the seams, reducing the likelihood of leaks.
- Position the First Panel: Align the first panel with the valley flashing and secure it in place with screws.
- Continue Installing Panels: Overlap the next panel over the first one, ensuring that it covers the valley flashing adequately. Follow the manufacturer’s guidelines for spacing and fastening.
Step 7: Seal the Valleys
To further protect against leaks, apply a high-quality sealant along the edges of the valley flashing where it meets the metal panels. This step is particularly important for open valleys, as it provides an extra layer of protection against water intrusion.
Step 8: Inspect Your Work
Once all the panels are installed, inspect your work carefully. Check for any gaps, misaligned panels, or potential leak points. Make any necessary adjustments before considering the job complete.
Step 9: Clean Up
Finally, clean the work area of any debris and dispose of old roofing materials responsibly. A clean site not only looks better but also minimizes hazards for future work.
Maintenance Tips for Metal Roof Valleys
After successfully installing your metal roof valley, maintaining it is crucial for ensuring its longevity:
- Regular Inspections: Check your roof valleys at least twice a year and after severe weather events. Look for signs of wear, rust, or damage.
- Clean Debris: Remove any leaves, branches, or debris that may accumulate in the valleys, as these can obstruct water flow and lead to leaks.
- Check Seals: Regularly inspect the seals along the edges of the flashing to ensure they remain intact and effective.
- Address Problems Early: If you notice any issues, such as rust or leaks, address them promptly to prevent further damage.
Conclusion
Installing a Metal Roof Valley is a crucial aspect of a metal roofing system that requires attention to detail and proper technique. By following the steps outlined in this guide, you can ensure that your valley is well-installed and capable of directing water runoff efficiently. Remember that proper installation not only enhances the aesthetic appeal of your home but also protects it from potential water damage.
If you’re ever unsure about the installation process or lack the experience, consider consulting with a professional roofing contractor. Investing in expert assistance can save you time, money, and headaches down the road.
Leave a Reply