Metal roofing has become an increasingly popular option for homeowners and commercial buildings due to its durability, longevity, and energy efficiency. When considering installing a metal roof, it’s crucial to understand the steps involved and how to interpret a metal roofing installation diagram. Such diagrams offer a visual guide to ensure that every component of the roof is installed properly, helping to avoid common issues and ensuring maximum protection for your home.
In this article, we’ll break down everything you need to know about metal roofing installation diagrams, from the tools required to understanding the key components of the diagram itself. Whether you’re a DIY homeowner or a professional contractor, having a clear understanding of metal roof installation can save time, prevent costly mistakes, and provide you with the long-lasting, reliable roof you expect.
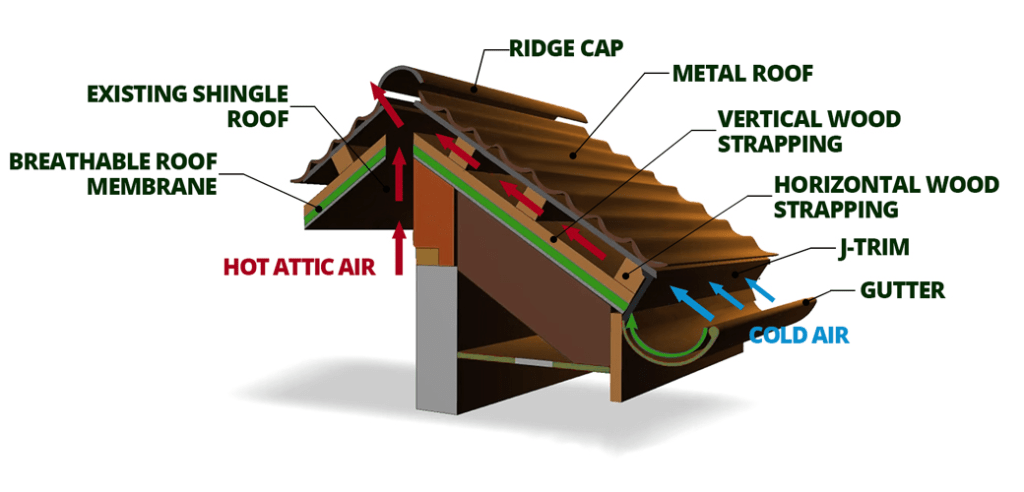
What Is a Metal Roofing Installation Diagram?
A metal roofing installation diagram is a visual representation of the various parts, layers, and components involved in installing a metal roof. It typically illustrates the placement of roof panels, flashing, fasteners, underlayment, and other crucial elements required for a secure, watertight installation. These diagrams provide step-by-step guidance for assembling each part of the roof in a systematic manner, helping installers avoid potential errors and structural problems.
These diagrams are essential tools that can simplify the installation process, especially for those new to working with metal roofing systems. For professionals, installation diagrams act as a checklist to ensure every aspect of the roof is installed according to industry standards and manufacturer recommendations.
Read too: How To Replace A Mobile Home Roof: Step-by-Step Guide for Homeowners
Key Components of a Metal Roofing Installation Diagram
When reading a metal roofing installation diagram, it’s important to familiarize yourself with the core elements typically represented. Below are the essential components that will likely be included:
1. Roof Panels
The roof panels form the majority of the metal roof’s surface. They come in various shapes and sizes, such as standing seam, corrugated, and ribbed panels. The diagram will show how to lay these panels properly, indicating where they overlap and how they should be fastened to the roof decking or battens.
2. Underlayment
The underlayment is a water-resistant layer that sits between the roof deck and the metal panels. It protects your home from moisture intrusion and is usually represented in the diagram by a dotted or shaded line under the panels. Common underlayment materials include synthetic membranes and felt paper, both designed to provide additional protection against leaks.
3. Flashing
Flashing refers to thin pieces of metal that are installed in areas where the roof meets a wall, chimney, or skylight, or around roof valleys to direct water away from these vulnerable areas. A metal roofing installation diagram will show the placement of flashing around these points to prevent water penetration.
4. Ridge Cap
The ridge cap covers the peak of the roof where two slopes meet. In metal roofing installation, the ridge cap is crucial for waterproofing the roof and allowing proper ventilation. The diagram will show how to install this cap securely over the metal panels at the roof’s peak.
5. Fasteners
Fasteners are used to secure metal panels to the roof deck or purlins. They often come with rubber washers to prevent water intrusion. The diagram will detail the spacing and placement of fasteners to ensure the panels are firmly attached without causing damage to the roofing material.
6. Ventilation Components
Proper ventilation is key to preventing condensation and ensuring the longevity of the roof. A metal roofing installation diagram might include instructions for installing roof vents, which are usually placed near the ridge or soffits to facilitate airflow.
7. Gutters and Drip Edges
Gutters and drip edges guide water away from the roof and foundation. In metal roofing installations, diagrams will show how these components should be attached to the roof’s edges to ensure proper water runoff.
8. Soffit and Fascia
These parts of the roofing system are located along the edge of the roof and are essential for both aesthetics and protection. The fascia supports the roof’s edge, while the soffit covers the underside of the eaves to prevent moisture and pests from entering. Diagrams will show their correct installation to match the overall roofing system.
How to Use a Metal Roofing Installation Diagram for Your Project
Step 1: Gather Materials and Tools
Before starting your metal roofing project, ensure that you have all necessary materials and tools as indicated in the installation diagram. This typically includes metal panels, underlayment, flashing, fasteners, ridge caps, sealants, and the tools needed for cutting and fastening. Always check your specific metal roofing system’s installation guide for any special tools or materials.
Step 2: Prepare the Roof Deck
Inspect your roof deck for any signs of damage or decay. If necessary, repair or replace damaged sections to provide a solid foundation for your new metal roof. A clean, dry, and smooth roof deck is essential for a successful installation. The diagram will often note the importance of starting with a well-prepared surface.
Step 3: Install the Underlayment
Following the diagram, lay the underlayment across the entire roof deck. Begin at the eaves and work your way up towards the ridge. Ensure that each layer of underlayment overlaps the one below it to create a water-tight barrier. The diagram will often specify how much overlap is needed, depending on your roof’s pitch and local weather conditions.
Step 4: Position the Roof Panels
Using the metal roofing installation diagram, position the first roof panel at one corner of the roof. Make sure it overhangs the eaves by the specified distance to ensure proper drainage into the gutters. Secure the panel with fasteners, ensuring the proper spacing as indicated in the diagram. Continue installing additional panels, ensuring each one overlaps the previous panel for a secure, weatherproof seam.
Step 5: Install Flashing and Ridge Caps
Follow the diagram’s instructions for placing flashing around roof penetrations such as chimneys, vents, and skylights. Flashing helps prevent water from seeping into these vulnerable areas. Once all panels are in place, install the ridge cap at the peak of the roof. The diagram will provide guidance on how to overlap the ridge cap with the roof panels for maximum protection.
Step 6: Secure Fasteners and Seal Joints
As you install the roof panels, be sure to securely fasten them according to the diagram’s instructions. Pay special attention to the placement of screws, making sure they penetrate the high seams of corrugated metal or the flat sections of standing-seam panels. After the roof panels and ridge cap are in place, seal any visible joints with a metal-compatible sealant as indicated in the diagram.
Step 7: Add Gutters and Drip Edges
Once the roof panels are securely in place, finish the project by installing gutters and drip edges as shown in the diagram. These components help guide water away from the roof and prevent pooling around the foundation of your home.
Common Mistakes to Avoid During Metal Roof Installation
1. Incorrect Fastener Placement
Improper placement of fasteners is one of the most common mistakes made during metal roof installations. Using the installation diagram can help you avoid over-tightening fasteners, placing them in the wrong location, or failing to use the correct type of fasteners for the job.
2. Ignoring Ventilation Requirements
Neglecting proper ventilation can lead to condensation issues, mold growth, and damage to the roof’s structure. The diagram will indicate the proper location and type of vents needed to maintain airflow beneath the metal roof panels.
3. Failing to Overlap Panels Properly
If the metal roof panels aren’t overlapped correctly, water can seep through the gaps, leading to leaks and damage. Always follow the metal roofing installation diagram to ensure that each panel overlaps as recommended by the manufacturer.
4. Not Installing Underlayment
Skipping the underlayment can lead to water damage, particularly in regions with heavy rainfall or snowfall. Always follow the diagram’s instructions for underlayment installation to create a solid moisture barrier beneath your metal roof.
Conclusion
A metal roofing installation diagram is an invaluable tool for ensuring the successful and long-lasting installation of your metal roof. Whether you’re a seasoned professional or tackling a DIY project, understanding each component and following the diagram step by step will help you avoid common pitfalls and achieve the best possible outcome. From preparing your roof deck and installing the underlayment to securing the roof panels and flashing, attention to detail is key to ensuring your metal roof provides decades of protection and value.


Leave a Reply