When it comes to installing a metal roof, the proper placement of screws is crucial to ensure the roof’s stability and longevity. The correct screw placement not only guarantees a secure attachment but also prevents potential leaks and damage to the roofing material. In this comprehensive guide, we will walk you through the essential tips for screw placement on a metal roof, ensuring a successful installation that can withstand the test of time.
Understanding the Importance of Screw Placement
Before delving into the specifics of screw placement, it’s essential to understand its significance in the overall integrity of a metal roof. Unlike traditional roofing materials, such as asphalt shingles, metal roofing relies heavily on screws to keep it in place. When installed correctly, the screws provide a reliable fastening method that prevents wind uplift and keeps the roof panels firmly secured.
Selecting the Right Screws
The first step in ensuring proper screw placement is selecting the appropriate screws for your metal roof. High-quality roofing screws made of stainless steel or coated with corrosion-resistant materials are essential. These screws offer superior durability and can withstand exposure to various weather conditions without rusting or deteriorating.
When choosing screws, consider the type and thickness of the metal roofing panels. Different roof profiles may require specific screw types, so consult with your manufacturer or roofing expert to ensure you have the right screws for your project.
Determining the Spacing and Pattern
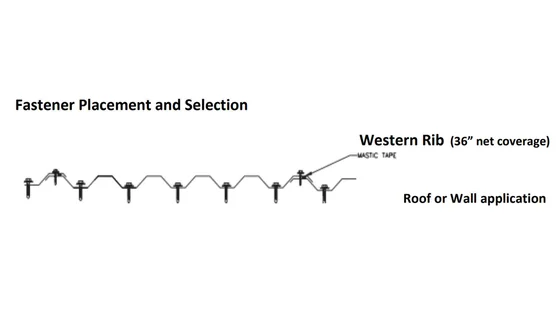
The spacing and pattern of the screws play a vital role in the roof’s structural integrity and resistance to wind forces. The general rule of thumb for screw spacing is to place them at the ridges or high points of the metal panels. This ensures positioning the screws in areas of maximum support and stability.
For most metal roofing applications, you should place a screw every 12 to 24 inches along the panel’s ridge. This spacing may vary depending on the local building codes and the specific metal roof system being used. Always refer to the manufacturer’s guidelines for the recommended screw spacing to achieve the best results.
Pre-Drilling Pilot Holes
Pre-drilling pilot holes before inserting screws is essential, especially when dealing with metal roofing. Pilot holes help prevent the metal from cracking or distorting during screw installation, ensuring a neat and secure attachment.
Using a drill with the appropriate bit size, create pilot holes slightly smaller than the diameter of the screws. This will allow the screws to grip firmly without causing damage to the metal panels. Pre-drilling also makes the installation process more manageable, especially when working on high-pitched roofs.
Maintaining a Watertight Seal
To maintain a watertight seal and prevent leaks, it is essential to pay close attention to the positioning of the screws and their washers. Position the screws so that they are in the flat area of the metal roofing panel and not in the raised ribs. Placing screws in the ribs may result in water pooling and potential leakage over time.
Moreover, using rubber or neoprene washers with the screws can create a reliable barrier against water penetration. These washers provide an extra layer of protection, ensuring that moisture stays out and your metal roof remains leak-free.
Conclusion:
Screw placement on a metal roof is a critical aspect of the installation process that should never be overlooked. By selecting the right screws, determining the appropriate spacing, pre-drilling pilot holes, and maintaining a watertight seal, you can ensure a secure and durable metal roof that will stand the test of time. Proper screw placement not only enhances the roof’s performance but also provides peace of mind, knowing that your home is protected from the elements for years to come.


Leave a Reply