As renewable energy gains popularity, many homeowners are turning to solar power to reduce their carbon footprint and lower their electricity bills. One of the most common concerns during the transition to solar energy is the installation process, especially for those with clay tile roofs. If you’re one of those homeowners looking to harness the power of the sun and wondering how to install solar panels on a clay tile roof, you’ve come to the right place. This comprehensive guide will walk you through the step-by-step process, making your solar panel installation smooth and successful.
Understanding Your Clay Tile Roof
Before diving into the installation process, it’s essential to familiarize yourself with your clay tile roof’s structure. Clay tiles are delicate and can crack or break easily if mishandled during the installation. Therefore, it’s crucial to exercise caution and use the appropriate tools and techniques to prevent any damage.
Check the Roof’s Condition: Before proceeding with solar panel installation, inspect the condition of your clay tiles. Replace any cracked or damaged tiles and ensure that the roof is in good shape to support the additional weight of the solar panels.
Understand the Tile Layout: Clay tile roofs have a unique interlocking pattern, and it’s essential to understand how the tiles fit together. This knowledge will help you plan the optimal placement of the solar panels without compromising the roof’s integrity.
Preparing for Solar Panel Installation
Now that you’re familiar with your clay tile roof’s structure, it’s time to prepare for the solar panel installation.
Assess Your Energy Needs: Determine your household’s energy consumption to understand how many solar panels you’ll need to install. Consider factors like your average electricity usage and the available space on your roof for solar panels.
Choose the Right Solar Panels: Opt for solar panels that are suitable for your climate and energy needs. Look for high-quality panels with a proven track record of efficiency and durability.
Contact a Professional Installer: While some homeowners may consider a DIY approach, it’s highly recommended to hire a professional solar panel installer with experience in working with clay tile roofs. They have the expertise to ensure a safe and efficient installation.
Process of Install Solar Panels On Clay Tile Roof
With the preparations complete, it’s time to proceed with the solar panel installation on your clay tile roof.
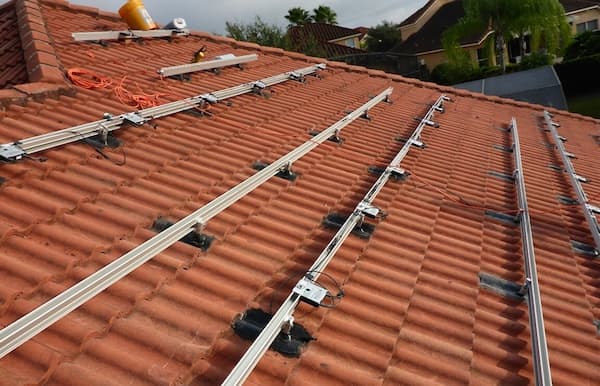
Mounting System Installation: The first step is to install the mounting system on your roof. The mounting system creates a stable foundation for the solar panels. It’s crucial to follow the manufacturer’s guidelines and use appropriate flashing and sealants to prevent any water leaks.
Panel Placement: Carefully position the solar panels on the mounting system, ensuring they are secure and aligned properly. Maintain the necessary gap between the panels to allow for optimal airflow and maximize energy production.
Wiring and Inverter Installation: Connect the solar panels with appropriate wiring and install the inverter. The inverter converts the direct current (DC) generated by the solar panels into usable alternating current (AC) for your home.
Final Steps and Safety Measures
As you near the completion of your solar panel installation, take some final steps to ensure everything is in order.
Quality Check: Conduct a thorough quality check to ensure all connections are secure, and there are no loose components. Double-check the panel alignment and tilt for optimal sun exposure.
Safety Measures: Safety should always be a priority during any installation process. If you’re not a professional, it’s best to leave the final inspection and testing to the experts.
Conclusion
Congratulations! You’ve successfully installed solar panels on your clay tile roof. By embracing solar energy, you’re not only reducing your carbon footprint but also making a wise investment for the future. Remember, regular maintenance and monitoring of your solar panel system are essential to ensure it continues to operate efficiently and effectively for years to come. Enjoy the benefits of clean energy and the savings on your electricity bills as you contribute to a more sustainable future.


Leave a Reply