Adding a lean-to structure for storage, a covered patio, or a workshop extension? Learning How To Build A Shed Roof Off A House can transform unused space into something practical and valuable.
This guide walks you through planning, framing, waterproofing, and finishing—so your new shed roof is structurally sound, code-compliant, and weather-resistant.
How To Build A Shed Roof Off A House Safely and Correctly
Before picking up tools, understand that attaching a roof to an existing house affects structure, drainage, and waterproofing. Proper technique prevents leaks and structural damage.
Read too: Is It Reasonable to Ask the Seller to Replace the Roof?
A shed roof (also called a lean-to roof) is a single-slope roof attached to a taller wall. You can learn more about roof structures generally at Wikipedia.
Do You Need a Permit to Build a Shed Roof Off a House?
One of the most common questions homeowners ask:
Is a building permit required?
In most U.S. municipalities, yes—if the roof is attached to your home.
Permit requirements typically depend on:
- Size (square footage)
- Structural attachment
- Electrical additions
- Local zoning laws
Check with your city’s building department before starting. Failing to obtain permits can create resale issues later.
Step 1: Plan the Roof Pitch and Size
What Is the Best Pitch for a Shed Roof?
Most shed roofs use a pitch between:
- 2:12 (minimum for metal roofing)
- 4:12 (ideal for shingles)
Pitch means the roof rises 2–4 inches for every 12 inches horizontally.
Why Pitch Matters
- Prevents water pooling
- Reduces snow load risk
- Improves drainage
According to building standards, asphalt shingles typically require at least a 2:12 slope.
Step 2: Choose the Right Materials
Framing Materials
- Pressure-treated ledger board (2×8 or 2×10)
- Rafters (2×6 or 2×8 depending on span)
- Galvanized lag bolts (½ inch diameter recommended)
Roofing Materials
- Asphalt shingles
- Metal roofing panels
- Underlayment membrane
- Flashing
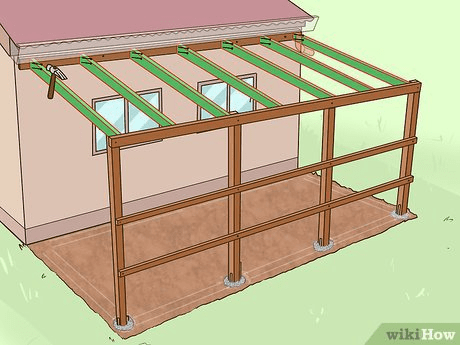
Step 3: Install the Ledger Board Properly
The ledger board supports the top end of your rafters.
How To Attach a Ledger Board to a House
- Locate wall studs using a stud finder.
- Remove siding where the ledger will sit.
- Install flashing behind the ledger location.
- Secure ledger using ½-inch lag bolts every 16 inches.
Lag bolts must penetrate at least 2 inches into structural framing, not just sheathing.
Important: Never attach a ledger to brick veneer or siding alone.
Step 4: Calculate and Cut Rafters
How Far Apart Should Rafters Be?
Standard spacing:
- 16 inches on center
- 24 inches for lighter roofing materials
Example Calculation
If your shed roof extends 10 feet from the house:
- Use 2×8 rafters for stronger load support.
- Cut birdsmouth notch for proper wall plate seating.
Measure twice. A ¼-inch misalignment can cause uneven rooflines.
Step 5: Install Rafters
- Attach rafter hangers to ledger board.
- Set rafters into hangers.
- Secure with structural screws.
- Attach lower ends to outer beam or wall plate.
Check level after every third rafter to ensure slope consistency.
Step 6: Install Sheathing
Use ½-inch exterior-grade plywood or OSB.
- Nail every 6 inches along edges
- Nail every 12 inches in field
Leave ⅛-inch expansion gap between sheets.
Step 7: Install Underlayment and Flashing
Waterproofing is critical.
Underlayment
Roll roofing felt horizontally from bottom upward.
Overlap seams by at least 4 inches.
Flashing (Most Important Step)
Improper flashing causes leaks.
Install:
- Step flashing along house wall
- Counter flashing embedded into siding
- Drip edge along roof edge
Ensure flashing overlaps properly to direct water away from house.
Step 8: Install Roofing Material
Asphalt Shingles
- Install starter strip.
- Lay shingles from bottom upward.
- Stagger seams for durability.
Metal Roofing
- Install panels vertically.
- Overlap by at least one rib.
- Use rubber washer screws.
Structural Considerations
Snow Load
If you live in northern states, design for snow load.
- 30–50 pounds per square foot is common in snowy regions.
- Consult local building code for specific requirements.
Drainage
Install gutters if roof length exceeds 8 feet.
This prevents:
- Soil erosion
- Foundation damage
- Water pooling
Pros and Cons of a Shed Roof Off a House
Advantages
- Simple design
- Cost-effective
- Easy DIY build
- Great for patios or storage
Disadvantages
- Limited attic space
- Requires careful flashing
- May impact natural light
Common Mistakes to Avoid
- Attaching ledger to siding only
- Skipping flashing
- Using undersized rafters
- Ignoring permit requirements
- Incorrect roof pitch
Avoiding these errors prevents expensive repairs later.
Estimated Cost Breakdown
| Item | Estimated Cost |
|---|---|
| Lumber | $400–$900 |
| Roofing materials | $300–$800 |
| Flashing & hardware | $100–$250 |
| Permit | $50–$200 |
| Total DIY Range | $850–$2,000 |
Costs vary by region and material choice.
FAQ: How To Build A Shed Roof Off A House
1. What is the minimum slope for a shed roof?
Most roofing materials require at least 2:12 slope. Check manufacturer guidelines.
2. Can I attach a shed roof directly to brick?
Not safely without structural framing. Ledger boards must attach to load-bearing framing.
3. Do I need a structural engineer?
For small residential projects, usually no—but consult local building codes.
4. How far can a 2×6 rafter span?
Typically 9–10 feet, depending on load and spacing.
5. What is the best roofing material for a shed roof?
Metal roofing performs well at lower slopes; asphalt shingles are cost-effective for moderate pitches.
6. How long does it take to build?
For experienced DIYers: 2–4 days.
Maintenance Tips
- Inspect flashing annually
- Clean gutters twice per year
- Replace damaged shingles immediately
- Check ledger bolts every 2–3 years
Routine inspection prevents leaks and structural deterioration.
Conclusion
Learning How To Build A Shed Roof Off A House allows you to expand usable space while increasing property value. With proper planning, correct ledger attachment, solid framing, and meticulous flashing, you can create a durable and weather-resistant addition.
Take your time, follow building codes, and focus on waterproofing. If this guide helped you plan your project, consider sharing it on social media to help other homeowners build smarter and safer.


Leave a Reply