How to Replace Clay Roof Tiles? Replacing clay roof tiles can seem like a daunting task, but with the right tools and a bit of know-how, it’s a manageable project for many homeowners. Whether you’re dealing with a few broken tiles or planning a more extensive repair, this guide will walk you through the process step-by-step. By the end, you’ll have the confidence to tackle this job yourself or to understand what a professional roofer will do.
Understanding Clay Roof Tiles
Clay roof tiles are popular for their durability, longevity, and classic aesthetic. These tiles are known to last over 100 years if properly maintained. However, they can still crack or break due to severe weather, falling branches, or accidental impacts. Before we dive into the replacement process, it’s important to understand the benefits of clay roof tiles:
- Durability: Resistant to weather, fire, and insects.
- Energy Efficiency: Natural thermal insulation properties help regulate indoor temperatures.
- Aesthetic Appeal: Available in various styles and colors, enhancing the visual appeal of your home.
- Eco-Friendly: Made from natural materials and fully recyclable.
Read too: How To Replace A Mobile Home Roof: Step-by-Step Guide for Homeowners
Preparation: What You’ll Need
Before you start replacing clay roof tiles, gather the necessary tools and materials. Here’s a checklist:
- Replacement clay tiles (make sure they match the existing ones in color and shape)
- Pry bar or flat crowbar
- Hammer
- Nails or tile clips
- Ladder
- Safety harness
- Work gloves
- Protective eyewear
- Mortar or adhesive (if necessary)
Safety First
Working on a roof can be dangerous, so take these precautions:
- Check the Weather: Choose a dry day with no high winds.
- Use Safety Gear: Wear a safety harness and secure it to a stable structure.
- Ladder Safety: Ensure your ladder is stable and on a flat surface. Have someone hold the ladder for extra stability.
- Protective Wear: Gloves and eyewear will protect you from sharp edges and debris.
How To Replace Clay Roof Tiles
Step 1: Inspect the Roof
Before replacing any tiles, inspect the entire roof to identify all damaged tiles. This will help you determine how many replacement tiles you need.
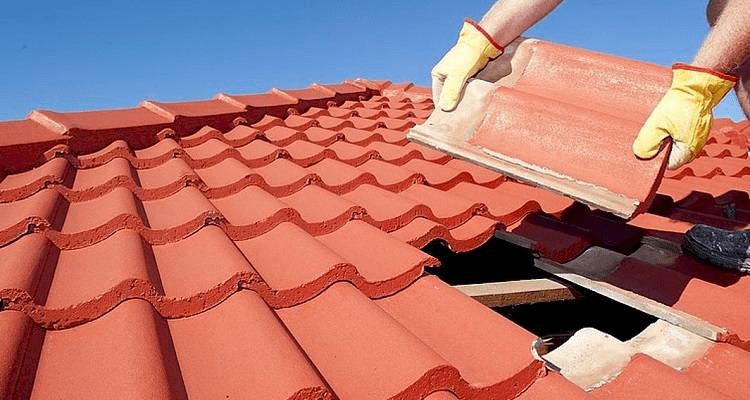
Step 2: Remove the Damaged Tiles
Carefully remove the damaged tiles using a pry bar or flat crowbar. Here’s how:
- Position the Pry Bar: Insert the pry bar under the tile above the damaged one. Lift gently to access the nails or clips holding the broken tile.
- Remove Nails or Clips: Use the hammer to remove nails or disengage the clips. If mortar is used, carefully chip it away.
- Lift the Tile: Once the fasteners are removed, lift the damaged tile out of place. Be careful not to damage adjacent tiles.
Step 3: Prepare the Area
Before installing the new tile, ensure the area is clean and free of debris. If the underlayment (the protective layer beneath the tiles) is damaged, replace it as well.
Step 4: Install the New Tile
Place the new tile in the same position as the old one, ensuring it aligns properly with adjacent tiles. Secure it using nails, clips, or adhesive, depending on the original installation method.
- Align the Tile: Make sure the new tile sits flush with the surrounding tiles.
- Secure the Tile: Nail or clip the tile in place. If using mortar, apply a small amount to the underside of the tile before setting it in place.
- Check for Stability: Ensure the tile is secure and does not move.
Step 5: Inspect the Roof
Once all damaged tiles are replaced, inspect the entire roof again to ensure all tiles are secure and properly aligned. This final check can prevent leaks and ensure the longevity of your roof.
Maintenance Tips
Regular maintenance can extend the life of your clay roof tiles:
- Regular Inspections: Check your roof at least twice a year and after major storms.
- Clean Debris: Remove leaves, branches, and other debris that can trap moisture and cause damage.
- Gutter Maintenance: Ensure gutters and downspouts are clear to prevent water buildup.
- Prompt Repairs: Address small issues immediately to prevent bigger problems.
Benefits of DIY Tile Replacement
Replacing clay roof tiles yourself can save money and give you a sense of accomplishment. Here are some benefits:
- Cost Savings: Avoid labor costs by doing the work yourself.
- Immediate Action: Address problems as soon as you notice them, preventing further damage.
- Skill Development: Learn valuable home repair skills that can be applied to other projects.
When to Call a Professional
While DIY tile replacement is feasible for small repairs, some situations require professional expertise:
- Extensive Damage: If multiple tiles are damaged or there are underlying structural issues.
- Complex Roof Designs: Roofs with steep pitches or intricate designs may require specialized skills.
- Safety Concerns: If you’re uncomfortable working at heights or lack the necessary safety equipment.
Conclusion
Knowing how to replace clay roof tiles is a valuable skill for any homeowner. It empowers you to maintain the integrity and beauty of your roof while saving on repair costs. By following the steps outlined in this guide, you can confidently tackle minor tile replacements and ensure your roof remains in excellent condition for years to come.


Leave a Reply