How to Install EPDM Roof? EPDM (Ethylene Propylene Diene Monomer) is one of the most popular roofing materials for flat or low-slope roofs, thanks to its durability, flexibility, and resistance to extreme weather conditions. If you’re considering installing an EPDM roof on your home or commercial property, understanding the process is essential to achieving a high-quality, long-lasting result. In this guide, we’ll walk you through how to install EPDM roof systems, providing detailed instructions and tips to ensure a successful installation.
Why Choose EPDM Roofing?
Before diving into the installation process, it’s worth understanding why EPDM roofing is such a popular choice. EPDM roofs are made from a synthetic rubber membrane that offers several key advantages:
- Durability: EPDM is highly resistant to UV rays, ozone, and extreme temperatures, making it a long-lasting roofing material. It can last up to 50 years with proper maintenance.
- Flexibility: The material remains flexible even in cold temperatures, allowing it to withstand freeze-thaw cycles without cracking or splitting.
- Cost-Effective: EPDM is relatively affordable compared to other roofing materials, and its ease of installation can reduce labor costs.
- Eco-Friendly: EPDM is often made from recycled materials, and it can be recycled at the end of its lifespan.
Read too: How To Replace Roof Shingles That Blew Off: A Comprehensive Guide
Now that we’ve covered the benefits, let’s move on to the step-by-step guide on how to install EPDM roof systems.
How To Install EPDM Roof: A Step-by-Step Guide
1. Preparation and Inspection
The first step in installing an EPDM roof is to prepare the surface and inspect the roof deck for any damage. A solid foundation is crucial for a successful installation.
- Clean the Roof Surface: Start by removing any debris, dirt, or old roofing material from the roof deck. The surface should be smooth and clean to ensure the EPDM membrane adheres properly.
- Inspect the Roof Deck: Check for any signs of damage, such as rot, cracks, or water damage. Repair any issues before proceeding with the installation. If the roof deck is in poor condition, it may need to be replaced or reinforced.
- Measure the Roof Area: Measure the roof to determine the amount of EPDM membrane you’ll need. Be sure to account for any overlapping and additional material needed for seams and edges.
2. Gather the Necessary Tools and Materials
Before you begin the installation, gather all the tools and materials you’ll need. Having everything on hand will make the process more efficient.
- EPDM Membrane: Purchase a high-quality EPDM membrane that fits your roof’s size and requirements. The membrane usually comes in large rolls.
- Adhesive: You’ll need a compatible adhesive to bond the EPDM membrane to the roof deck. There are two main types of adhesive: water-based and solvent-based. Choose the one that suits your project.
- Seam Tape and Primer: To seal the seams between membrane sheets, you’ll need seam tape and primer.
- Rollers and Brushes: These are essential for applying adhesive and smoothing out the membrane.
- Utility Knife: A sharp utility knife is needed for cutting the membrane to size.
- Protective Gear: Gloves, safety glasses, and knee pads are recommended for safety and comfort during installation.
3. Installing the EPDM Membrane
With the roof deck prepared and materials ready, you can begin the installation process. Follow these steps to ensure a smooth and secure application of the EPDM membrane.
A. Lay Out the EPDM Membrane
- Unroll the Membrane: Start by unrolling the EPDM membrane over the roof deck. Position it carefully, allowing it to overhang the edges slightly. Let the membrane rest for about 30 minutes to relax and settle, which helps prevent wrinkles during installation.
- Cut to Size: Use a utility knife to trim the membrane to fit the roof’s dimensions. Make sure to leave enough material for seams and edges.
B. Apply the Adhesive
- Fold Back the Membrane: Fold back half of the membrane to expose the roof deck. This allows you to apply adhesive without disturbing the membrane’s position.
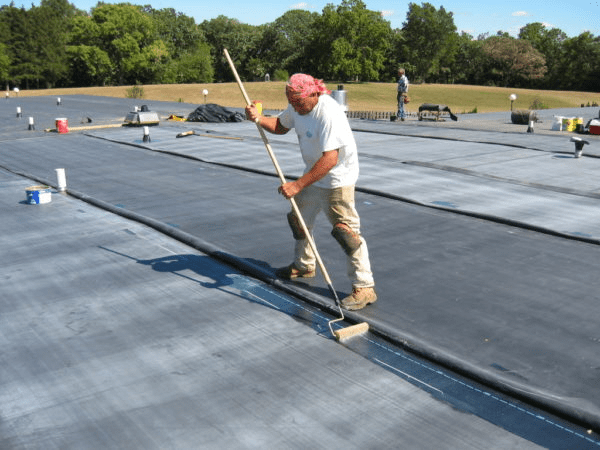
- Apply Adhesive: Using a roller or brush, apply the adhesive to the roof deck and the back of the membrane. Work in small sections to prevent the adhesive from drying out before the membrane is laid down.
- Lay Down the Membrane: Once the adhesive becomes tacky, carefully lay the membrane back onto the roof deck, smoothing it out with a roller to remove any air bubbles or wrinkles. Repeat the process for the other half of the membrane.
C. Seal the Seams
- Prime the Seams: Where two sections of the EPDM membrane overlap, apply primer to the seam area using a brush or roller. This helps the seam tape adhere properly.
- Apply Seam Tape: Place the seam tape along the edge of the bottom membrane, leaving the release paper on until you’re ready to seal the seam. Press down firmly to ensure a good bond.
- Seal the Seam: Peel off the release paper and press the top membrane onto the seam tape. Use a roller to apply pressure and ensure a watertight seal.
4. Finishing Touches
After the membrane is installed and seams are sealed, there are a few final steps to complete the installation.
A. Secure the Edges
- Trim the Edges: Use a utility knife to trim any excess membrane around the edges of the roof.
- Install Edge Flashing: To protect the edges and create a clean finish, install edge flashing or termination bars. This step also helps prevent wind uplift.
B. Install Roof Drains and Vents
- Cut Openings: If your roof has drains, vents, or other penetrations, carefully cut openings in the EPDM membrane.
- Install Flashing: Apply flashing around these areas to ensure a watertight seal. Use seam tape and adhesive to secure the flashing in place.
C. Final Inspection
- Check for Wrinkles and Bubbles: Inspect the entire roof for any wrinkles, air bubbles, or loose edges. These can compromise the integrity of the roof and should be addressed immediately.
- Clean Up: Once the installation is complete, clean up any remaining debris and tools. Dispose of any unused adhesive and materials according to local regulations.
5. Maintenance Tips for EPDM Roofing
Proper maintenance is key to extending the life of your EPDM roof. Here are some tips to keep your roof in top condition:
- Regular Inspections: Conduct regular inspections, especially after severe weather, to check for any signs of damage or wear.
- Clean the Roof: Keep the roof clean by removing debris, dirt, and leaves that can trap moisture and cause damage over time.
- Address Issues Promptly: If you notice any damage, such as tears or punctures, address them immediately to prevent leaks and further deterioration.
- Professional Maintenance: Consider scheduling professional maintenance every few years to ensure your EPDM roof remains in optimal condition.
Common Mistakes to Avoid When Installing EPDM Roofing
Installing an EPDM roof can be straightforward, but there are some common mistakes that can compromise the quality and longevity of the roof. Here’s how to avoid them:
1. Inadequate Surface Preparation
Failing to properly clean and prepare the roof deck can lead to poor adhesion and premature failure of the membrane. Always ensure the surface is clean, dry, and smooth before applying the EPDM membrane.
2. Incorrect Adhesive Application
Using too much or too little adhesive can cause issues with the membrane’s adhesion. Follow the manufacturer’s instructions for the correct amount of adhesive, and apply it evenly to both the roof deck and membrane.
3. Poor Seam Sealing
Improperly sealed seams are one of the most common causes of leaks in EPDM roofs. Make sure to use primer and seam tape correctly, and apply pressure with a roller to create a strong, watertight seal.
4. Skipping the Relaxation Period
Not allowing the EPDM membrane to relax before installation can result in wrinkles and bubbles. Always give the membrane time to settle before applying adhesive and securing it in place.
Conclusion
Knowing how to install EPDM roof systems properly is essential for achieving a durable, long-lasting roof. By following the step-by-step guide outlined above, you can ensure a successful installation that protects your property for decades to come. Remember, the key to a quality EPDM roof lies in careful preparation, correct adhesive application, and proper sealing of seams and edges. With these tips in mind, you’re well on your way to enjoying the many benefits of an EPDM roof.


Leave a Reply