Shingling a hip roof can be a challenging task, especially if you’re new to roofing or home improvement. However, with the right tools, materials, and a clear understanding of the process, it’s possible to achieve professional-looking results. This comprehensive guide will walk you through how to shingle a hip roof, covering everything from preparation to the final touches. Whether you’re a seasoned DIYer or a beginner, this article will equip you with the knowledge needed to complete your project successfully.
Understanding the Basics: What is a Hip Roof?
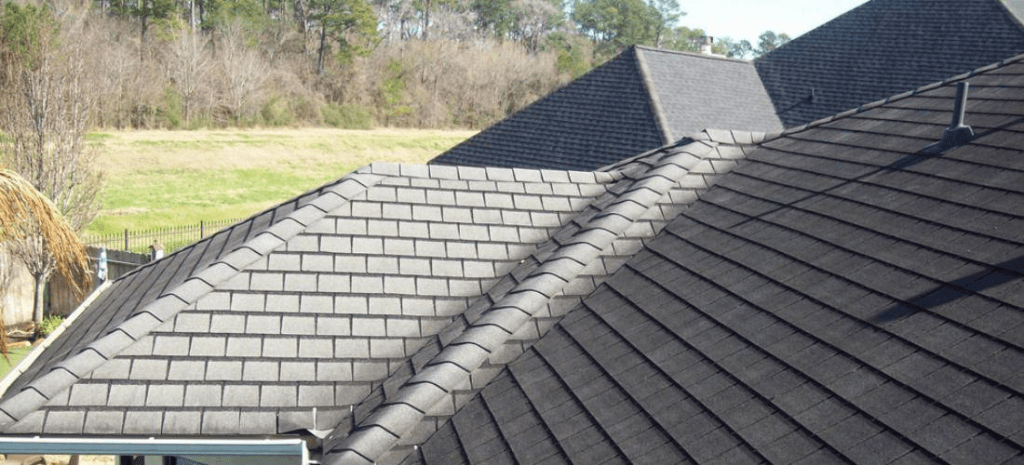
Before diving into the step-by-step guide on how to shingle a hip roof, it’s important to understand what a hip roof is and how it differs from other roof types. A hip roof is a type of roof where all sides slope downwards to the walls, usually with a gentle slope. It typically has four sides, with the “hips” being the diagonal lines formed by the intersection of the roof’s slopes. These hips give the roof its distinctive appearance and contribute to its stability and wind resistance.
Hip roofs are popular in both residential and commercial buildings due to their durability and aesthetic appeal. However, their unique structure requires careful planning and precise execution when it comes to shingling.
Read too: How To Replace Roof Shingles That Blew Off: A Comprehensive Guide
Preparing to Shingle a Hip Roof: Tools and Materials
Before you start shingling your hip roof, it’s crucial to gather all the necessary tools and materials. Proper preparation will save you time and ensure the job is done correctly.
Tools You’ll Need:
- Roofing nails
- Hammer or pneumatic nail gun
- Utility knife
- Chalk line
- Measuring tape
- Ladder
- Roofing shovel or pry bar (for removing old shingles)
- Safety gear (gloves, safety glasses, harness)
Materials You’ll Need:
- Asphalt shingles (make sure to have enough for the entire roof, including extra for cuts and mistakes)
- Roofing felt or underlayment
- Hip and ridge shingles
- Starter strip shingles
- Roof sealant or roofing cement
- Drip edge
Once you have all your tools and materials, make sure your work area is safe. Check the weather forecast to ensure you’ll have clear skies during your project. Working on a roof can be dangerous, so safety should always be your top priority.
How to Shingle a Hip Roof: Step-by-Step Instructions
1. Remove Old Shingles and Inspect the Roof Deck
The first step in learning how to shingle a hip roof is to remove any old shingles and inspect the roof deck. Use a roofing shovel or pry bar to carefully lift and remove the old shingles, nails, and underlayment. It’s important to ensure that the roof deck is in good condition before installing new shingles. Look for any signs of rot, damage, or weak spots. If you find any issues, repair them before proceeding.
2. Install the Drip Edge
Next, install the drip edge along the eaves and rake edges of the roof. The drip edge is a metal flashing that helps direct water away from the roof and into the gutters. Start by nailing the drip edge to the eaves, ensuring it hangs over the edge of the roof slightly. Then, install the drip edge along the rake edges. This step is crucial for preventing water damage to your roof’s structure.
3. Lay Down the Underlayment
After installing the drip edge, the next step is to lay down the underlayment. The underlayment, often made of roofing felt, provides an additional layer of protection against water infiltration. Start at the bottom edge of the roof and work your way up, overlapping each row by about 4 inches. Use roofing nails to secure the underlayment to the roof deck, ensuring it’s flat and free of wrinkles.
For added protection, especially in areas prone to ice dams or heavy rain, consider using a self-adhesive waterproof membrane on the lower sections of the roof and in valleys.
4. Install the Starter Strip Shingles
Before installing the main field shingles, you need to install starter strip shingles along the eaves. The starter strip provides a secure foundation for the first row of shingles and helps prevent wind damage. Cut the shingles to the appropriate size and lay them along the eaves, ensuring they extend over the drip edge by about half an inch. Nail the starter shingles in place, spacing the nails evenly along the strip.
5. Begin Shingling the Roof
Now, it’s time to start installing the asphalt shingles. Begin at the bottom edge of the roof and work your way up, row by row. Lay the first row of shingles over the starter strip, making sure the tabs of the shingles are aligned with the edges of the starter shingles. Use roofing nails to secure each shingle, placing the nails just below the adhesive strip to prevent wind uplift.
When installing shingles on a hip roof, you need to pay special attention to the hips. As you approach the hip lines, cut the shingles so they fit snugly against the hip. This ensures a clean, finished look and prevents water from seeping through the gaps.
6. Shingle the Hip Lines
Shingling the hips is a crucial part of learning how to shingle a hip roof. For this step, you’ll use hip and ridge shingles, which are specifically designed for these areas. Start at the bottom of the hip and work your way up to the ridge, overlapping each shingle as you go. Nail each shingle in place, making sure the nails are positioned so they will be covered by the next shingle in the row.
It’s important to maintain a consistent overlap and alignment as you work up the hip. This not only ensures a watertight seal but also gives the roof a uniform appearance.
7. Install the Ridge Cap Shingles
Once the hips are shingled, the final step is to install the ridge cap shingles along the roof’s ridge. These shingles cover the ridge line where the two sides of the roof meet and provide the finishing touch to your roofing project.
Start at one end of the ridge and work your way across, overlapping each shingle as you go. Use roofing nails to secure the ridge cap shingles, placing the nails on each side of the ridge to ensure they’re firmly attached. Be sure to cover the nail heads with roof sealant or cement to prevent leaks.
8. Final Inspection and Clean-Up
After installing the ridge cap shingles, conduct a final inspection of the roof. Check for any loose shingles, exposed nails, or areas where the shingles aren’t lying flat. Make any necessary adjustments to ensure your roof is properly sealed and protected against the elements.
Once you’re satisfied with the installation, clean up the work area. Remove any debris, old shingles, and unused materials from the roof and surrounding area. Proper disposal of old shingles is important, so check your local regulations for guidelines on how to dispose of roofing materials.
Common Mistakes to Avoid When Shingling a Hip Roof
Learning how to shingle a hip roof can be challenging, especially if you’re doing it for the first time. To help you avoid common pitfalls, here are some mistakes to watch out for:
1. Incorrect Nail Placement
Improper nail placement is a common mistake that can compromise the integrity of your roof. Nails should be placed just below the adhesive strip on the shingles and driven in at the correct depth. If nails are placed too high or too low, the shingles may not be properly secured, leading to wind damage or leaks.
2. Inadequate Overlap
Ensuring proper overlap between shingles is critical for preventing water infiltration. Each row of shingles should overlap the row below by at least 4 inches. If the overlap is too small, water can seep through the gaps and cause damage to the roof deck.
3. Skipping the Underlayment
Some DIYers may be tempted to skip the underlayment to save time or money, but this is a mistake. The underlayment provides an essential barrier against moisture and should always be installed before the shingles.
4. Ignoring Hip and Ridge Shingles
Using standard shingles on hips and ridges instead of specialized hip and ridge shingles can result in a less durable roof. Hip and ridge shingles are designed to fit these areas precisely and provide better protection against wind and water.
Conclusion
Shingling a hip roof is a complex but rewarding project that requires careful planning, attention to detail, and the right tools. By following this step-by-step guide on how to shingle a hip roof, you’ll be well on your way to completing a durable and attractive roofing job.
Remember, safety is paramount when working on a roof, so take the necessary precautions to protect yourself and others. If you’re ever unsure about a step in the process, don’t hesitate to consult with a professional roofer for guidance.
With the knowledge gained from this guide, you can confidently take on your hip roof shingling project and enjoy the satisfaction of a job well done.


Leave a Reply