Metal roofing has become a popular choice for homeowners and contractors due to its durability, longevity, and energy efficiency. However, one of the most crucial aspects of ensuring that your metal roof lasts for decades is knowing where to screw metal roof panels correctly. Proper screw placement not only ensures the roof is secure but also prevents potential leaks, wind damage, and premature wear.
This guide will walk you through everything you need to know about the correct placement of screws on a metal roof. We will discuss the tools, materials, and techniques required to get the job done right. Whether you’re a professional roofer or a DIY enthusiast, understanding where to screw metal roof panels can save you time, money, and effort.
Read too: How To Replace Roof Shingles That Blew Off: A Comprehensive Guide
Why Proper Screw Placement is Essential for Metal Roofing
Before diving into the specific details of where to screw metal roof panels, it’s important to understand why correct screw placement matters.
1. Preventing Leaks
One of the main purposes of a metal roof is to keep water out of your home. Improper screw placement can lead to water penetration, especially if screws are placed on the wrong part of the panel or not adequately tightened. Leaks can cause extensive damage to the structure, insulation, and interiors of your home.
2. Wind Resistance
Correctly installed screws help secure the metal panels to the roof deck, making the roof more resistant to high winds and extreme weather. Incorrect placement can leave your roof vulnerable to wind uplift, potentially leading to significant damage.
3. Avoiding Panel Distortion
Overdriving or underdriving screws can distort the metal panels, reducing the aesthetic appeal and potentially compromising the roof’s performance. Proper screw placement helps distribute the pressure evenly across the roof.
Tools and Materials Needed for Installing Metal Roof Screws
Before getting started on your metal roof installation, gather the necessary tools and materials:
- Metal roofing panels
- Roofing screws (with neoprene washers)
- Cordless drill or impact driver
- Measuring tape
- Chalk line
- Safety equipment (gloves, safety glasses, non-slip boots, harness)
Roofing Screws: What You Need to Know
The most common screws used for metal roofing are self-tapping screws with a rubber or neoprene washer attached. The washer creates a watertight seal when the screw is tightened, preventing water from seeping into the roof deck. Ensure you use screws designed for metal roofing, as they are specifically built to withstand the demands of a metal roof.
Where to Screw Metal Roof Panels: Step-by-Step Guide
Now that you have the necessary tools and materials, let’s get into the specifics of where to screw metal roof panels for a secure and leak-free installation.
Step 1: Plan Your Screw Layout
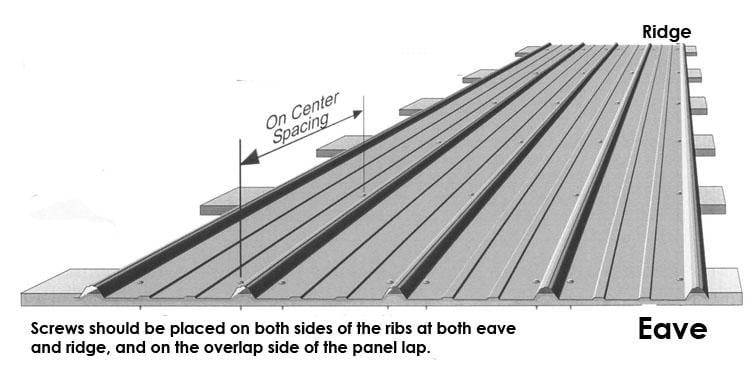
Before you start installing the screws, plan the layout carefully. Most metal roofing manufacturers will provide specific instructions on the placement of screws for their products, but the general rule of thumb is to place screws in the flat areas of the metal panels rather than on the ridges. This prevents water from pooling around the screws and reduces the likelihood of leaks.
Step 2: Start at the Bottom Edge of the Roof
Begin installing the metal roof panels at the bottom edge of the roof, typically starting from the side opposite the prevailing wind direction. Align the first panel with the eave, making sure it hangs slightly over the edge to allow water runoff.
Step 3: Fasten the Panel
Using your cordless drill or impact driver, begin securing the first metal panel to the roof deck. The first screws should be placed about 1 inch from the panel edge at the bottom (closest to the eave) in the flat section. Avoid placing screws in the raised ridges as this can lead to improper sealing and leaks.
Step 4: Screw Spacing Guidelines
Proper spacing is crucial to ensure that the panels are securely fastened without overdriving the screws. Follow these general guidelines for where to screw metal roof panels:
- Horizontal Spacing: Place screws approximately every 12 to 24 inches along the width of the panel, depending on the manufacturer’s recommendation. Closer spacing may be needed for areas prone to high winds.
- Vertical Spacing: Along the vertical sides of the panel (the seams where the panels overlap), screws should be spaced about every 18 to 24 inches. Secure the panels in a straight line using a chalk line as a guide to ensure consistent placement.
Step 5: Secure Overlapping Panels
When installing the next panel, ensure it overlaps the edge of the previous panel by at least one ridge. This overlap is essential for preventing water intrusion. Place screws through the overlapping section at the top and bottom of the panels to hold them securely together. Make sure you don’t leave gaps between panels, as these can lead to leaks.
Step 6: Tightening the Screws
One of the common mistakes when installing metal roofing is either over-tightening or under-tightening the screws. Here’s how to avoid both:
- Over-Tightening: When screws are overdriven, the neoprene washer becomes squished, and its ability to create a watertight seal is compromised. This can allow water to penetrate the roof deck.
- Under-Tightening: When screws are not tightened enough, the panel remains loose, which can lead to water seepage and wind uplift.
To avoid these issues, tighten the screws until the neoprene washer is snug against the metal panel without flattening or distorting it.
Step 7: Repeat the Process
Continue installing metal panels across the roof, following the same process. Be sure to check that each panel is properly aligned with the previous one, and use a chalk line to keep your screw rows straight.
Step 8: Install Screws Around Roof Penetrations
If you have chimneys, vents, or skylights on your roof, you’ll need to cut the metal panels to fit around these penetrations. Once the panels are cut, use additional screws and appropriate flashing to secure the metal around these areas. Place screws along the flat sections around the penetration to ensure a watertight seal.
Step 9: Final Inspection
Once all panels are installed, inspect your work for any missed screws, gaps, or inconsistencies in screw placement. Make sure the screws are evenly spaced and properly tightened to ensure the roof’s long-term performance.
Where to Screw Metal Roof: Tips for a Secure Installation
To ensure a successful and secure metal roof installation, here are some additional tips:
1. Follow Manufacturer’s Instructions
Different metal roofing systems may have varying requirements for screw placement and spacing. Always consult the manufacturer’s installation guide to ensure you follow their specific recommendations.
2. Use the Right Screw Length
Choosing the correct screw length is essential to ensure that the screws penetrate both the metal panel and the roof decking beneath. Typically, roofing screws range from 1 to 1.5 inches in length, but the exact length you need will depend on the thickness of the metal panels and the type of decking material used.
3. Ensure Proper Overlap Between Panels
Each panel should overlap the next by at least one rib to ensure proper water shedding. Failure to maintain proper overlap can result in water intrusion, especially in heavy rainfall.
4. Use Chalk Lines for Alignment
To keep the rows of screws aligned, use a chalk line across the roof. This not only improves the appearance of the roof but also ensures that the screws are properly spaced and placed in the correct position on each panel.
Common Mistakes to Avoid When Screwing Metal Roof Panels
Avoiding these common mistakes will help ensure your metal roof installation is secure and long-lasting:
- Screwing in the Ridges: Never place screws in the raised ridges of metal panels. Always fasten them in the flat sections to ensure a watertight seal.
- Inconsistent Screw Spacing: Unevenly spaced screws can leave parts of the metal panel loose and vulnerable to wind uplift.
- Overdriving Screws: Over-tightening screws can damage the neoprene washer, leading to potential leaks. Tighten screws until the washer is snug, but not flattened.
Conclusion: Ensuring a Strong Metal Roof with Proper Screw Placement
Understanding where to screw metal roof panels is a critical aspect of installing a durable and leak-resistant roof. By following the step-by-step guide outlined in this article, you can ensure that your metal roof is properly secured, enhancing its longevity and resistance to harsh weather conditions. Remember to always use the correct tools, screws, and techniques to achieve a professional-quality installation.
With the right preparation and attention to detail, your metal roof will provide years of reliable protection for your home.


Leave a Reply