Adding a roof to the rear of your house is more than just a simple home improvement—it’s a smart way to expand your living space, improve comfort, and increase property value. Whether you want to create a cozy outdoor seating area, a weather-protected deck, or a covered patio for entertaining, this project requires careful planning, design choices, and execution.
In this comprehensive guide, we’ll walk you through how to add a roof off the rear of your house, from planning and permits to materials, structural options, and cost considerations. This guide is perfect for homeowners seeking to do it themselves or those hiring a contractor but wanting to stay informed.
Read too: How Long Do Standing Seam Metal Roofs Last? A Comprehensive Guide to Durability and Longevity
Why Consider Adding a Roof to the Rear of Your House?
Many homeowners love their backyards, but the open nature of these spaces often limits their usability due to sun, rain, or snow. By adding a roof over the rear of your house, you:
- Create year-round usability for your deck or patio
- Increase home resale value
- Improve energy efficiency by providing shade and reducing interior heat
- Add charm and character to your home exterior
This simple upgrade can completely transform your outdoor lifestyle.
Planning Phase: Start With Your Vision
Before diving into the nuts and bolts of how to add a roof off your rear of house, start with the basics:
1. Define the Purpose
Ask yourself:
- Will it be a space for outdoor dining or lounging?
- Do you want full coverage or partial shade?
- Should it be a permanent extension or seasonal?
2. Sketch the Area
Create a rough drawing of your backyard and the rear wall of your house. Measure the space where you want the roof to be installed. Take note of:
- Door and window placement
- Existing deck or patio dimensions
- Proximity to trees, fences, or neighboring structures
How To Add A Roof Off My Rear Of House — Step-by-Step Breakdown
This is where we dive into the details. Follow these essential steps to add a roof to the back of your home:
Step 1: Check Building Codes and Get Permits
Every city or municipality has building regulations. Visit your local building department or their website and:
- Learn what types of additions are allowed
- Determine if zoning laws affect your backyard
- Submit plans and apply for permits if required
Failing to get proper permits could result in fines or forced demolition later on.
Step 2: Choose the Roof Style
There are multiple roof styles to choose from:
- Gable Roof: A classic triangular roof that blends well with most house styles.
- Hip Roof: Slopes on all sides, offering better wind resistance.
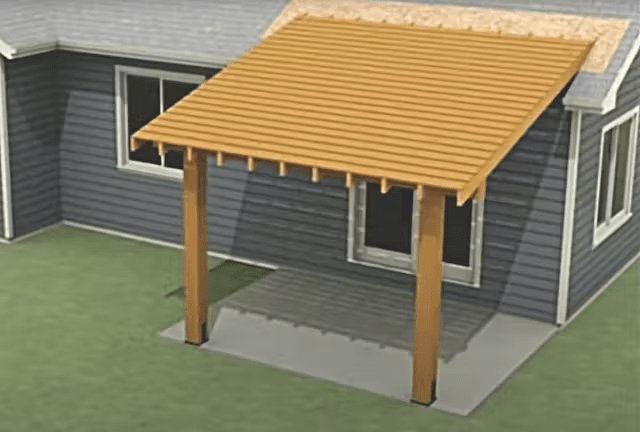
- Shed Roof: A single-sloped roof, ideal for modern aesthetics and easier drainage.
- Flat Roof: A minimalist option often used in contemporary homes.
Your roof style should match your home’s architecture and function.
Step 3: Select Your Materials
Your roofing materials will determine both aesthetics and durability. Common choices include:
- Asphalt shingles: Affordable and easy to match with existing house roofing
- Metal panels: Durable and sleek, often used in shed or modern designs
- Polycarbonate sheets: Great for letting in natural light
- Wood or composite materials: For pergola-style covers or rustic appeal
Also consider framing materials like treated lumber, cedar, or aluminum, depending on your design and climate.
Step 4: Design the Supporting Structure
The roof must be supported by a solid frame:
- Attach ledger boards to the house wall for structural connection
- Use concrete footings to support vertical posts
- Install horizontal beams and rafters to form the roof skeleton
A professional engineer or contractor can help ensure the load-bearing components are up to code and safe.
Step 5: Install Roofing
Once the frame is complete:
- Apply underlayment or weatherproof barriers
- Install your chosen roofing material
- Add gutters for water drainage
- Seal all joints and edges to prevent leaks
DIY vs. Hiring a Contractor: What’s Right for You?
Building a roof off the back of your house might look simple on paper, but the execution requires expertise. Consider these factors:
DIY Benefits
- Cost savings
- Custom control
- Personal satisfaction
DIY Challenges
- Requires tools and construction knowledge
- Time-consuming
- Risk of errors or injury
Hiring a Contractor
If you’re not experienced with roofing or structural carpentry, hiring a licensed contractor is a safer route. Professionals also navigate permits and building codes more efficiently.
Cost Considerations: Budgeting for the Project
Understanding the cost is a vital part of learning how to add a roof off your rear of house. Prices vary based on size, materials, and labor.
Typical Cost Breakdown:
| Item | Estimated Cost |
|---|---|
| Permits | $150 – $500 |
| Materials | $2,000 – $6,000 |
| Labor (if hiring) | $3,000 – $10,000 |
| Total (DIY) | $2,000 – $6,000 |
| Total (Contractor) | $5,000 – $15,000+ |
Unexpected expenses may include demolition, grading, or electrical work if you’re installing lights or fans.
Enhancing Functionality and Style
A roof extension is not just about coverage—it’s also an opportunity to elevate your outdoor area.
Consider Adding:
- Ceiling fans for air circulation
- Recessed lighting or string lights for ambiance
- Outdoor speakers for entertainment
- Skylights or clear panels for daylight
- Curtains or blinds for privacy and shade
These features make the space more comfortable and functional.
Mistakes to Avoid When Adding a Roof Off the Rear of Your House
Even seasoned DIYers can make errors. Here are common pitfalls:
- Skipping permits: Can lead to legal trouble
- Not matching roof pitch: Makes your addition look like an afterthought
- Choosing the wrong materials for climate: May deteriorate quickly
- Ignoring drainage needs: Can cause water damage
- Underestimating structural requirements: A safety risk
Work with a designer or contractor to avoid these issues.
Conclusion: Enjoying Your Covered Outdoor Living Area
Learning how to add a roof off your rear of house empowers you to extend your indoor comfort to the outdoors. Whether it’s sipping coffee on a rainy morning, hosting summer BBQs, or just relaxing in shade, a well-designed roof addition is one of the most rewarding improvements you can make to your home.
Start with a clear vision, follow local regulations, and choose the right design and materials to match your lifestyle. Whether you go the DIY route or hire a pro, the results will enhance your home for years to come.


Leave a Reply