Removing a center wall in your house can open up your living space, improve natural light flow, and modernize your home’s design. However, if the wall you’re removing is load-bearing, it’s essential to properly brace the roof before taking it down. Without the right support, you could compromise your home’s structural integrity and create dangerous conditions.
In this guide, we’ll explain how to brace roof to remove center wall in house step by step, covering safety tips, necessary tools, and techniques to ensure a successful project.
Read too: Hail Damage Roof Repair: Essential Guide to Restoring Your Home’s Protection
Why Roof Bracing Matters When Removing a Center Wall
Many center walls in houses are load-bearing, meaning they support the weight of the roof or upper floors. When such a wall is removed without proper bracing:
- Roof sagging can occur.
- Cracks may appear in walls or ceilings.
- Structural collapse is possible in extreme cases.
By bracing the roof before wall removal, you provide temporary support while you install permanent alternatives, such as beams or columns.
Understanding Load-Bearing Walls
Before you can brace your roof, you need to know whether the center wall is load-bearing. Signs that a wall is load-bearing include:
- It runs perpendicular to ceiling joists.
- There are structural beams directly above it.
- The wall aligns with beams or supports in the basement or crawl space.
If you’re unsure, always consult a structural engineer or experienced contractor before proceeding.
Tools and Materials Needed
To successfully follow the how to brace roof to remove center wall in house process, gather the following items:
- Adjustable steel support posts (also called lally columns or jack posts).
- 4×4 or 2×6 lumber for temporary beams.
- Sledgehammer and nails or structural screws.
- Circular saw for cutting lumber.
- Safety gear (gloves, helmet, goggles).
- Measuring tape and carpenter’s level.
How To Brace Roof To Remove Center Wall In House – Step-by-Step Instructions
Below is a detailed process to help you safely brace the roof while removing the center wall.
Step 1: Plan and Prepare the Area
Clear the area around the wall to be removed. Move furniture, remove decorations, and ensure you have clear access from floor to ceiling.
If the wall has electrical wiring, plumbing, or HVAC ducts, turn off utilities and have a professional relocate them before you start bracing.
Step 2: Determine the Roof Load Points
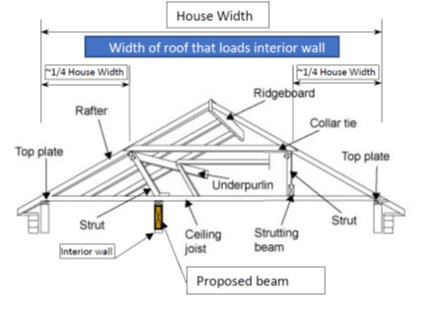
Find the exact location where your roof’s weight transfers down through the wall. This will help you position your temporary supports correctly.
Look in the attic for rafters or trusses directly above the wall. These are the areas you’ll be supporting during the removal process.
Step 3: Install Temporary Support Beams
Place temporary beams on both sides of the wall—about 2 to 3 feet away.
- Use 4×4 or doubled 2×6 lumber horizontally across the ceiling joists.
- Secure them with nails or screws to prevent movement.
This setup distributes the load to your temporary posts instead of the wall you’re removing.
Step 4: Set Up Adjustable Support Posts
Position steel jack posts under the temporary beams.
- Space posts about every 4 to 6 feet along the beam.
- Adjust the posts until they fit snugly against the beam without forcing upward pressure (to avoid damaging the ceiling).
Step 5: Double-Check Stability Before Wall Removal
Before you remove any part of the wall, inspect the bracing setup.
- Ensure beams are straight and level.
- Make sure posts are locked in place and on solid footing.
If the posts are on a wooden floor, place a thick piece of plywood underneath to spread the load.
Step 6: Remove the Wall Carefully
Start by removing drywall or plaster to expose the framing. Cut and remove wall studs one at a time, working from one end to the other.
Once the wall is gone, you can install a permanent beam (such as a laminated veneer lumber beam) supported by columns at each end.
Step 7: Remove Temporary Supports
After the permanent support beam is fully installed and inspected by a professional, you can safely remove the temporary roof bracing.
Safety Considerations
When following how to brace roof to remove center wall in house, safety should be your number one priority:
- Never remove a load-bearing wall without first consulting an engineer or licensed contractor.
- Use high-quality support materials rated for structural loads.
- Wear protective gear at all times.
- Avoid working alone; have someone assist in case of emergency.
Common Mistakes to Avoid
- Incorrect Post Placement – Posts must be directly under load points, not randomly spaced.
- Removing Wall Before Bracing – This can cause sudden structural failure.
- Using Weak Materials – Lightweight lumber can bow under load; always use strong beams.
- Skipping Professional Inspection – Even small errors in support placement can compromise safety.
Temporary Bracing vs. Permanent Support
It’s important to understand that temporary bracing is not a replacement for permanent structural support. The purpose of temporary bracing is to hold the roof in place while you work.
Permanent solutions include:
- Installing a load-rated beam with proper supports.
- Using engineered trusses.
- Adding vertical support columns.
The Role of a Structural Engineer
Even if you are skilled at DIY projects, a structural engineer’s guidance ensures your bracing plan meets safety codes. They can:
- Calculate load requirements.
- Recommend beam sizes and post spacing.
- Verify that your bracing is safe before you remove the wall.
Cost of Bracing and Removing a Center Wall
Costs vary depending on home size, wall length, and labor rates. On average:
- Temporary bracing materials: $200–$500.
- Steel jack posts: $50–$100 each.
- Professional labor: $50–$100/hour.
- Engineer consultation: $300–$800.
Final Thoughts
Learning how to brace roof to remove center wall in house is essential for anyone planning to open up their living space safely. While the process can be tackled by experienced DIYers, structural changes always carry risk. Proper bracing ensures that your roof stays supported while you remove the wall, preventing costly and dangerous damage.
If you plan this project carefully, use the right materials, and follow professional advice, you can transform your home into a more open, modern, and safe living space without compromising its structural integrity.


Leave a Reply