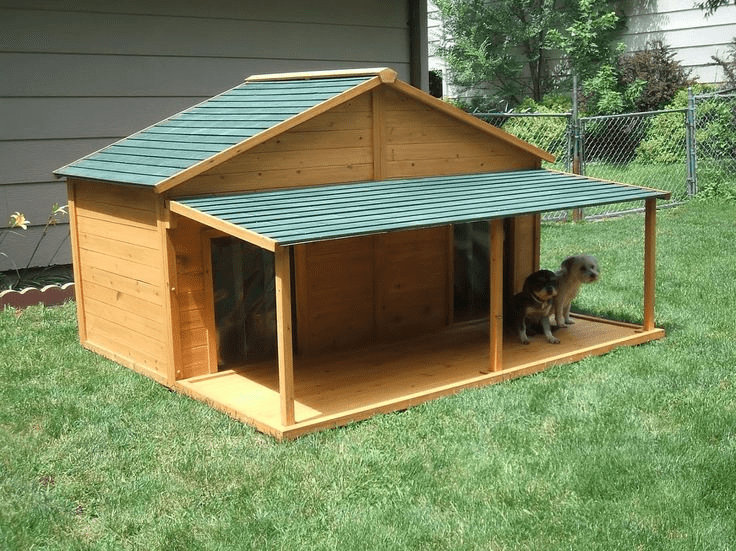
Building a dog house is a wonderful way to provide your furry friend with a safe, comfortable space outdoors. If you want a durable and attractive design, learning how to build a dog house with a gable roof is a smart choice. Gable roofs are practical because they shed rain and snow efficiently, offer better ventilation, and give your dog house a classic, charming look.
In this comprehensive guide, we’ll walk you through the process of building a dog house with a gable roof—from planning and materials to step-by-step construction and finishing touches. Whether you’re a seasoned DIY enthusiast or a first-timer, this article will help you create a sturdy and inviting shelter your dog will cherish.
Read too: Hail Damage Roof Repair: Essential Guide to Restoring Your Home’s Protection
Why Choose a Gable Roof for Your Dog House?
Before we dive into the construction steps, it’s worth understanding why a gable roof is ideal for dog houses:
- Effective Weather Protection: The sloped design allows rainwater and snow to slide off easily, preventing leaks and water damage.
- Improved Ventilation: The triangular shape creates extra space inside the roof for air circulation, helping to keep your dog cool in summer.
- Classic Aesthetic: Gable roofs add a traditional, attractive look that can complement your home’s exterior.
- Easy to Build: Compared to more complex roof styles, a gable roof is straightforward to construct with basic carpentry skills.
How To Build A Dog House With A Gable Roof: Planning and Preparation
Step 1: Measure Your Dog
Start by measuring your dog’s length, height, and width to determine the right size for the house. The dog house should be large enough for your pet to stand up, turn around, and lie down comfortably.
- Length: Add about 6 inches to your dog’s length.
- Height: The entrance should be about 75% of your dog’s height.
- Width: Allow enough space for your dog to move easily inside.
Step 2: Gather Materials and Tools
Here’s a list of typical materials you’ll need:
- Plywood sheets (for walls, floor, and roof)
- 2×4 lumber (for framing)
- Exterior-grade screws or nails
- Wood glue
- Asphalt shingles or waterproof roofing material
- Paint or weatherproof sealant
- Hinges (optional, for a removable roof)
- Sandpaper
- Insulation material (optional)
Tools required:
- Measuring tape
- Saw (circular or hand saw)
- Drill or hammer
- Screwdriver or drill bit
- Paintbrush
- Safety gear (gloves, goggles)
How To Build A Dog House With A Gable Roof: Step-by-Step Construction
Step 3: Build the Base Frame
Construct a rectangular base frame using 2×4 lumber. The frame provides a sturdy foundation and keeps the dog house off the ground to prevent moisture buildup.
- Cut two long 2x4s to the house’s length.
- Cut two shorter 2x4s for the width.
- Join the pieces with screws at the corners, forming a rectangle.
- Attach plywood flooring to the frame securely.
Step 4: Construct the Walls
Cut plywood panels for the front, back, and sides of the dog house. The front panel should include a dog door cutout.
- Measure and mark the entrance hole, usually about 75% of your dog’s height.
- Use a jigsaw to cut the door opening.
- Attach all wall panels to the base frame with screws.
Step 5: Build the Gable Roof Frame
To create the gable roof:
- Cut four rafters from 2×4 lumber at an angle (usually 45 degrees) to form the triangular shape.
- Assemble two rafters into a triangle and repeat for the other side.
- Connect the two triangles with a ridge board running horizontally along the peak.
Step 6: Attach Roof Sheathing
Cover the rafters with plywood sheets cut to size. Secure them firmly with screws.
- Overhang the plywood slightly beyond the walls to help with water runoff.
- Sand rough edges to prevent splinters.
Step 7: Install Roofing Material
Apply roofing felt or tar paper for waterproofing, then cover with asphalt shingles or other waterproof roofing material. This step protects the dog house from rain and snow.
- Use roofing nails or adhesive to secure shingles.
- Make sure to cover the edges properly.
Step 8: Finishing Touches
- Paint or seal the exterior wood with weatherproof paint or sealant.
- Consider insulating the floor and walls for colder climates.
- Add trim around the door and edges for a polished look.
- Optionally, install a hinge on one side of the roof for easy cleaning access.
Tips for Building a Dog House With a Gable Roof
- Ventilation: Add vents near the roof peak or install a small window to improve airflow.
- Elevate the House: Use bricks or blocks under the base to keep the house off damp ground.
- Materials: Choose durable, non-toxic materials safe for pets.
- Weatherproofing: Regularly maintain paint and roofing to extend your dog house’s lifespan.
Common Questions About How To Build A Dog House With A Gable Roof
Can I Build a Dog House Without Special Carpentry Skills?
Absolutely! With basic tools and careful measurements, anyone can build a sturdy dog house. Follow step-by-step instructions and take your time.
What Size Should I Make the Dog House?
Make sure the dog house fits your pet comfortably, with room to move but not too large that it won’t retain warmth.
Is Insulation Necessary?
In colder climates, insulation can help keep your dog warm. Use foam boards, reflective insulation, or straw bedding for comfort.
Conclusion: Creating a Comfortable and Stylish Dog House
Knowing how to build a dog house with a gable roof allows you to create a durable, weather-resistant shelter that your dog will enjoy for years. The classic gable roof design not only protects your pet from the elements but also adds aesthetic appeal to your yard.
By planning carefully, gathering the right materials, and following each construction step, you’ll end up with a dog house that’s both functional and charming. Plus, the satisfaction of building something with your own hands is priceless!


Leave a Reply