A lean-to structure is one of the simplest and most cost-effective ways to add covered space to your home. Whether you want a shaded patio, a storage shed, or a small workshop, learning how to build a lean to off a house roof can transform unused outdoor space into something functional and attractive.
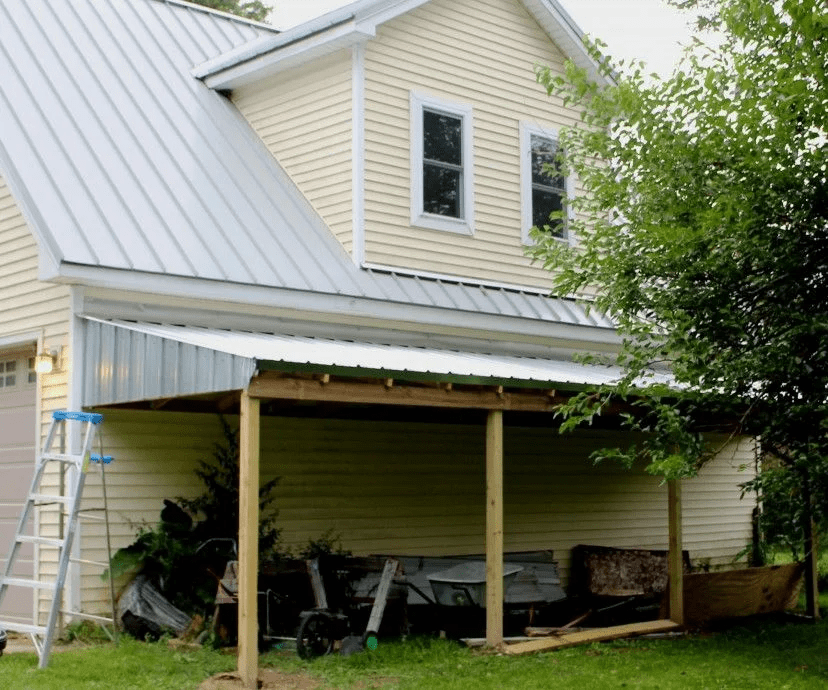
This type of construction uses your existing house wall and roofline as part of the structure, reducing materials, labor, and costs compared to freestanding builds. The lean-to roof slopes away from the main building, allowing rain and snow to run off efficiently.
In this comprehensive guide, we’ll cover everything from planning and permits to materials, construction steps, and finishing touches — so you can complete your lean-to project with confidence.
Read too: How Long Do Standing Seam Metal Roofs Last? A Comprehensive Guide to Durability and Longevity
Why Choose a Lean-To Design?
Building a lean-to off your house roof offers several advantages:
- Cost-Effective: Uses one existing wall as support.
- Space-Efficient: Fits into narrow or awkward outdoor spaces.
- Weather Protection: Sloped roof design keeps rain and snow away.
- Versatile: Works for patios, carports, firewood storage, or garden sheds.
Planning Before You Build
Before you start gathering lumber and tools, careful planning ensures a safe, durable, and code-compliant structure.
1. Check Local Building Codes & Permits
Contact your local building authority to determine if you need a permit. Many municipalities have rules about how close you can build to property lines and how you attach structures to your house.
2. Determine the Size and Purpose
Decide what the lean-to will be used for — seating area, storage, or workspace — and measure the available space. This will determine the dimensions of your frame and roofing materials.
3. Choose the Roof Pitch
The slope of your lean-to roof is crucial. A pitch of at least 3:12 (3 inches of rise for every 12 inches of run) is ideal for water drainage.
Tools and Materials Needed
Tools:
- Circular saw or hand saw
- Power drill
- Level
- Tape measure
- Carpenter’s square
- Hammer
- Ladder
Materials:
- Pressure-treated lumber (for posts, beams, rafters)
- Joist hangers
- Galvanized screws or nails
- Roofing material (metal sheets, shingles, or polycarbonate panels)
- Flashing and sealant
- Concrete (if setting posts in ground)
How To Build A Lean To Off A House Roof: Step-by-Step
Step 1: Prepare the House Wall Attachment
Locate the area where the lean-to will connect to your house. Mark a horizontal line along the wall where the top ledger board will be installed. Use a level to ensure accuracy.
Secure the ledger board to the wall using lag bolts, making sure it’s fastened to the house’s structural framing, not just siding.
Step 2: Install Support Posts
Measure and mark where your outer support posts will be placed. Dig post holes at least 12–18 inches deep (or more in frost-prone areas). Set the posts in concrete, ensuring they are plumb and aligned.
Step 3: Add the Outer Beam
Attach an outer beam across the tops of the support posts. This beam will carry the weight of the roof rafters on the outer edge.
Step 4: Install Rafters
Cut rafters to fit from the ledger board to the outer beam. Space them 16–24 inches apart. Use joist hangers at the ledger board and secure the rafters to the outer beam with screws or nails.
Step 5: Add Roofing Materials
Depending on your preference and budget, you can install:
- Metal roofing: Durable and weather-resistant.
- Shingles: Matches most house roofs.
- Polycarbonate panels: Allows light through for greenhouse or patio use.
Install roofing starting from the bottom edge upward, overlapping each sheet or shingle.
Step 6: Add Flashing and Sealant
To prevent leaks where the lean-to meets the house, install roof flashing under the house’s existing roofing and over the top edge of your lean-to roof. Apply a waterproof sealant along joints.
Step 7: Optional Finishing Touches
You can customize your lean-to with side walls, gutter systems, lighting, or even skylights.
Safety Tips
- Always use treated lumber for outdoor builds.
- Wear gloves and safety goggles.
- Work with a partner for lifting beams and roofing.
- Ensure the lean-to structure is securely anchored to withstand wind loads.
Common Mistakes to Avoid
- Incorrect Pitch: Too flat and water won’t drain; too steep and construction is harder.
- Weak Ledger Attachment: If the ledger board isn’t anchored to the house framing, the roof could fail.
- Ignoring Flashing: Without proper flashing, leaks can damage your house wall.
- Poor Post Anchoring: Posts set without concrete can shift over time.
Cost Estimate
- Lumber: $200–$500 (depending on size)
- Roofing materials: $150–$400
- Hardware and fasteners: $50–$100
- Sealant and flashing: $30–$70
Estimated Total: $430–$1,070
Benefits of DIY vs. Hiring a Contractor
DIY Advantages:
- Lower cost
- Flexible design choices
- Satisfaction of building it yourself
Hiring a Contractor:
- Professional results
- Faster completion
- Knowledge of building codes
Final Thoughts
Learning how to build a lean to off a house roof can open up many possibilities for functional and attractive outdoor spaces. With the right tools, materials, and preparation, you can complete this project over a weekend or two, saving money and customizing it to your needs.
Whether you’re looking to create a cozy shaded patio, protect your car from the elements, or add extra storage space, a lean-to is one of the most practical and affordable building projects you can tackle.

Leave a Reply