Building a miniature house out of popsicle sticks is a classic and rewarding craft project, perfect for kids and adults alike. One of the most challenging yet satisfying parts of the process is creating the roof. A well-built roof not only adds charm and character to your popsicle stick house but also completes the overall structure and ensures durability.
In this comprehensive guide, we dive into How To Build A Popsicle Stick House Roofing Part 1, focusing on the essential first steps of designing and assembling the roof framework. Whether you’re a beginner or looking to improve your craft skills, this step-by-step guide will help you build a strong, aesthetically pleasing roof for your popsicle stick house.
Read too: Is It Reasonable to Ask the Seller to Replace the Roof?
Why Focus on Roofing for Your Popsicle Stick House?
The roof is more than just a decorative element on your popsicle stick house. It plays a key role in:
- Structural Integrity: A well-constructed roof supports the walls and adds stability.
- Aesthetic Appeal: The style and finish of your roof dramatically affect the overall look of your miniature house.
- Craftsmanship Skill: Learning to build a roof helps you master key crafting techniques such as precise cutting, gluing, and assembling.
This article, part one of a roofing series, will guide you through laying the foundation for a solid and beautiful roof.
Materials and Tools Needed for How To Build A Popsicle Stick House Roofing Part 1
Before starting, gather the following materials:
- Popsicle sticks (craft sticks) – standard size works best
- Wood glue or a strong craft adhesive
- Small clamps or binder clips (to hold pieces while drying)
- Craft knife or small saw
- Ruler or measuring tape
- Pencil for marking
- Sandpaper (optional, for smoothing edges)
- Cutting mat or protective surface
Step 1: Plan Your Popsicle Stick Roof
Successful roofing starts with a solid plan:
- Decide on the Roof Style: Common choices include flat roofs, gable roofs, and pitched roofs. For beginners, a simple gable roof (two sloping sides meeting at a ridge) is recommended.
- Measure the Roof Dimensions: Determine the length and width of your roof based on your house’s base. Add extra length for overhangs if desired.
- Sketch Your Roof: A rough sketch helps visualize angles and assembly steps, especially for the rafters and support beams.
Step 2: Cutting and Preparing Popsicle Sticks
Before assembling, you’ll need to cut some popsicle sticks:
- Rafters: These are the slanted beams that form the main roof structure. Cut sticks to the correct length and angle. Use a craft knife and ruler for precision.
- Support Beams: Horizontal sticks will hold rafters in place and add strength.
- Roof Base Pieces: Some sticks will be cut to fit horizontally or vertically across the rafters for support and roofing material attachment.
Sand edges lightly for a cleaner finish and better glue adhesion.
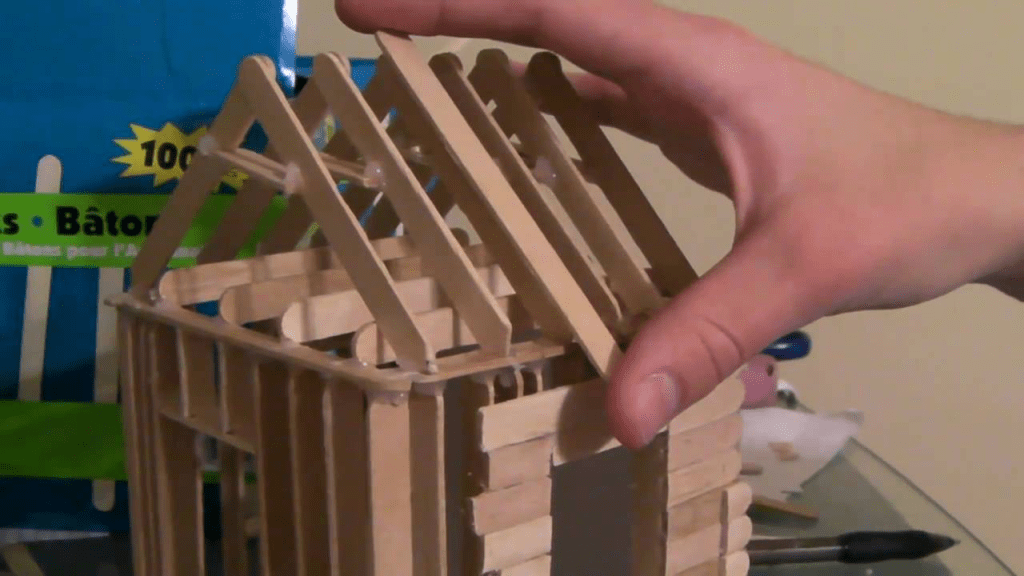
Step 3: Constructing the Roof Frame
The roof frame is the skeleton of your roof, providing shape and support:
- Assemble Rafters: Glue two rafters together at the peak, forming an inverted “V” or triangle shape typical of a gable roof. Hold the joint with clamps until dry.
- Attach Rafters to House Frame: Once dry, glue the bottom ends of the rafters to the top edges of your popsicle stick house walls.
- Add Support Beams: Glue horizontal sticks across the rafters to strengthen the frame and provide a base for the roofing material.
Take time to ensure everything is aligned properly—use a ruler and square to keep angles consistent.
Step 4: Reinforcing the Roof Frame
To enhance the durability of your roof frame:
- Add diagonal braces between rafters and support beams to prevent wobbling.
- Double up popsicle sticks in key areas for extra strength.
- Make sure glue dries completely before moving on to prevent weak joints.
Step 5: Preparing for Roofing Material
Once the frame is solid, it’s time to prepare for attaching your chosen roofing material (covered in Part 2):
- Ensure all surfaces are smooth and clean for better adhesion.
- Plan the roofing style—will you use flat sticks, shingles made from cut sticks, or other craft materials like paper or fabric?
- Decide on any roof overhangs or decorative elements to include.
Tips for Success When Building Your Popsicle Stick Roof
- Patience is Key: Allow glue to dry thoroughly between steps.
- Measure Twice, Cut Once: Precision in cutting ensures a neat and stable roof.
- Use Proper Adhesive: Wood glue or a strong craft glue provides the best hold for popsicle sticks.
- Work on a Stable Surface: Prevent shifting while the glue dries by working on a flat, sturdy table.
- Keep It Light: Don’t overload the roof with heavy materials that can weaken the popsicle stick frame.
Common Challenges in Building a Popsicle Stick Roof and How to Overcome Them
- Misaligned Rafters: Use a square and clamps to hold pieces in place until glue sets.
- Weak Joints: Reinforce critical points with additional glue and double sticks.
- Uneven Cuts: Take your time with a sharp craft knife and use a metal ruler to guide cuts.
- Warping Sticks: Store popsicle sticks flat and dry to avoid warping before use.
Conclusion
Mastering How To Build A Popsicle Stick House Roofing Part 1 is the foundation for creating an impressive miniature house. By carefully planning, cutting, and assembling the roof frame, you set yourself up for a strong and visually appealing structure.
Stay tuned for Part 2, where we’ll explore applying roofing materials and finishing touches to complete your popsicle stick house roof. This multi-part series ensures you’ll gain confidence and skill with every step, making your craft project a fun and rewarding experience.


Leave a Reply