A leaking roof between your house and outdoor patio can be frustrating and potentially damaging. Water intrusion can lead to structural issues, mold growth, and damage to furniture or flooring. Understanding how to fix leaking roof from house to outdoor patio is essential for protecting your home and outdoor living spaces.
This guide provides detailed steps, common causes, preventative measures, and maintenance tips to help homeowners identify and repair leaks effectively.
How To Fix Leaking Roof From House To Outdoor Patio – Understanding the Problem
Leaks between a house and an attached outdoor patio are often caused by improper flashing, damaged roofing materials, or issues with roof slope and drainage. These leaks may appear as water stains, dripping water, or mold growth on ceilings or walls.
Common Causes
- Flashing Problems: Flashing is the metal or rubber material used to seal joints where the patio roof meets the main house. Damaged, loose, or improperly installed flashing is a common cause of leaks.
- Roof Material Damage: Shingles, tiles, or metal panels may be cracked, missing, or warped, allowing water to penetrate.
- Clogged Gutters or Downspouts: Poor water drainage can cause water to back up and seep into the joint between the house and patio.
- Roof Slope Issues: If the patio roof doesn’t slope away from the house correctly, water can pool and leak.
- Sealant Deterioration: Rubber seals or caulking may dry out and crack over time, reducing waterproofing.
Read too: How Long Do Standing Seam Metal Roofs Last? A Comprehensive Guide to Durability and Longevity
Step-by-Step Guide to Fix Leaking Roof From House To Outdoor Patio
Repairing a leak requires careful inspection and the right materials. Follow these steps to fix the issue safely and effectively.
Step 1: Inspect the Roof and Identify the Leak
- Check for visible water stains on ceilings, walls, or patio ceilings.
- Inspect shingles, tiles, or metal panels near the joint with the house.
- Examine flashing and sealant for damage or gaps.
- Use a garden hose to simulate rain and locate the exact source of the leak.
Step 2: Clean the Area
- Remove debris, leaves, or dirt from the roof and gutters.
- Ensure the surface is dry before applying repairs.
- If using a ladder, ensure it is stable and secure to prevent accidents.
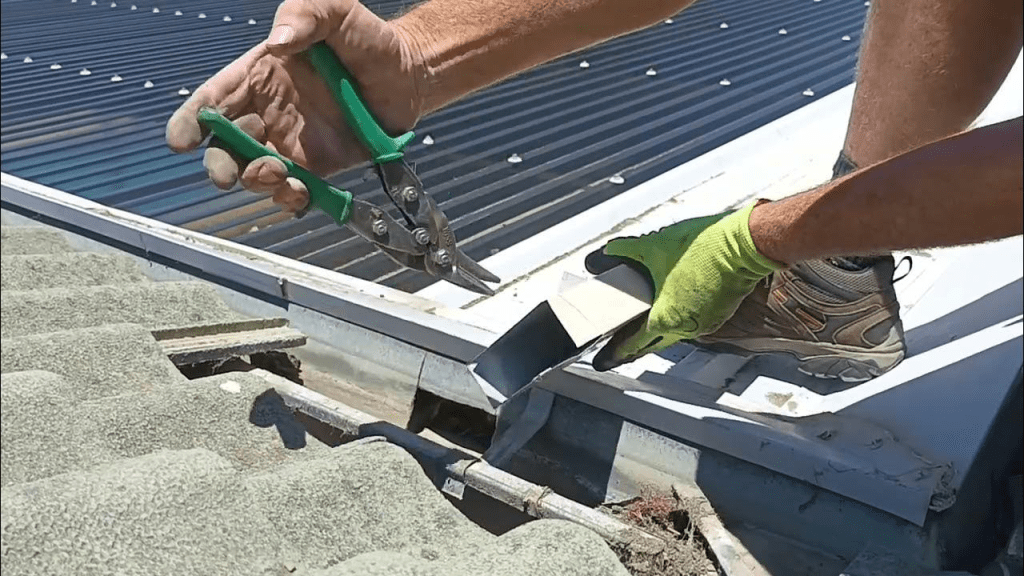
Step 3: Repair or Replace Flashing
Flashing is critical for preventing leaks at roof joints:
- Inspect for Damage: Look for rust, corrosion, or bent flashing.
- Remove Old Flashing: Carefully lift shingles or roofing material to remove damaged flashing.
- Install New Flashing: Slide new metal flashing under the shingles and secure it with roofing nails.
- Seal the Edges: Apply roofing sealant along the edges to prevent water penetration.
Step 4: Replace or Repair Damaged Roofing Materials
- Replace cracked shingles, tiles, or metal panels near the leak.
- For minor damage, use roofing cement to seal cracks or holes.
- Ensure roofing materials overlap correctly to direct water away from the joint.
Step 5: Apply Waterproof Sealant
- Use high-quality exterior caulk or roofing sealant along seams and edges where the patio roof meets the house.
- Smooth the sealant with a putty knife for uniform coverage.
- Allow it to cure according to manufacturer instructions before exposing to rain.
Step 6: Improve Roof Slope and Drainage
- Check that the patio roof slopes away from the house.
- Consider adding or adjusting gutters and downspouts to improve water flow.
- Install drip edges or diverters to channel water away from vulnerable areas.
Step 7: Test the Repair
- Use a garden hose to simulate rainfall on the repaired area.
- Inspect the interior for signs of leaks.
- Reapply sealant or make additional adjustments if water is still penetrating.
Preventative Measures to Avoid Future Leaks
Taking proactive steps can prevent leaks from recurring:
- Regular Inspections: Check your patio roof and flashing at least twice a year.
- Clean Gutters and Downspouts: Remove debris to maintain proper water flow.
- Sealant Maintenance: Reapply caulk or sealant every few years.
- Trim Overhanging Trees: Prevent branches from damaging roofing materials.
- Install Quality Materials: Use durable shingles, tiles, or metal panels rated for your climate.
Safety Tips During Roof Repairs
Roof work can be hazardous. Follow these precautions:
- Wear non-slip shoes and gloves.
- Use a secure ladder and have a partner assist when possible.
- Avoid working during rain or high winds.
- Consider hiring a professional for steep or complex roofs.
When to Call a Professional
Some leaks may require professional expertise:
- Persistent leaks after DIY repairs.
- Extensive damage to roofing materials or structural elements.
- Mold or water damage affecting the house’s interior.
- Complex roof designs or high-rise patios.
Professional roofing contractors have specialized tools, materials, and experience to fix leaks effectively and ensure long-term protection.
Benefits of Timely Repairs
Addressing leaks promptly offers several advantages:
- Prevents Structural Damage: Water intrusion can weaken beams, joists, and walls.
- Reduces Mold Growth: Prevents health hazards associated with mold and mildew.
- Protects Furniture and Flooring: Avoids costly interior damage.
- Maintains Home Value: Well-maintained roofs increase property longevity and curb appeal.
- Saves Money in the Long Run: Early repairs are less expensive than major renovations or replacements.
Conclusion
Learning how to fix leaking roof from house to outdoor patio involves identifying the cause, repairing flashing and roofing materials, applying sealant, and improving drainage. Regular maintenance and preventative measures are essential for preventing future leaks and protecting both the house and patio areas.
Whether you choose a DIY approach or hire a professional, addressing leaks promptly ensures a safe, functional, and attractive outdoor living space. With the right materials, careful inspection, and proper techniques, homeowners can effectively resolve leaks and maintain their roof’s integrity for years to come.


Leave a Reply