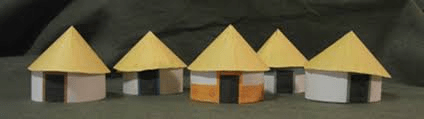
Cardboard houses are one of the most popular DIY projects for school crafts, playhouses, and decorative displays. While making the walls and base of the house is often straightforward, the challenge usually comes when you want to build a unique roof. Most crafters stick to simple flat or triangular designs, but if you want to give your house a creative and realistic touch, learning how to make a round roof on a cardboard house is the perfect choice.
A round roof instantly transforms your cardboard house into something more eye-catching, whimsical, and professional-looking. It can resemble a dome, a hut, or even a fairy-tale cottage, depending on how you design it. This guide will walk you through materials, techniques, step-by-step instructions, and creative ideas for making a round roof.
Why Choose a Round Roof for Your Cardboard House?
Before diving into how to make a round roof on a cardboard house, it’s worth asking why a round roof is a great idea:
- Adds realism: Dome or rounded roofs mimic real-life huts, cottages, or traditional houses.
- Unique design: It stands out compared to common triangular roofs used in cardboard models.
- Creative flexibility: Rounded roofs can be painted, textured, or decorated in endless ways.
- Educational value: Building a round roof introduces geometry, measurement, and problem-solving skills.
Materials You’ll Need
To get started, gather the following items:
- Cardboard sheets (thinner cardboard is easier to bend for curves)
- Scissors or craft knife
- Ruler and pencil
- Compass (or a round object for tracing)
- Hot glue gun or strong craft glue
- Tape (masking or duct tape for reinforcement)
- Decorative materials (paint, markers, fabric, or natural elements)
Optional extras: paper mâché, colored paper, or textured wrapping for extra detail.
Read too: How Long Do Standing Seam Metal Roofs Last? A Comprehensive Guide to Durability and Longevity
Step-By-Step: How To Make A Round Roof On A Cardboard House
Now let’s walk through the practical process.
Step 1: Measure the House
Start by measuring the top dimensions of your cardboard house where the roof will sit. Knowing the diameter is crucial if you want the round roof to fit perfectly.
Step 2: Draw and Cut a Circle
Using a compass or by tracing a round object (like a bowl or lid), draw a large circle on cardboard. This circle will form the base of your roof. Cut it out carefully with scissors or a craft knife.
Step 3: Create a Cone Shape
Cut a triangular wedge (like a slice of pizza) from the circle. Bring the two cut edges together and overlap them until the circle forms a cone. Glue or tape the edges in place. This cone will act as the round roof.
Step 4: Adjust the Size
Test the cone on top of your cardboard house. If it’s too big, trim the base of the cone. If it’s too small, make another circle slightly larger. Accuracy in this step ensures the roof sits neatly on the house.
Step 5: Reinforce the Structure
Because cardboard can sometimes bend or collapse, reinforce the cone by:
- Adding another layer of cardboard inside the cone.
- Using tape along the seams.
- Applying paper mâché for a smoother, stronger finish.
Step 6: Attach the Roof
Apply hot glue around the top edge of your cardboard house and carefully place the cone roof on it. Hold it in position until the glue dries. Make sure the roof is centered and secure.
Step 7: Decorate the Roof
This is where creativity shines. Depending on your project, you can:
- Paint the roof with acrylics or spray paint.
- Add shingles using small cardboard rectangles.
- Cover with fabric for a softer look.
- Use moss, bark, or natural materials for a rustic cottage effect.
- Add glitter or metallic paint for a magical finish.
Creative Variations for Round Roofs
There are multiple ways to explore how to make a round roof on a cardboard house beyond the simple cone method:
- Dome roof: Use paper mâché over a balloon. Once dry, pop the balloon and trim the dome to fit your house.
- Layered roof: Create multiple cone layers stacked on top of each other for a tiered design.
- Sloped round roof: Cut the cone unevenly so one side is higher, giving a slanted effect.
- Open-top round roof: Leave part of the roof open for a gazebo-style house.
Tips for Success
- Use thinner cardboard for curves—it bends more easily than thick, rigid cardboard.
- Always test the fit before gluing permanently.
- For large houses, use reinforced cardboard or add internal supports to keep the roof stable.
- If kids are involved, pre-cut the cardboard circles to avoid accidents with scissors or knives.
Fun Decoration Ideas
Once you know how to make a round roof on a cardboard house, you can experiment with endless themes:
- Fairy-tale cottage: Add moss, twigs, and flowers for a woodland vibe.
- Modern dome: Paint with metallic silver or white for a futuristic look.
- Winter hut: Add cotton balls or white paint for a snowy effect.
- Rustic hut: Use jute fabric or straw glued to the roof for a natural, handmade touch.
Educational Benefits
Building a round roof isn’t just a fun project—it’s also educational:
- Geometry skills: Cutting circles and making cones introduces mathematical concepts.
- Engineering basics: Understanding how curved shapes hold weight and balance.
- Problem-solving: Figuring out how to fit and secure the roof properly.
- Creativity: Designing, painting, and decorating the roof develops artistic expression.
Common Mistakes and How to Avoid Them
- Roof too small/large: Always measure before cutting. Use a compass for accuracy.
- Weak structure: Reinforce with extra layers or paper mâché.
- Messy glue lines: Apply hot glue carefully and wipe excess before it dries.
- Crooked placement: Hold the roof in place until the glue fully sets.
Final Thoughts
Learning how to make a round roof on a cardboard house is a simple yet rewarding skill. It adds character, uniqueness, and realism to your DIY project. With just a circle of cardboard, a bit of glue, and creativity, you can build a roof that transforms your plain cardboard house into a magical miniature home, a rustic hut, or a futuristic dome.
The key is to measure carefully, reinforce the structure, and let your imagination guide the decoration. Whether for a school project, a child’s playhouse, or a decorative piece, your cardboard house will stand out once it’s topped with a round roof.
So grab your materials, follow the steps, and start crafting your dream cardboard home today!


Leave a Reply