Introduction
Adding a gable roof to the side of a house is a great way to expand your living space, create a covered patio, or enhance your home’s aesthetic appeal. Whether you’re building a porch, carport, or additional room, attaching a gable roof to the side of a house requires careful planning, precise measurements, and the right materials to ensure durability and stability.
This guide will walk you through the entire process, from preparation to construction, covering essential details such as structural considerations, roof pitch, framing, and waterproofing. Whether you’re a DIY enthusiast or hiring a contractor, understanding the process can help you achieve a strong and long-lasting gable roof attachment.
Read too: How To Replace Roof Shingles That Blew Off: A Comprehensive Guide
Understanding Gable Roof Attachments
Before diving into the steps, it’s important to understand what a gable roof is and why it’s a popular choice.
What Is a Gable Roof?
A gable roof consists of two sloping sides that meet at a ridge, forming a triangular shape at each end. This design is known for its simple construction, excellent water runoff, and effective ventilation.
Why Choose a Gable Roof for an Extension?
- Easy to construct – A gable roof has a straightforward design, making it one of the simplest roof types to attach to an existing structure.
- Strong and durable – Its sloped design efficiently sheds water and snow, reducing structural stress.
- Aesthetic appeal – A gable roof can enhance the visual appeal of your home while maintaining a cohesive architectural style.
When attaching a gable roof to the side of a house, key considerations include roof pitch compatibility, load distribution, and proper waterproofing to prevent leaks where the new roof meets the existing structure.
Attaching A Gable Roof To The Side Of A House: Step-by-Step Guide
Step 1: Planning and Preparation
Before construction begins, thorough planning is crucial to ensure a smooth building process.
1.1. Determine the Roof Pitch
The pitch (or slope) of the gable roof should match or complement the existing house roof. A standard gable roof pitch ranges from 4:12 to 8:12, meaning the roof rises 4 to 8 inches for every 12 inches of horizontal run.
1.2. Check Local Building Codes
Many areas have specific regulations for roof extensions, including:
- Minimum pitch requirements
- Load-bearing calculations
- Attachment methods
- Waterproofing and flashing rules
Consult your local building department to ensure compliance before starting the project.
1.3. Gather Necessary Materials and Tools
You’ll need:
- Pressure-treated lumber for framing (rafters, ridge beam, and support beams)
- Plywood or OSB for roof decking
- Roofing underlayment and shingles
- Flashing and sealant
- Nails, screws, and fasteners
- Measuring tape, saw, drill, and hammer
Step 2: Preparing the Attachment Area
Properly preparing the side of the house ensures a strong and secure connection between the new roof and the existing structure.
2.1. Locate and Mark the Attachment Point
- Identify the wall plate (top plate of the exterior wall) where the gable roof will connect.
- Use a chalk line to mark the roof attachment height.
2.2. Install a Ledger Board
- A ledger board provides a secure base for the rafters to attach.
- Use lag bolts to anchor the board into the house’s framing (not just the siding).
- Apply flashing above the ledger board to prevent water infiltration.
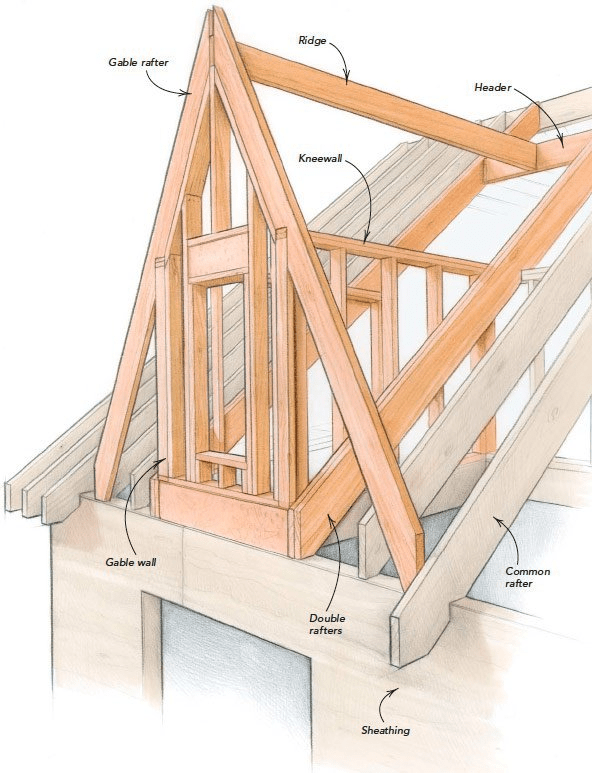
Step 3: Framing the Gable Roof
The structural framework of the gable roof includes rafters, a ridge beam, and support posts.
3.1. Installing the Ridge Beam
- Position the ridge beam parallel to the existing house wall.
- Secure it using support posts if necessary.
3.2. Cutting and Attaching Rafters
- Measure and cut rafters to fit the required slope.
- Secure rafters to the ridge beam and ledger board using metal rafter hangers or toe-nailing techniques.
3.3. Adding Collar Ties and Bracing
- Collar ties help prevent roof sagging by connecting rafters near the ridge.
- Additional bracing may be required for structural reinforcement.
Step 4: Installing Roof Decking and Underlayment
Once the framework is complete, the next step is to install decking and protective layers.
4.1. Attach Roof Decking
- Use OSB or plywood sheets to cover the rafter structure.
- Nail each sheet securely, ensuring tight seams.
4.2. Apply Underlayment
- Install a waterproof roofing underlayment over the decking.
- Overlap each layer to direct water away from seams.
Step 5: Roofing and Waterproofing
Proper roofing materials and flashing are essential for leak prevention.
5.1. Install Shingles or Metal Roofing
- If using asphalt shingles, start from the bottom edge and work upwards.
- For metal roofing, attach panels securely following the manufacturer’s guidelines.
5.2. Apply Flashing Where the Roof Meets the House
- Install step flashing where the new gable roof meets the house siding.
- Seal gaps with roofing sealant to prevent water leaks.
Common Mistakes to Avoid When Attaching A Gable Roof To The Side Of A House
- Skipping Building Permits – Always check local regulations before starting construction.
- Incorrect Ledger Board Installation – Failing to anchor it properly can lead to structural issues.
- Improper Flashing – Without adequate waterproofing, leaks can develop where the new roof meets the house.
- Weak Framing – Using undersized rafters or inadequate bracing can cause sagging or collapse over time.
- Ignoring Ventilation – Poor attic ventilation can lead to moisture buildup and mold growth.
Final Thoughts
Attaching a gable roof to the side of a house is a rewarding project that adds both functionality and value to your home. Whether you’re expanding your living space or building a covered outdoor area, proper planning, framing, and waterproofing are essential for long-term durability.
By following the steps outlined in this guide, you can ensure a structurally sound and aesthetically pleasing roof addition. If you’re unsure about any part of the construction process, consulting a professional roofer or structural engineer can provide additional peace of mind.


Leave a Reply