Attaching Wood A Frame Roof To A Round DollHouse. Creating a beautiful round dollhouse with a wooden A-frame roof is a rewarding DIY project that adds charm and realism to your miniature world. However, the unique structure of a round dollhouse can make attaching an A-frame roof a bit tricky. This guide will walk you through the process, ensuring a sturdy and aesthetically pleasing result.
Why Choose an A-Frame Roof for a Round Dollhouse?
An A-frame roof is a classic design known for its simplicity, strength, and aesthetic appeal. When paired with a round dollhouse, it creates a whimsical and cozy appearance, reminiscent of fairytale cottages or rustic cabins. Here are a few reasons why an A-frame roof is a great choice:
- Structural Stability – The triangular design distributes weight evenly, making it strong and durable.
- Easy Assembly – Compared to complex roof designs, an A-frame is relatively simple to construct and attach.
- Aesthetic Appeal – It complements the round shape, giving the dollhouse a unique and charming look.
Read too: Is It Reasonable to Ask the Seller to Replace the Roof?
Materials and Tools Needed
Before you begin attaching a wood A-frame roof to a round dollhouse, gather the necessary materials and tools:
Materials:
- Thin plywood or balsa wood (for the roof panels)
- Wood glue (for a secure bond)
- Small nails or screws (for extra reinforcement)
- Wood filler (to smooth out any gaps)
- Sandpaper (for finishing touches)
- Paint or wood stain (optional, for customization)
Tools:
- Saw (hand saw or jigsaw) (to cut the wood)
- Drill (if using screws for attachment)
- Clamps (to hold pieces together while glue dries)
- Measuring tape and ruler (for precise cuts)
- Pencil or chalk (for marking cuts)
Attaching Wood A-Frame Roof to a Round Dollhouse: Step-by-Step Instructions
Step 1: Measure and Cut the Roof Panels
Since your dollhouse is round, you need to carefully measure and cut the A-frame panels to fit the curved structure.
- Measure the diameter of the dollhouse – This helps determine the width of each roof panel.
- Decide the roof pitch – A steeper pitch creates a taller look, while a lower pitch makes a flatter roof.
- Mark and cut two triangular panels – Use thin plywood or balsa wood to cut two identical panels that will form the A-frame shape.
- Smooth the edges – Sand the edges of each panel to remove roughness and ensure a snug fit.
Step 2: Create Support Beams
Since a round dollhouse does not have flat edges for the roof to sit on, you need support beams for stability.
- Cut wooden support beams – These should match the length of the A-frame’s slanted edges.
- Attach beams to the top edge of the dollhouse – Use wood glue and small nails for a secure fit.
- Ensure alignment – The beams should be evenly placed to hold the roof panels properly.
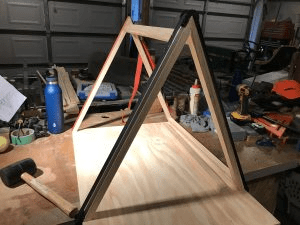
Step 3: Position and Attach the Roof Panels
Now, it’s time to attach the A-frame panels to your round dollhouse.
- Apply wood glue along the edges of the support beams – This ensures a strong initial bond.
- Position the first roof panel – Hold it in place and use clamps to secure it while the glue dries.
- Repeat with the second panel – Ensure both panels meet at the top to form a clean peak.
- Reinforce with small nails or screws – This step adds durability to the structure.
Step 4: Fill Gaps and Smooth the Surface
Since you are attaching flat panels to a round structure, there may be slight gaps.
- Use wood filler – Apply it to any visible gaps or uneven areas.
- Let it dry completely – Follow the recommended drying time on the product.
- Sand the surface – Smooth out the filler for a seamless finish.
Step 5: Customize Your Roof
Now that your A-frame roof is securely attached, you can personalize it to match your dollhouse’s theme.
- Paint or stain the wood – Choose a color that complements your dollhouse.
- Add shingles or texture – Use thin wooden strips, craft foam, or textured paper for a realistic look.
- Decorate with miniature details – Small windows, chimneys, or rooftop decor can add charm.
Common Challenges and How to Overcome Them
1. Ensuring a Secure Fit on a Round Structure
Since the dollhouse is round, getting the roof panels to sit perfectly can be tricky. Solution: Use support beams and wood filler to create a smooth transition.
2. Preventing Roof Panels from Slipping
Wood glue alone may not hold the panels in place while drying. Solution: Use clamps or temporary tape to keep everything aligned.
3. Achieving a Clean Roof Peak
If the panels don’t meet perfectly at the peak, it may look uneven. Solution: Sand the edges before attaching them to create a seamless joint.
Final Thoughts on Attaching Wood A-Frame Roof to a Round Dollhouse
Attaching a wooden A-frame roof to a round dollhouse is a fun and rewarding project that enhances the look and durability of your miniature home. By carefully measuring, using support beams, and reinforcing with wood glue and nails, you can create a stable and visually appealing roof. Don’t forget to add personal touches like paint, shingles, and tiny details to bring your dollhouse to life!
With patience and creativity, your round dollhouse will have a charming, well-fitted A-frame roof that stands out in any miniature collection.


Leave a Reply