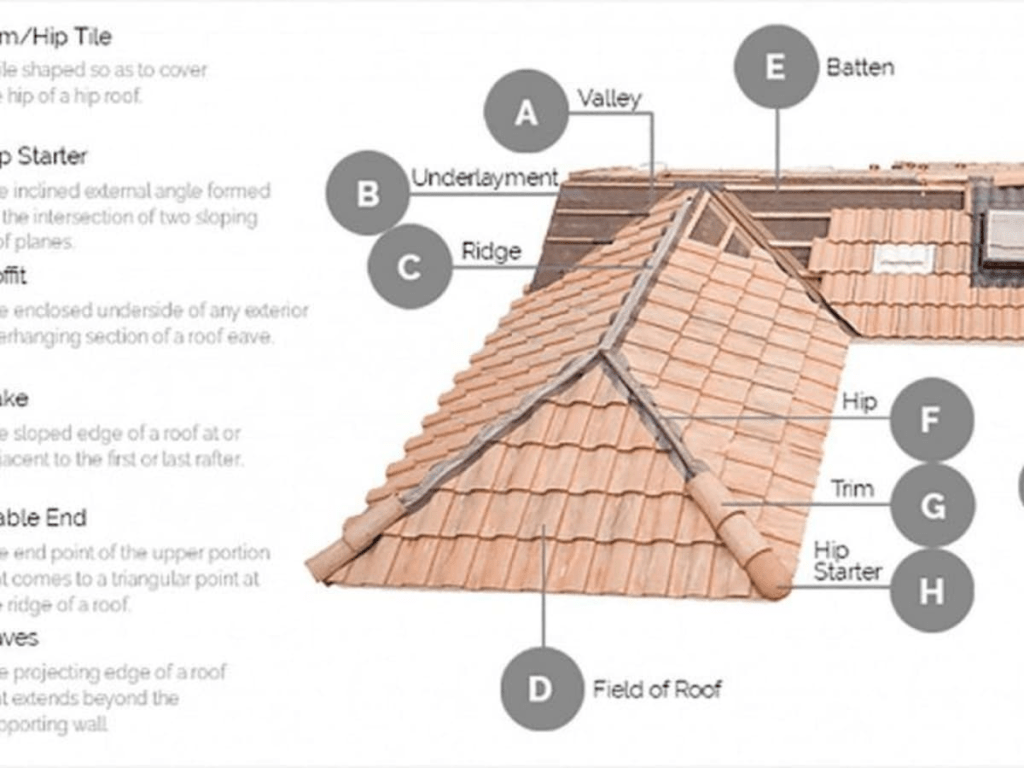
When considering roofing options, clay roof tiles stand out for their durability, aesthetic appeal, and traditional charm. However, installing clay roof tiles requires meticulous attention to detail to ensure a successful and long-lasting roofing system. In this article, we will delve into the essential installation details for clay roof tiles, offering a comprehensive guide to help you understand the process and make informed decisions.

Why Choose Clay Roof Tiles?
Before diving into the installation process, it’s important to understand why clay roof tiles are a popular choice for many homeowners:
1. Durability
Clay roof tiles are known for their longevity. When properly installed and maintained, they can last over 100 years. Their natural resistance to weather conditions such as rain, wind, and extreme temperatures makes them an ideal choice for various climates.
Read too: Is It Reasonable to Ask the Seller to Replace the Roof?
2. Aesthetic Appeal
Clay tiles add a distinctive and classic look to any home. They come in a variety of colors and styles, allowing homeowners to select the perfect match for their architectural style.
3. Energy Efficiency
Clay tiles can help with energy efficiency by providing natural insulation. They keep homes cooler in the summer and warmer in the winter, reducing the need for excessive heating or cooling.
Clay Roof Tiles Installation Details
Installing clay roof tiles requires careful planning and execution. Here’s a step-by-step guide to the essential installation details:
1. Preparing the Roof Deck
The first step in installing clay roof tiles is preparing the roof deck. This involves:
- Inspecting the Deck: Ensure the roof deck is in good condition. Repair or replace any damaged sections before proceeding with the installation.
- Adding Underlayment: Install a water-resistant underlayment over the roof deck. This layer provides an extra barrier against moisture and helps protect the deck.
2. Installing the Starter Course
The starter course is the first row of tiles installed at the eaves. It is crucial for ensuring that the rest of the tiles are properly aligned and securely attached. Key details include:
- Placement: Position the starter tiles with a slight overhang to direct water away from the roof deck.
- Securing: Use roofing nails or staples to secure the starter tiles in place.
3. Installing the Tiles
With the starter course in place, proceed with installing the main rows of clay tiles. Consider the following:
- Tile Layout: Begin at the bottom of the roof and work your way up. Each tile should overlap the tile below it to ensure proper water drainage.
- Alignment: Ensure each row of tiles is perfectly aligned. Use a chalk line as a guide for consistent placement.
- Fastening: Secure the tiles using nails or screws. Be careful not to drive the fasteners too deeply, as this can crack the tiles.
4. Installing the Ridge Tiles
The ridge tiles are installed along the peak of the roof and provide a finishing touch. Installation details include:
- Underlayment: Place a layer of underlayment along the ridge to prevent water infiltration.
- Tile Placement: Fit the ridge tiles over the top row of tiles, ensuring they cover the entire peak.
- Securing: Fasten the ridge tiles with mortar or screws, depending on the manufacturer’s recommendations.
5. Flashing and Sealing
Proper flashing and sealing are crucial to prevent leaks and ensure the longevity of your clay roof tiles:
- Flashing: Install flashing around roof penetrations, such as chimneys and vents, to direct water away from these vulnerable areas.
- Sealing: Apply a sealant around the edges of the tiles and flashing to prevent water from seeping underneath.
6. Final Inspection
After completing the installation, conduct a thorough inspection:
- Check for Gaps: Look for any gaps or misalignments between tiles and adjust as needed.
- Inspect Flashing: Ensure flashing is properly installed and sealed.
- Clean Up: Remove any debris from the roof and check for loose or damaged tiles.
Maintenance Tips for Clay Roof Tiles
Proper maintenance is essential for preserving the integrity and appearance of your clay roof tiles. Here are some tips to keep your roof in top condition:
1. Regular Inspections
Conduct regular inspections of your clay roof tiles, especially after severe weather events. Look for signs of damage, such as cracked or missing tiles, and address any issues promptly.
2. Clean Gutters and Downspouts
Keep gutters and downspouts clear of debris to prevent water from backing up and causing damage to the roof tiles.
3. Remove Moss and Algae
Moss and algae can grow on clay roof tiles, affecting their appearance and performance. Use a soft brush and a cleaning solution to remove these growths without damaging the tiles.
4. Repair Damage Promptly
If you notice any damaged tiles, replace them as soon as possible to prevent leaks and further damage.
Conclusion
Installing clay roof tiles involves a series of important steps that require attention to detail and proper technique. From preparing the roof deck to securing the ridge tiles and ensuring proper flashing and sealing, each step contributes to the overall success of the installation. By understanding and following these clay roof tiles installation details, you can ensure a durable, aesthetically pleasing, and long-lasting roofing solution for your home.
For those considering a clay tile roof, proper installation and maintenance are key to enjoying the many benefits of this classic and resilient roofing material.


Leave a Reply