When it comes to roofing materials, concrete roof tiles stand out for their durability, aesthetic appeal, and long lifespan. These tiles can enhance the look of your home while providing robust protection against the elements. However, the installation of concrete roof tiles requires careful planning, the right materials, and precise execution to ensure that your roof lasts for decades. In this comprehensive “Concrete Roof Tile Installation Guide,” we’ll walk you through the entire process, from the initial preparation to the final inspection.
Why Choose Concrete Roof Tiles?
Before diving into the installation process, it’s important to understand why concrete roof tiles are an excellent choice for your home. Concrete tiles offer several advantages:
- Durability: Concrete tiles can withstand extreme weather conditions, including high winds, heavy rain, and even hail. They are also resistant to fire and pests, making them one of the most durable roofing materials available.
- Aesthetic Appeal: Available in various colors, shapes, and textures, concrete tiles can complement a wide range of architectural styles. Whether you prefer a traditional look or a more modern design, there is a concrete tile option that fits your needs.
- Energy Efficiency: Concrete tiles can help improve your home’s energy efficiency by providing excellent insulation. They can reflect sunlight and reduce heat transfer, keeping your home cooler in the summer and warmer in the winter.
- Low Maintenance: Once installed, concrete roof tiles require minimal maintenance. They don’t rot, warp, or require frequent replacement, making them a cost-effective choice over time.
- Longevity: With proper installation and maintenance, concrete roof tiles can last 50 years or more, making them a long-term investment in your home.
Preparing for Installation
Proper preparation is key to a successful concrete roof tile installation. Before you begin, you’ll need to gather the necessary tools and materials, assess your roof structure, and ensure that you’re following all local building codes and regulations.
Read too: How To Replace A Mobile Home Roof: Step-by-Step Guide for Homeowners
Assessing the Roof Structure
Concrete tiles are heavier than most other roofing materials, so it’s crucial to ensure that your roof structure can support the additional weight. If you’re replacing an old roof, you may need to reinforce the roof framing or consult with a structural engineer to evaluate the load-bearing capacity.
Gathering Tools and Materials
To install concrete roof tiles, you’ll need the following tools and materials:
- Concrete roof tiles
- Underlayment (usually a synthetic or asphalt felt)
- Roofing nails or screws
- Roofing hammer or nail gun
- Chalk line
- Measuring tape
- Ladder
- Safety harness and other protective gear
- Roof battens (if required by local code)
- Flashing materials (for valleys, vents, chimneys, etc.)
- Tile cutting tools
Checking Local Building Codes
Before starting the installation, check with your local building authority to ensure that your project complies with all relevant codes and regulations. Some areas have specific requirements for underlayment, flashing, and even the type of tiles that can be used.
Step-by-Step Concrete Roof Tile Installation Guide
Now that you’re prepared, it’s time to start the installation process. Follow these steps to ensure a successful and long-lasting roof.
1. Installing the Underlayment
The first step in the “Concrete Roof Tile Installation Guide” is to install the underlayment. The underlayment acts as a secondary barrier against moisture and is critical for preventing leaks.
- Start at the Eaves: Begin by laying the underlayment at the eaves of the roof, working your way up to the ridge. Overlap each layer by at least 2 inches to ensure complete coverage.
- Secure the Underlayment: Use roofing nails or staples to secure the underlayment to the roof deck. Be sure to fasten it every 6 inches along the edges and 12 inches in the middle.
- Install Additional Layers: Depending on local codes and the pitch of your roof, you may need to install additional layers of underlayment. Follow the manufacturer’s guidelines and local regulations.
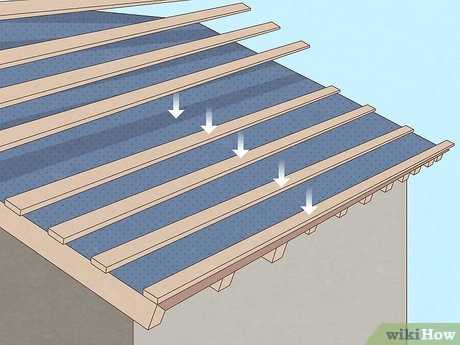
2. Installing Roof Battens (if required)
In some regions, roof battens are required to provide a secure attachment point for the tiles and to create a drainage gap between the tiles and the roof deck.
- Mark Batten Lines: Use a chalk line to mark the position of the battens across the roof. The spacing will depend on the size of the tiles and the pitch of the roof.
- Attach the Battens: Secure the battens to the roof deck using roofing nails or screws. Ensure that the battens are level and properly aligned.
3. Installing Flashing
Flashing is essential for preventing water infiltration at critical points on the roof, such as valleys, vents, chimneys, and skylights.
- Valley Flashing: Install metal valley flashing along the roof valleys. The flashing should extend at least 12 inches on either side of the valley and be secured with roofing nails.
- Vent and Chimney Flashing: Install flashing around vents, chimneys, and other roof penetrations. Make sure the flashing is properly integrated with the underlayment to direct water away from these vulnerable areas.
4. Laying the Concrete Tiles
With the underlayment, battens (if required), and flashing in place, you can begin laying the concrete roof tiles.
- Start at the Eaves: Begin laying tiles at the eaves of the roof, working your way across and up. The first row of tiles should overhang the edge of the roof slightly to allow for proper water runoff.
- Secure Each Tile: Secure each tile to the roof battens or directly to the roof deck (depending on the installation method) using roofing nails or screws. Ensure that the nails or screws penetrate through the tile and into the batten or deck beneath.
- Stagger the Joints: Stagger the joints between tiles in adjacent rows to create a more watertight seal and a visually appealing pattern.
- Cut Tiles as Needed: Use tile cutting tools to trim tiles to fit around edges, valleys, and roof penetrations. Take care to ensure that cut tiles are properly secured and aligned.
5. Installing Ridge and Hip Tiles
Ridge and hip tiles are used to cover the roof’s ridges and hips, providing a finished look and additional protection against water infiltration.
- Install Ridge Tiles: Lay the ridge tiles along the roof’s peak, securing them with nails or screws. Ensure that the ridge tiles overlap each other and are aligned properly.
- Install Hip Tiles: If your roof has hips, install hip tiles in the same manner, starting at the bottom and working your way up.
6. Final Inspection and Touch-Ups
After the installation is complete, conduct a thorough inspection to ensure that everything is properly secured and aligned.
- Check for Loose Tiles: Walk the roof (using safety gear) and check for any loose or improperly secured tiles. Re-secure any tiles that are not firmly attached.
- Inspect Flashing: Ensure that all flashing is correctly installed and that there are no gaps or loose edges where water could infiltrate.
- Clean Up Debris: Remove any debris, tools, or leftover materials from the roof and the surrounding area.
Maintenance Tips for Concrete Roof Tiles
Proper maintenance is crucial to extending the life of your concrete roof tiles and ensuring they continue to perform well. Here are some maintenance tips:
- Regular Inspections: Conduct regular inspections of your roof, especially after severe weather, to check for any damage or loose tiles.
- Cleaning: Keep the roof free of debris, such as leaves and branches, which can trap moisture and lead to mold or mildew growth.
- Repair Damage Promptly: If you notice any cracked or broken tiles, repair or replace them promptly to prevent water infiltration.
- Check Flashing and Gutters: Inspect flashing and gutters to ensure they are not clogged or damaged. Proper drainage is essential to prevent water buildup on the roof.
Conclusion
Installing concrete roof tiles is a significant project, but with careful planning and execution, it can result in a beautiful and long-lasting roof that enhances your home’s curb appeal and provides excellent protection. This “Concrete Roof Tile Installation Guide” has provided you with the essential steps and tips to successfully install your concrete roof tiles.
Whether you’re a seasoned DIY enthusiast or a professional contractor, following this guide will help ensure that your concrete roof tile installation is a success. With their durability, aesthetic appeal, and energy efficiency, concrete roof tiles are a smart investment that can add value and longevity to your home.


Leave a Reply