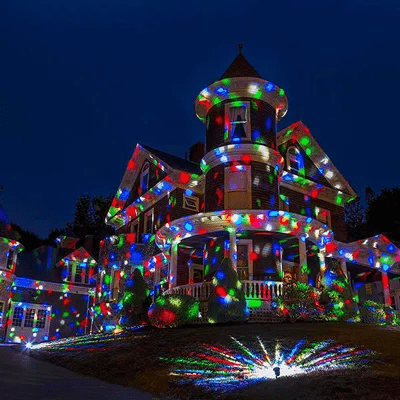
When the holidays arrive, many homeowners look forward to lighting up their homes with dazzling displays. Christmas light projectors have become a popular choice because they’re easy to install and create magical effects with minimal effort. But if you have a home with a slanted or steep roof, you may be wondering: Do Christmas light projectors work on house with slanted roof?
This article will help you understand how light projectors work, what you need to consider for sloped roofing, and how to maximize the beauty and safety of your setup. We’ll break it down into simple explanations and provide helpful tips for all types of homes—flat or slanted.
Read too: How To Replace Roof Shingles That Blew Off: A Comprehensive Guide
Understanding How Christmas Light Projectors Work
Before diving into whether they’re effective on angled surfaces, let’s first understand how Christmas light projectors function.
A Christmas light projector works by projecting patterns, colors, or images onto a surface—typically the exterior walls or roof of a home. These projectors use powerful LED lights, often paired with rotating lenses or animated slides, to create festive effects like snowflakes, stars, Santa, or even holiday messages.
They are usually placed on a lawn, driveway, or porch, and can cover large areas depending on the model’s power and range.
Do Christmas Light Projectors Work On House With Slanted Roof?
This is a great question—and the short answer is yes, Christmas light projectors can work on houses with slanted roofs, but there are a few factors to consider in order to achieve the best results.
Let’s explore these in detail:
1. Projection Angle and Surface Compatibility
Light projectors work best when they’re aimed directly at a flat, vertical surface. Houses with slanted roofs can pose a challenge because the surface angle deflects the light differently.
If your home has a steep roof pitch, the projector beam may scatter, causing the image to appear distorted or reduced in brightness. However, by adjusting the projector’s position and angle, you can often compensate for the slope and still achieve a beautiful effect.
Pro Tips:
- Place the projector lower to the ground and aim it upwards to counter the roof’s angle.
- Use a swiveling or adjustable stake/mount so you can fine-tune the projection.
- Opt for projectors with wide-angle lenses for better surface coverage.
2. Distance and Light Coverage Area
Another important factor is the distance between the projector and your roof.
Projectors have optimal working ranges (usually between 15 and 40 feet). Slanted roofs often require the projector to be positioned further away or at a different angle to cover a large portion evenly.
For example:
- A steep roof might benefit from placing the projector at the edge of your property, aimed at the upper half of the roof.
- Wider-angle models can compensate for shorter distances and angles.
Always check your projector’s lumens rating and coverage specs before purchasing. Higher lumens = brighter display, which helps if the angle isn’t perfect.
3. Surface Texture and Color of the Roof
Yes, believe it or not, the material and color of your roof can affect how well the projector works.
Dark-colored or matte roofs absorb more light, which can dull or blur the projected images. In contrast, light-colored or reflective roofs (like metal) will better reflect the beams.
Roof types that work well:
- Light-colored asphalt shingles
- White or silver metal roofs
- Tile roofs with minimal texture
More challenging surfaces:
- Dark, absorbent shingles
- Wooden shakes or very textured materials
Still, a high-powered projector with adjustable focus can overcome many of these challenges.
4. Weather Conditions and Outdoor Placement
Houses with slanted roofs tend to have run-off during rain or snow, which can splash or interfere with light projections depending on the setup. The same goes for projectors exposed to heavy snow or wind.
To counter this:
- Choose weather-resistant projectors rated for outdoor use (IP65 or higher).
- Stake the unit firmly into the ground.
- Avoid placing it where snow may pile up and block the lens.
You might also want to consider mounting the projector on a post or stand if snow levels are a concern in your area.
5. Animated vs. Static Light Projectors
Animated projectors can provide movement, such as falling snow or swirling lights, while static ones shine fixed images.
Animated projectors often work better on slanted roofs because the motion distracts from slight distortions caused by the angle.
Also, animation adds a dynamic element, which can enhance how the lights interact with the shape and pitch of your roof.
6. Best Practices for Installing Projectors on Slanted Roof Homes
Here are step-by-step recommendations to help you get the most from your projector:
Step 1: Assess Your Roof’s Pitch
Measure or estimate the angle of your roof. Steeper pitches (above 30°) may need more precise positioning.
Step 2: Select a Strategic Placement Spot
Find a clear, level area in your yard that provides an unobstructed view of the roof surface.
Step 3: Use an Adjustable Mount
Many projectors come with a pivoting stand or stake. Make sure it can tilt to accommodate a sloped surface.
Step 4: Test Before Final Placement
Turn the projector on at night and walk around with it to see where it looks best. Temporary placement lets you perfect the angle before staking it permanently.
Step 5: Secure the Power Source
Use outdoor-rated extension cords and ensure connections are weatherproof.
7. Alternatives and Enhancements
If you’re struggling with projection on your sloped roof, here are a few ideas to enhance the display:
- Project onto vertical walls instead of the roof.
- Use multiple projectors from different angles to blend effects.
- Add LED icicle lights or outline lights along the roofline for layered depth.
- Consider mapping projectors designed for 3D surfaces (more advanced and pricey, but very effective).
8. Common Mistakes to Avoid
- Using indoor projectors outdoors (they’re not weatherproof).
- Placing too close to the house—this can result in hotspots or blurry images.
- Not accounting for roof texture or color—darker surfaces may require a brighter projector.
- Projecting during daylight—most effects are only clearly visible at night.
9. FAQ: Do Christmas Light Projectors Work on a House With Slanted Roof?
Q: Will the images be distorted on a slanted roof?
A: Possibly, but adjusting the projector angle and distance usually minimizes distortion.
Q: Should I use more than one projector?
A: Yes, for larger roofs or more complex effects, two or more projectors can provide better coverage and depth.
Q: Is it safe to leave the projector outside all season?
A: Only if it’s rated for outdoor use and secured properly against wind and snow.
Q: Can I project onto shingles or metal roofing?
A: Yes, but metal and lighter colors give better visibility than dark shingles.
Conclusion
So, do Christmas light projectors work on house with slanted roof? Absolutely! With the right setup, projector model, and angle adjustments, you can still enjoy a stunning holiday light display even with a pitched roof.
While sloped roofs do present some challenges—such as surface angle and material—you can easily overcome them with proper planning. Whether you use one projector or multiple, add some animation, or combine with traditional lights, your slanted roof won’t stop you from joining in the festive fun.
In fact, some of the most beautiful and dynamic Christmas displays are on homes with interesting architecture—including slanted roofs.
So go ahead—light it up and spread the holiday cheer!
Leave a Reply