When it comes to long-term durability, energy efficiency, and low maintenance, few roofing systems can match the performance of EPDM roofing. EPDM Roofing System Installation has gained widespread popularity, especially for commercial and low-slope roofs, due to its exceptional resistance to weather, UV radiation, and flexibility. This article will explore the ins and outs of EPDM Roofing System Installation, from materials and tools to step-by-step instructions, benefits, and maintenance tips.
What is EPDM Roofing?
EPDM stands for Ethylene Propylene Diene Monomer, a synthetic rubber material that is highly durable and flexible. This type of roofing has been around for over 50 years and is particularly effective for flat or low-slope roofs. EPDM is typically available in large sheets or rolls that are applied to a roof surface using adhesives or fasteners. Its ability to withstand extreme temperatures, UV rays, and weather conditions makes it an excellent choice for long-term roofing solutions.
Read too: Decoding Timelines: How Long Does It Take To Replace A Roof and What to Expect
Benefits of EPDM Roofing System
Before diving into the details of EPDM Roofing System Installation, it’s important to understand why this system is such a popular choice for building owners.
1. Durability and Longevity
One of the key reasons why EPDM roofing is so widely used is because of its long lifespan. Properly installed, an EPDM roof can last up to 50 years or more. It is resistant to wind, hail, and UV rays, making it ideal for various climates, including both hot and cold environments.
2. Energy Efficiency
EPDM roofing is available in black and white varieties, with the white option offering reflective properties that help reduce heat absorption. This makes it an energy-efficient choice, particularly for buildings in hot climates. By reflecting sunlight, EPDM roofs help reduce cooling costs and contribute to energy savings.
3. Low Maintenance
Once installed, EPDM roofs require very little maintenance compared to other roofing systems. Regular inspections and minor repairs, such as patching small tears or resealing seams, are usually sufficient to keep the roof in optimal condition for decades.
4. Cost-Effective
Compared to other roofing materials like PVC or TPO, EPDM is more affordable upfront and over the long term due to its minimal maintenance requirements. The simplicity of the installation process also helps reduce labor costs.
5. Environmental Benefits
EPDM is a sustainable roofing material. It is fully recyclable, and its long lifespan reduces the need for frequent replacements, which in turn minimizes waste. Moreover, its energy-saving properties help lower a building’s carbon footprint.
Step-by-Step Guide to EPDM Roofing System Installation
When it comes to EPDM Roofing System Installation, the process is relatively straightforward, but it requires precision and attention to detail to ensure that the roof is properly sealed and protected. Below is a step-by-step guide on how to install an EPDM roofing system.
Step 1: Gather Materials and Tools
Before starting the installation, make sure you have all the necessary materials and tools:
- EPDM membrane (in sheets or rolls)
- Primer
- Adhesive (water-based or solvent-based)
- Seam tape
- Roof deck screws or fasteners (if needed)
- A roller or broom for smoothing the membrane
- Utility knife or scissors for cutting
- Flashing material for roof edges and penetrations
- A heat gun for flashing (optional)
Step 2: Prepare the Roof Surface
The first step in any EPDM Roofing System Installation is to prepare the roof deck. The surface must be clean, dry, and free from debris to ensure that the EPDM membrane adheres properly. Remove any old roofing materials, dirt, and loose nails or screws. Inspect the deck for any damage, such as rotting wood or structural issues, and repair it before continuing with the installation.
Step 3: Apply the Primer
Once the roof surface is ready, apply a coat of primer to the roof deck where the EPDM membrane will be installed. This helps the adhesive bond more securely to the surface. The primer should be applied evenly using a brush or roller. Allow the primer to dry according to the manufacturer’s recommendations, usually around 30 minutes, before proceeding.
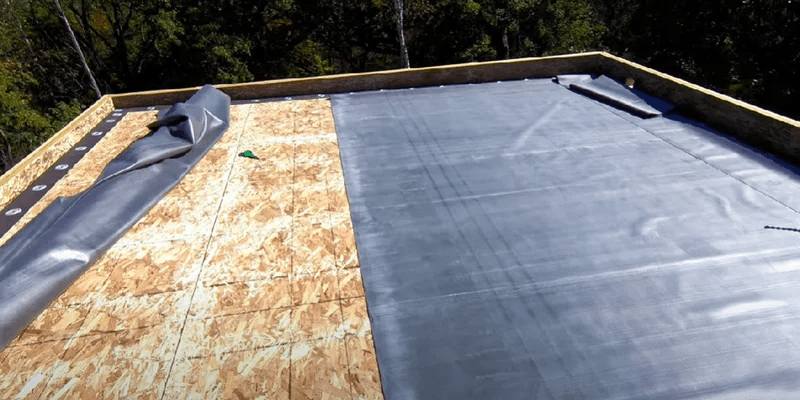
Step 4: Install the EPDM Membrane
Now that the roof deck is primed, you can begin installing the EPDM membrane. Start by unrolling the membrane over the surface of the roof, positioning it so that it covers the entire area. Make sure there are no wrinkles or folds in the material. You may need to trim the membrane to fit using a utility knife or scissors, but always leave a little extra material at the edges for overlapping and sealing.
Once the membrane is positioned correctly, fold it back in sections and apply adhesive to the roof deck, one section at a time. The adhesive should be spread evenly, and the membrane should be pressed down into the adhesive using a roller or broom to ensure a smooth and secure bond. Repeat this process for each section until the entire roof is covered with the EPDM membrane.
Step 5: Seal the Seams
In most cases, the EPDM membrane will consist of multiple sheets that need to be sealed together. This is done using seam tape, which ensures that no water can penetrate between the sheets.
Here’s how to properly seal the seams:
- Apply primer along the edges of the overlapping sheets where the seam tape will be placed.
- Cut a strip of seam tape and position it along the seam, leaving the protective backing on until you are ready to press the sheets together.
- Once positioned, peel off the backing and press the top sheet firmly onto the seam tape, smoothing it down to remove any air bubbles or wrinkles.
- Use a roller to firmly adhere the seam tape to the membrane for a watertight seal.
Step 6: Flash the Roof Edges and Penetrations
Flashing is an essential part of the EPDM Roofing System Installation process, especially around roof edges, vents, chimneys, and other penetrations. Flashing materials, such as EPDM flashing tape or precut flashing pieces, should be used to cover these areas to prevent water infiltration.
- For roof edges, wrap the membrane over the edge and secure it with flashing tape.
- For penetrations like vents or skylights, cut the EPDM membrane around the penetration, then use flashing to seal the area completely.
Step 7: Inspect the Roof
After the installation is complete, inspect the entire roof for any signs of improper sealing, wrinkles, or unadhered areas. Ensure all seams are properly taped, and edges are secure. Correct any issues immediately to prevent future problems.
Tips for Maintaining Your EPDM Roofing System
Even though EPDM roofing systems are low-maintenance, regular inspections and minor maintenance can extend the roof’s lifespan even further. Here are some maintenance tips to keep your EPDM roof in excellent condition:
1. Regular Inspections
Conduct a visual inspection of your roof at least twice a year, ideally in spring and fall, and after any major storms. Look for signs of wear and tear, such as holes, blisters, or loose seams.
2. Clean the Roof Surface
Dirt, leaves, and debris can accumulate on the roof and eventually cause damage. Use a soft broom or pressure washer (on low settings) to clean the surface without harming the membrane.
3. Patch Small Leaks
If you notice any small leaks or tears, patch them immediately using EPDM-compatible materials. Small issues can quickly turn into larger problems if left unaddressed.
4. Trim Overhanging Trees
Branches that hang over your roof can cause damage by rubbing against the EPDM membrane or falling during storms. Keep trees trimmed to avoid these issues.
5. Monitor for Ponding Water
Although EPDM is highly water-resistant, standing water on flat roofs can weaken the adhesive over time. Ensure proper drainage by addressing any low spots or clogs in the roof’s drainage system.
Advantages and Disadvantages of EPDM Roofing System
Advantages:
- Cost-Effective: EPDM is one of the most affordable roofing materials, particularly for large commercial buildings.
- Durability: Resistant to UV rays, extreme temperatures, and weather conditions, it offers a long lifespan of up to 50 years.
- Eco-Friendly: It is recyclable and offers energy efficiency, particularly with white EPDM for heat reflection.
- Easy Installation: Installation is straightforward, making it a good choice for both professionals and DIY homeowners.
Disadvantages:
- Aesthetics: EPDM roofing is often plain in appearance and is available only in black or white, limiting its aesthetic appeal for residential properties.
- Vulnerability to Punctures: EPDM can be punctured by sharp objects, so it’s important to avoid placing heavy, sharp items on the roof.
- Requires Professional Installation for Complex Roofs: While straightforward for flat roofs, more complex roof designs might require a professional for proper installation.
Conclusion
EPDM Roofing System Installation is a cost-effective, durable, and energy-efficient solution for both commercial and residential properties, especially those with low-slope or flat roofs. With proper installation and maintenance, an EPDM roof can provide decades of protection from the elements. Whether you’re considering a new roof installation or replacing an existing one, EPDM is a versatile and eco-friendly option that offers long-term benefits.


Leave a Reply