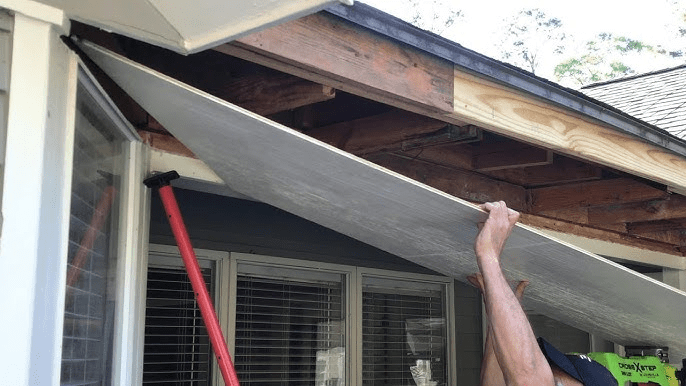
When it comes to maintaining your home’s exterior, fixing a board in the edge of your house roof is an important task that should not be overlooked. Whether it’s due to weather damage, wear and tear, or accidental impact, a loose or damaged board at the roof’s edge can lead to bigger problems like water leaks, pest intrusion, and structural issues. If you’re wondering how to fix a board in the edge of my house roof, this article will guide you through everything you need to know — from identifying the problem to performing a durable repair.
Why Is It Important to Fix a Board in the Edge of My House Roof?
The edges of your roof, often referred to as fascia boards, play a critical role in protecting your home. These boards:
- Support the bottom row of roof shingles or tiles.
- Provide a base for gutters to be attached.
- Shield the roof and attic from water damage by directing rainwater away.
- Help prevent pests like birds and rodents from entering gaps.
Read too: Hail Damage Roof Repair: Essential Guide to Restoring Your Home’s Protection
Ignoring a damaged or loose board can cause serious issues such as wood rot, water damage, and compromised structural integrity. Fixing the board promptly ensures your roof remains strong, weather-resistant, and visually appealing.
Signs You Need to Fix a Board in the Edge of My House Roof
Before diving into repairs, it’s important to recognize the warning signs:
- Visible cracks or splits in the wood.
- Loose or hanging boards that move when touched.
- Peeling paint or discoloration indicating water damage.
- Presence of mold, mildew, or wood rot.
- Sagging gutters that may be caused by a weakened fascia.
- Pest damage such as holes or chew marks.
If you notice any of these signs, it’s time to act.
Tools and Materials You’ll Need to Fix a Board in the Edge of My House Roof
To properly fix the board, you should gather:
- Replacement wood board or fascia board (usually cedar or PVC)
- Measuring tape
- Hammer and nails or power drill with screws
- Pry bar or crowbar
- Saw (circular or handsaw)
- Wood sealant or primer
- Exterior-grade paint
- Ladder or scaffolding for safe roof access
- Safety gloves and goggles
- Caulk or weatherproof sealant
Step-by-Step Instructions to Fix a Board in the Edge of My House Roof
Step 1: Assess the Damage
Climb the ladder carefully and inspect the damaged board. Determine whether it needs to be repaired or fully replaced. If the damage is extensive or involves rot, replacement is recommended.
Step 2: Remove the Damaged Board
Use the pry bar or crowbar to gently remove nails or screws holding the damaged board. Carefully detach the board without damaging the surrounding structure.
Step 3: Measure and Cut the Replacement Board
Measure the length and width of the removed board precisely. Using the saw, cut the replacement fascia board to the exact size.
Step 4: Prepare the Replacement Board
Before installation, apply a wood sealant or primer to protect the board from moisture and pests. Let it dry completely.
Step 5: Attach the New Board
Position the replacement board along the edge of the roof and secure it with nails or screws. Make sure it is flush with adjacent boards and firmly attached to the rafters or trusses.
Step 6: Seal the Joints
Use caulk or weatherproof sealant to fill gaps between the new board and adjacent surfaces. This prevents water infiltration.
Step 7: Paint the Board
Apply at least two coats of exterior-grade paint matching your home’s trim color. Painting seals the wood and enhances curb appeal.
Step 8: Inspect Your Work
Ensure the board is secure and the paint is even. Check that gutters are properly reattached if you removed them during the repair.
Tips for Maintaining the Boards at the Edge of Your House Roof
- Regular Inspections: Check fascia boards twice a year, especially after harsh weather.
- Keep Gutters Clean: Clogged gutters can cause water overflow that damages the boards.
- Trim Nearby Trees: Branches can scrape and damage fascia boards.
- Prompt Repairs: Fix any signs of damage quickly to avoid costly replacements.
- Use Quality Materials: Investing in weather-resistant wood or synthetic fascia can prolong durability.
Common Mistakes to Avoid When You Fix a Board in the Edge of My House Roof
- Ignoring Safety: Always use a sturdy ladder, wear gloves and goggles, and work with a partner if possible.
- Poor Measurements: Cutting the replacement board inaccurately can lead to gaps and weak attachment.
- Skipping Sealant or Paint: Leaving the wood unprotected accelerates deterioration.
- Using Wrong Fasteners: Exterior-grade galvanized nails or screws are necessary to prevent rust and loosening.
When to Call a Professional
Some repairs may be too complex or risky for DIY, especially if:
- The damage extends deep into the roof structure.
- You notice signs of widespread water damage or mold.
- You’re uncomfortable working at heights.
- The roof edge involves complicated angles or designs.
A professional roofer or carpenter can assess the situation and ensure a safe, long-lasting repair.
Conclusion: Fix a Board in the Edge of My House Roof for a Stronger, Safer Home
Fixing a board in the edge of your house roof is essential for maintaining your home’s structural integrity and appearance. By carefully assessing damage, using proper materials, and following safe repair steps, you can restore your roof’s edge to its optimal condition.
Taking care of fascia boards not only protects your home from weather and pests but also contributes to its overall value and curb appeal. Whether you’re a seasoned DIYer or considering professional help, knowing how to fix a board in the edge of my house roof will keep your home safe and beautiful for years to come.
Leave a Reply