Adding a gable roof to the side of a house can significantly improve your home’s aesthetic appeal, increase usable space, and enhance weather protection. Whether you’re planning an enclosed addition, a covered porch, or an extension over a patio, knowing how to attach a gable roof to side of house properly is essential to ensure structural integrity and durability.
In this guide, we’ll walk you through the complete process — from planning and measuring to framing and sealing — to help you complete your project safely and correctly.
Read too: How To Replace Roof Shingles That Blew Off: A Comprehensive Guide
Why Choose a Gable Roof for Your Side Addition?
Before diving into how to attach a gable roof to side of house, it’s helpful to understand the appeal of gable roofs.
✔ Timeless Aesthetic
Gable roofs are one of the most popular roof types due to their clean triangular shape, which suits both traditional and modern homes.
✔ Efficient Water Drainage
The sloped design naturally allows water, snow, and debris to slide off, reducing the chance of leaks or water damage.
✔ Ventilation Potential
The triangular attic space under a gable roof can be used for attic ventilation or even storage, depending on the size.
✔ Easier Framing
Compared to more complex roof types (like hip or gambrel roofs), gables are relatively easier to frame for those with carpentry experience.
Tools and Materials You’ll Need
Before we explore how to attach a gable roof to side of house, gather these essential tools and supplies:
🛠 Tools:
- Tape measure
- Level
- Circular saw
- Nail gun or framing hammer
- Ladder or scaffolding
- Chalk line
- Framing square
- Safety glasses and gloves
📦 Materials:
- Rafters (2×6, 2×8, or 2×10, depending on span)
- Ridge board
- Ceiling joists
- Roof sheathing (plywood or OSB)
- Fasteners (nails, screws, hurricane ties)
- House wrap or flashing
- Roofing underlayment and shingles
- Fascia and soffits
How To Attach A Gable Roof To Side Of House — Full DIY Process
Attaching a gable roof to the side of your house involves careful planning, framing, and waterproofing. Here’s a step-by-step breakdown:
Step 1: Plan and Check Local Building Codes
Before any physical work starts, check your local zoning and building regulations. You may need:
- A permit
- Architectural drawings
- Structural inspections
Failure to comply can result in fines or removal of the structure.
Step 2: Design the Roof and Calculate Pitch
Decide on the roof pitch — common pitches include 4/12, 6/12, or 8/12 — which affects water runoff, appearance, and ceiling height. Use a gable roof calculator to determine the correct rise, run, and rafter lengths.
Step 3: Prepare the Side Wall
This is where you’ll tie in the new roof to the existing structure. You may need to:
- Expose the wall sheathing
- Mark your wall plate line
- Locate studs and headers for attachment
Use a chalk line to ensure a level installation area.
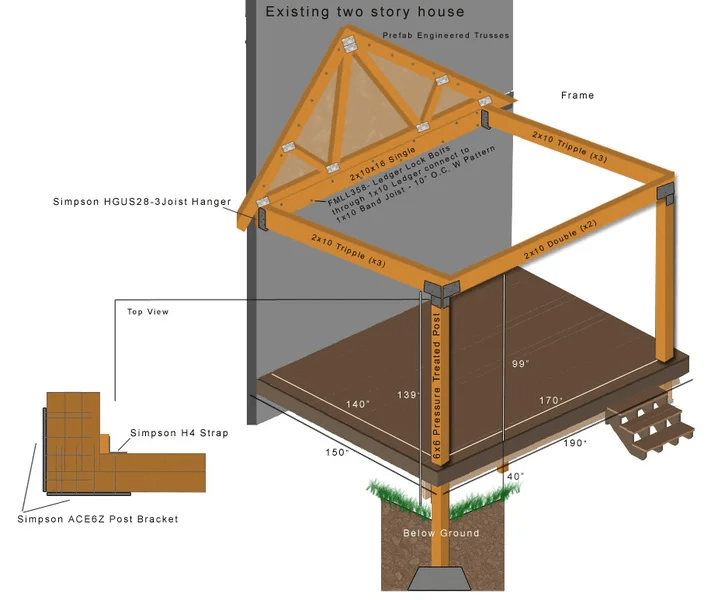
Step 4: Install the Ledger Board
The ledger board supports the rafters that connect the new gable to the side of the house.
- Use lag screws or bolts to secure the ledger into studs
- Ensure it is level and properly flashed to prevent leaks
- Consider a double ledger board for added strength
This step is crucial in attaching the new gable securely to the home.
Step 5: Frame the Gable End Wall
Build the vertical triangular gable end with studs and a top plate that will match your desired roof pitch.
- Use proper headers over windows or doors
- Add blocking for lateral support
- Securely tie the gable wall into the house framing
This gable wall forms one of the triangle ends of your roof.
Step 6: Set the Ridge Board
The ridge board sits at the peak and serves as the spine for your rafters.
- Use temporary braces to hold the ridge board in place
- Ensure it is level and centered
If tying into an existing roof, you may need to notch or cut into the fascia of the existing roofline.
Step 7: Install Rafters and Joists
Now you’re ready to frame the actual roof:
- Attach rafter pairs from the top ridge board down to the ledger board or wall plate
- Secure with nails, hurricane ties, or metal connectors
- Install ceiling joists to prevent walls from spreading
Make sure rafters are evenly spaced (usually 16″ or 24″ on center).
Step 8: Sheath the Roof
Apply 1/2″ or 5/8″ plywood or OSB sheets across the rafters.
- Leave a small gap (about 1/8″) between panels to allow for expansion
- Nail panels every 6–8 inches along rafters
Sheathing provides a strong base for underlayment and shingles.
Step 9: Flash and Waterproof the Connection
The junction between your new gable roof and the house must be watertight:
- Install flashing where the new roof meets the existing wall
- Add house wrap or roofing membrane over the sheathing
- Apply metal drip edge and ridge venting as needed
Improper flashing is the #1 cause of leaks in roof additions.
Step 10: Install Roofing Materials
Shingle or metal roofing should match your existing roof both visually and functionally.
- Install roofing underlayment (felt or synthetic)
- Lay down shingles from the bottom up
- Add ridge caps and venting
Tips for a Seamless Gable Roof Addition
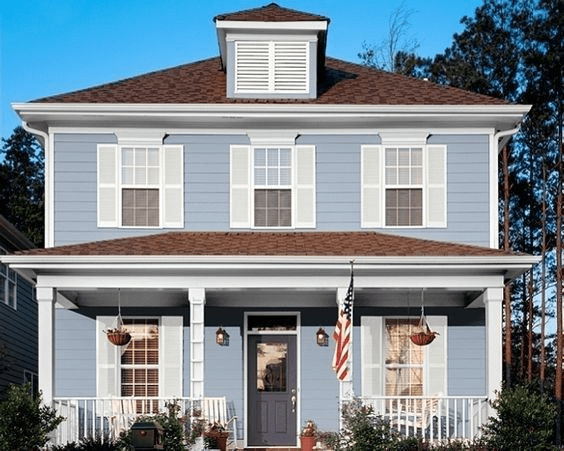
- Match siding, shingles, and trim to the existing home for cohesive aesthetics
- Ensure your roof slopes away from any existing windows or features
- Add gutters or downspouts to manage drainage effectively
- Use insulation if the space beneath the gable is enclosed and climate-controlled
Common Mistakes to Avoid
Even experienced builders sometimes make errors. Watch out for:
- Wrong pitch calculation – can result in uneven ridges or water pooling
- Inadequate flashing – leads to leaks and mold
- Weak framing – affects roof lifespan and safety
- Ignoring permit requirements – can lead to fines or mandatory teardown
When to Hire a Professional
If the addition involves:
- Electrical or HVAC changes
- Complex roof tie-ins
- Load-bearing walls
- High elevation framing
…it’s wise to hire a licensed contractor or structural engineer. Roofing can be dangerous and requires precise measurements — especially when connecting to an existing home.
Frequently Asked Questions
❓ Can I attach a gable roof without removing siding?
Yes, but you must install proper flashing and water barriers. Often, a section of siding is temporarily removed for more secure attachment.
❓ How do I calculate the length of rafters?
Use the Pythagorean theorem or a roofing calculator based on your rise and run. Add extra length for overhangs.
❓ Is a building permit always required?
Most local codes require a permit for roof extensions. Always check with your local building department.
Conclusion: Mastering How To Attach A Gable Roof To Side Of House
Learning how to attach a gable roof to side of house is a valuable skill for homeowners and contractors alike. With proper planning, the right materials, and attention to structural details, this project can add beauty, value, and function to your home.
Whether you’re building a sunroom, covered patio, or home extension, a properly attached gable roof will stand strong against weather and time. If you’re ever unsure, don’t hesitate to consult a professional — it’s better to be safe than risk structural issues or leaks.
Leave a Reply