Adding a patio roof can transform your outdoor space into a comfortable, shaded area for entertaining or relaxing. If you’re unsure how to attach a patio roof to a house, it’s essential to follow proper steps to ensure stability, safety, and weather resistance. Doing it incorrectly can lead to leaks, structural damage, or even safety hazards.
Materials and Tools Needed
Materials:
- Patio roof kit or lumber (beams, rafters)
- Flashing and sealant
- Lag bolts or anchor screws
- Roof panels (metal, polycarbonate, or shingles)
Tools:
- Drill with masonry and wood bits
- Level and measuring tape
- Circular saw
- Ladder or scaffolding
- Safety gear (gloves, goggles, helmet)
Read too: How To Replace Roof Shingles That Blew Off: A Comprehensive Guide
Expert Tip: Always verify local building codes before beginning your installation to ensure compliance and safety (Wikipedia).
Step-By-Step Process
1. Plan and Measure
- Determine roof size, slope, and attachment height
- Mark beam locations on your house wall
- Consider gutter alignment and drainage
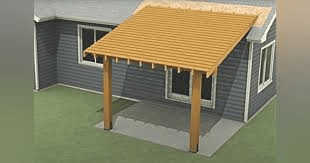
2. Install Ledger Board
- A ledger board acts as the primary support for your patio roof
- Attach using lag bolts into the house’s studs
- Apply flashing and sealant to prevent water infiltration
3. Set Up Posts
- Position vertical support posts at patio corners
- Ensure posts are plumb using a level
- Secure posts in concrete footings for stability
4. Attach Beams and Rafters
- Connect beams to the ledger board and posts
- Install rafters perpendicular to beams
- Space rafters evenly (typically 16–24 inches apart)
5. Install Roof Panels
- Lay your roofing material over rafters
- Ensure proper overlap to prevent leaks
- Secure panels with screws or nails recommended by manufacturer
6. Finish and Seal
- Apply caulking along ledger board edges
- Check all bolts and screws for tightness
- Paint or stain wood if using lumber for added protection
Common Mistakes to Avoid
- Skipping flashing: Can cause leaks
- Ignoring slope: Water may pool on the roof
- Incorrect post alignment: Leads to structural instability
- Using short screws or bolts: Reduces load-bearing capacity
Comparison Table: DIY vs Professional Installation
| Factor | DIY | Professional |
|---|---|---|
| Cost | $500 – $2,500 | $1,500 – $5,000 |
| Time | 2–5 days | 1–3 days |
| Complexity | Moderate | Low |
| Warranty | None | Often included |
| Safety | User-dependent | High |
Safety Considerations
- Always wear protective gear
- Avoid working on wet or windy days
- Use scaffolding or ladders correctly
- Ensure structural load limits are not exceeded
FAQ
Q1: Can I attach a patio roof to brick or stucco walls?
A1: Yes, but use masonry anchors or lag shields and pre-drill holes carefully.
Q2: What is the ideal slope for a patio roof?
A2: A slope of 2–4 inches per foot allows proper water drainage.
Q3: Do I need a permit for patio roof installation?
A3: Most municipalities require a building permit—check local regulations.
Q4: How long does installation take?
A4: DIY installation usually takes 2–5 days; professionals may complete in 1–3 days.
Q5: Can I attach a patio roof to an existing shingled roof?
A5: It’s possible with a proper ledger board and flashing, but consult a professional to avoid leaks.
Conclusion
Knowing how to attach a patio roof to a house ensures your outdoor area is safe, functional, and visually appealing. By following step-by-step instructions, using the right materials, and prioritizing safety, you can enjoy a durable patio roof for years to come.
Share this guide with friends or family planning a patio upgrade—they’ll appreciate the expert tips and clear instructions!


Leave a Reply