If you’re looking for a budget-friendly way to provide shade or shelter, attaching a tarp awning to your house roof can be a smart and effective solution. Whether you’re planning a backyard party, protecting a patio, or adding temporary coverage for tools or furniture, knowing how to attach a tarp awning to a house roof is a skill that can save you both time and money.
In this guide, we’ll walk you through a detailed, step-by-step method to securely install a tarp awning, ensuring it stands up to weather and looks tidy. From choosing the right tarp to securing it properly to your roofline, this tutorial covers everything you need to know.
Why Use a Tarp Awning?
Before diving into how to attach a tarp awning to a house roof, it’s helpful to understand why tarp awnings are such a popular DIY solution. Here are some benefits:
- Affordability: Tarps are significantly cheaper than permanent awnings.
- Versatility: You can use them for shade, rain cover, or temporary enclosures.
- Quick Setup: They’re easy to install with basic tools.
- Portability: You can take them down or move them when needed.
Whether you’re covering a backyard deck, a garden workspace, or a driveway, a tarp awning offers convenience without a permanent commitment.
Read too: How To Replace Roof Shingles That Blew Off: A Comprehensive Guide
Types of Tarps Suitable for Awnings
Not all tarps are created equal. The material and size of your tarp will directly affect its performance and longevity. When learning how to attach a tarp awning to a house roof, choose from the following types:
- Polyethylene (poly) tarps – Water-resistant, UV-resistant, and lightweight.
- Canvas tarps – Breathable and durable, but less water-resistant.
- Vinyl tarps – Heavier and extremely durable for heavy-duty weather protection.
- Mesh tarps – Ideal for shade while allowing air to flow through.
Make sure the tarp includes reinforced grommets for secure anchoring.
Tools and Materials You’ll Need
To properly attach a tarp awning, gather these tools and supplies:
Tools:
- Drill or screwdriver
- Ladder or step stool
- Measuring tape
- Level
- Utility knife or scissors
Materials:
- Tarp (sized according to your space)
- Rope, bungee cords, or ratchet straps
- Screw hooks, eye bolts, or heavy-duty nails
- Carabiners (optional)
- Wooden beams or PVC pipes (for frame support if needed)
Planning Your Tarp Awning Setup
Before beginning the installation, evaluate the layout and surrounding area:
- Choose the location: Identify where the tarp will extend—across a deck, patio, or driveway.
- Measure the space: Record the width and length needed for proper coverage.
- Evaluate roof style: Different attachment methods may apply depending on whether you have an eave, fascia board, gutter system, or open rafters.
Planning is a crucial part of understanding how to attach a tarp awning to a house roof securely and efficiently.
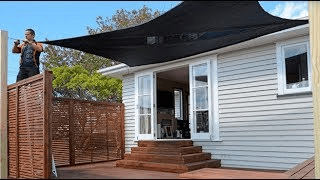
How To Attach A Tarp Awning To A House Roof: Step-by-Step Guide
Now that you’re prepared, let’s walk through the process of safely attaching your tarp awning.
Step 1: Measure and Cut (If Needed)
Using a measuring tape, determine the desired area the tarp will cover. Choose a tarp that’s slightly larger than your measured area to allow for sloping (to ensure rain runoff).
If needed, use a utility knife to trim the tarp, but reinforce the new edges with tarp repair tape and create grommet holes with a grommet kit to maintain durability.
Step 2: Choose Anchor Points on the Roof
Depending on your roof design, you may attach the tarp to:
- Eaves using screw hooks or eye bolts
- Rafters for homes without fascia boards
- Fascia boards (use caution not to damage roofing components)
- Temporary beam secured on the roof using weights or clamps (avoid nailing directly into shingles)
Mark the anchor points clearly and check that they’re level to ensure the tarp will hang evenly.
Step 3: Install Roof Anchors
Install your chosen anchor method:
- Drill pilot holes into the fascia or under the eaves.
- Install screw hooks or eye bolts.
- If needed, install a horizontal beam (like a treated 2×4) along the roof edge and secure it with brackets or heavy-duty straps.
This provides a strong and removable base for tarp attachment.
Step 4: Secure the Tarp’s Roof Edge
Attach the tarp’s grommets to the anchors using:
- Bungee cords – Allow flexibility and reduce tearing from wind.
- Rope – Thread through grommets and tie tightly to anchors.
- Carabiners – Offer quick attachment and detachment if temporary.
Ensure the tarp is taut to prevent sagging, which can collect water and create stress on the material.
Step 5: Anchor the Opposite Side (Ground Level)
Extend the tarp outward to your desired coverage area. You have several options for supporting the outer edge:
- Telescopic poles with guy lines and stakes
- Wooden posts concreted into the ground
- Fence or railing attachment
- Freestanding PVC frames
Use rope or bungee cords to attach the tarp to these supports, and make sure to tension the lines to keep everything stable.
Step 6: Create a Slope for Water Runoff
Always angle your tarp slightly to allow rain to run off and prevent pooling.
- Attach the roof edge slightly higher than the outer edge.
- Use adjustable poles or blocks to create a 10–15° slope.
- Consider installing a gutter along the tarp’s edge to direct runoff if water drainage is an issue.
Step 7: Test and Reinforce
After everything is secured:
- Check all connection points.
- Tug gently on ropes and cords to ensure tightness.
- Spray water (if possible) to simulate rain and ensure proper drainage.
- Add additional grommets or reinforce stress points if needed.
Tips for Long-Term Tarp Awning Use
- Check monthly for signs of wear, grommet tearing, or UV damage.
- Reinforce with duct tape or tarp repair tape if fraying occurs.
- Remove in heavy winds to prevent lifting and damage.
- Store dry when not in use to avoid mold and mildew.
Alternatives to Tarp Awnings
If you’re looking for something more permanent, consider these options:
- Retractable awnings
- Metal or wood framed canopies
- Pergolas with canopy covers
- Sail shades
However, if you need something affordable and adjustable, nothing beats the flexibility of a tarp awning.
Common Mistakes to Avoid
- Attaching directly to shingles – This can cause roof leaks.
- No slope – Water will pool and potentially tear the tarp.
- Overtightening bungees – Can snap or tear grommets.
- Skipping anchors – Tarps must be properly secured to prevent blowing away.
Safety Considerations
- Always use a ladder with care and have someone assist if possible.
- Avoid working on the roof in wet or windy conditions.
- Use gloves to prevent rope burn and grommet cuts.
- Keep kids and pets clear of the workspace.
Final Thoughts
Knowing how to attach a tarp awning to a house roof can open up numerous possibilities for quick shelter solutions around your home. Whether you’re throwing a backyard BBQ, protecting your porch, or just need a shaded spot to relax, a well-secured tarp can do the trick.
By choosing the right materials, anchoring it correctly, and ensuring proper drainage, you’ll extend the life of your tarp and create a safe, comfortable outdoor space.
So next time you need a fast fix for the sun or rain, don’t overlook the power of a well-installed tarp awning.
Leave a Reply