If you’re looking to improve your home’s functionality and curb appeal, learning how to attach a gable roof carport on the side of your house is a great place to start. A well-built carport provides protection for your vehicle, adds value to your property, and offers a shaded space that can double as an outdoor sitting area or workspace.
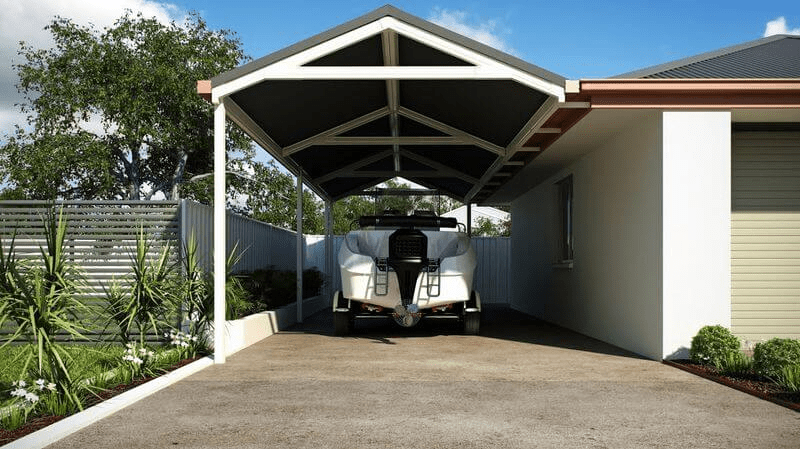
While there are many carport design styles, the gable roof carport is one of the most popular because of its pitched roof, which offers better water drainage and a more aesthetically pleasing look that often matches the existing roofline of the house.
Read too: How Long Do Standing Seam Metal Roofs Last? A Comprehensive Guide to Durability and Longevity
This comprehensive guide walks you through the full process of attaching a gable roof carport to the side of your house, from planning and permitting to final construction. Whether you’re a DIY enthusiast or just exploring your options before hiring a contractor, this article will give you a clear roadmap.
What Is a Gable Roof Carport?
Before diving into the “how to attach gable roof carport on side of house” process, let’s clarify what a gable roof carport is.
A gable roof consists of two sloping sides that meet at a central ridge, forming a triangular shape (the gable) at each end. Compared to flat or shed-style roofs, gable roofs offer:
- Better water and snow runoff
- Enhanced aesthetics
- Increased height and ventilation
- More structural durability
A gable roof carport, when attached properly, can blend seamlessly with your home’s architecture while providing functional vehicle protection.
Planning Your Gable Roof Carport Project
1. Check Local Building Codes and Permits
Before starting construction, it’s essential to research your local zoning laws, HOA rules (if applicable), and building codes. Most municipalities will require a permit for adding any structure attached to your home.
Important Considerations:
- Distance from property lines (setback requirements)
- Stormwater runoff compliance
- Roofing material guidelines
- Structural load calculations
2. Determine the Size and Design
The typical carport is 12 to 20 feet wide and 20 feet deep, but the size can vary based on your vehicle and space. Also, consider the pitch of the gable roof to ensure it complements your house.
- Single carport: ~12×20 feet
- Double carport: ~20×20 feet
- Roof pitch: A 4:12 or 6:12 pitch works well for most gable designs
Choose materials that match or complement your house’s siding and roof. Common materials include wood, aluminum, or steel for the frame, and asphalt shingles, metal panels, or polycarbonate for the roof.
Tools and Materials You’ll Need
Before learning how to attach a gable roof carport on side of house, gather the essential tools and materials:
Tools:
- Tape measure
- Power drill
- Circular saw
- Hammer
- Level
- Post hole digger
- Ladder or scaffolding
- Nail gun or screws
Materials:
- Pressure-treated lumber or metal beams
- Concrete mix (for footings)
- Roofing material (shingles or metal panels)
- Joist hangers, lag bolts, and brackets
- Ridge board and rafters
- Flashing and weatherproofing materials
How To Attach Gable Roof Carport On Side Of House – Full Installation Process
Here’s a step-by-step breakdown of how to attach gable roof carport on side of house safely and efficiently:
Step 1: Prepare the Area
Clear the ground where the carport will be built. Remove vegetation, debris, or any old concrete slabs. Mark out the perimeter using stakes and string.
- Level the ground
- Confirm measurements match your blueprint
- Plan post locations (typically 4×4 or 6×6 posts)
Step 2: Dig Post Holes and Pour Concrete Footings
Use a post hole digger to dig holes about 2 feet deep (deeper if required by frost line in your area).
- Place posts into the holes
- Use a level to ensure they are plumb
- Pour concrete and allow 24–48 hours to cure
Tip: Anchor brackets set in concrete provide extra stability for attaching the vertical support posts.
Step 3: Attach Ledger Board to Side of House
This is a critical part of learning how to attach gable roof carport on side of house.
- The ledger board supports the carport roof and must be securely fastened to the side wall of your house.
- Choose a location just below the existing roofline.
- Use lag bolts or sleeve anchors to attach the board to wall studs or a concrete block wall.
Important: Apply flashing above the ledger board to prevent water infiltration.
Step 4: Install the Beams and Rafters
With the posts set and ledger in place, install the cross beams that run parallel to the ledger board.
- Connect beams to the vertical posts using joist hangers or metal brackets
- Cut and attach roof rafters from the ledger to the ridge board
- Rafters should be spaced 16″ or 24″ apart for structural strength
At this point, your gable frame will begin to take shape.
Step 5: Frame the Gable Ends
Cut triangular gable end trusses to create the classic gable roof shape. These should sit flush on the ridge beam and rafters.
- Attach plywood or OSB sheathing
- Add vents if desired for airflow
- Cover with roofing felt or underlayment
Step 6: Install Roofing Material
Depending on your roofing choice (metal, shingle, etc.), install your material from the bottom edge up to the ridge.
- Ensure overlaps are correct to avoid leaks
- Use roofing nails or screws based on material
- Install a ridge cap along the top
Step 7: Final Touches and Finishing
- Install gutters and downspouts if needed
- Paint or stain wooden components to match your home
- Seal joints with caulk or waterproofing sealant
- Inspect all bolts and connections for safety
Safety Tips When Building a Gable Roof Carport
- Wear safety gear (gloves, goggles, hard hat)
- Never work on the roof during rain or wind
- Use scaffolding or ladders properly secured
- Don’t attempt alone—have a helper for lifting and stabilizing beams
Common Mistakes to Avoid
When learning how to attach gable roof carport on side of house, watch out for these frequent DIY errors:
- Not anchoring the ledger board properly
- Skipping flashing or weatherproofing
- Using incorrect roof pitch
- Failing to secure permits
- Using incompatible materials (e.g., untreated lumber)
Benefits of a Gable Roof Carport Attached to Your House
- Seamless aesthetic integration
- Better protection from rain/snow
- Increased property value
- Can double as a covered patio or workspace
- Greater airflow and ventilation
Should You Hire a Professional?
While this guide covers how to attach gable roof carport on side of house from a DIY perspective, you may want to consider hiring a contractor if:
- You’re unfamiliar with structural framing
- You’re dealing with electrical wiring for lights or outlets
- Local codes require professional inspection
- The house wall is made of brick or concrete
Conclusion: Gable Roof Carport Installation Simplified
Understanding how to attach gable roof carport on side of house can empower homeowners to take on a functional and rewarding project. Whether you’re doing it yourself or planning to hire a contractor, knowing the essential steps—from securing permits to finishing touches—ensures the job is done safely and correctly.
With a properly installed gable roof carport, you’ll not only enjoy year-round vehicle protection, but you’ll also add usable outdoor space and real curb appeal to your property.
Leave a Reply