Many homeowners want extra outdoor space that’s protected from sun and rain, but don’t know where to start. Learning how to build a porch roof attached to house can feel overwhelming without clear guidance. This guide walks you through the process step by step, using practical advice that’s beginner-friendly and aligned with real-world building standards.
What Is a Porch Roof Attached to a House?
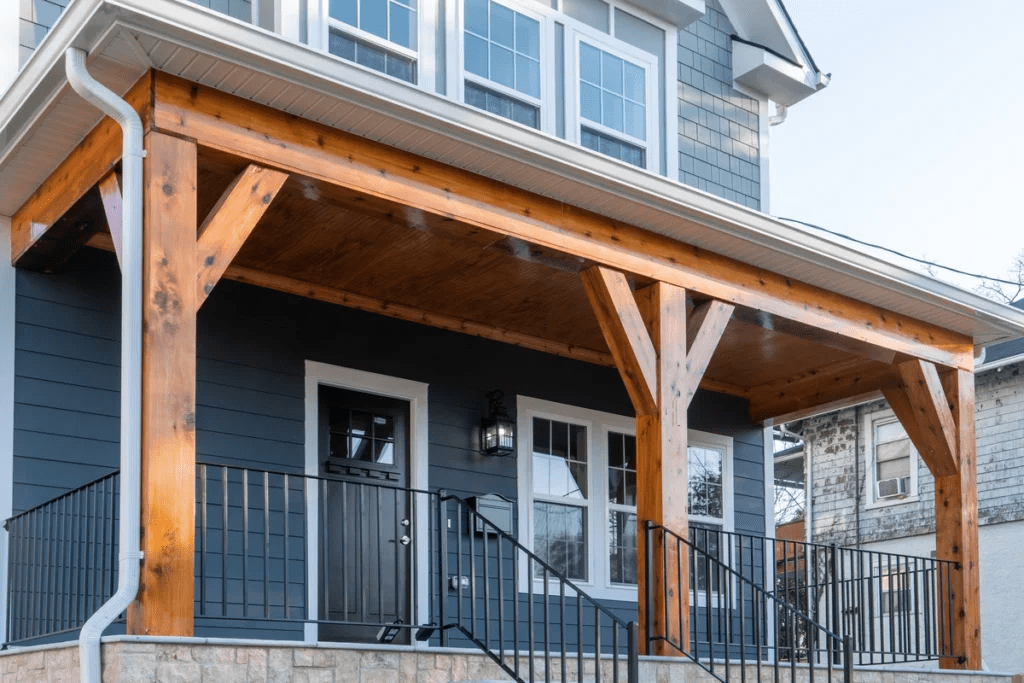
A porch roof attached to a house is a roof structure that connects directly to the main building, typically using a ledger board secured to the house’s framing. Unlike a freestanding roof, it relies partly on the house for support, making it more stable and often more cost-effective.
Read too: Hail Damage Roof Repair: Essential Guide to Restoring Your Home’s Protection
According to general residential construction principles summarized on
👉 https://en.wikipedia.org/wiki/Porch
attached porches have been used for centuries to improve comfort, ventilation, and curb appeal.
Why homeowners choose attached porch roofs:
- Better structural stability
- Lower material costs compared to freestanding roofs
- Seamless visual integration with the house
- Increased usable outdoor living space
Do You Need a Permit to Build a Porch Roof?
Yes, in most US states, you do need a building permit.
Why permits matter
Local building departments enforce:
- Structural safety
- Snow load and wind load requirements
- Proper attachment to the main house
- Electrical and drainage clearance
📊 Industry data from the International Code Council (ICC) shows that over 65% of residential structural failures are related to improper connections or load calculations—often from unpermitted DIY work.
Tip: Always check with your city or county building office before starting.
What Materials Are Needed to Build a Porch Roof Attached to a House?
Essential Materials List
- Pressure-treated lumber (ledger board & posts)
- Galvanized lag bolts or structural screws (½ inch diameter recommended)
- Post anchors (rated for exterior use)
- Rafters (2×6 or 2×8 depending on span)
- Roofing material (shingles or metal panels)
- Flashing (aluminum or galvanized steel)
- Waterproof membrane
- Concrete (for footings)
Tools Required
- Circular saw
- Level (minimum 24 inches)
- Drill with masonry and wood bits
- Tape measure
- Chalk line
- Safety gear (gloves, goggles, helmet)
How to Build a Porch Roof Attached to House: Step-by-Step

4
Step 1: Plan the Roof Design and Pitch
Choose a roof style that matches your house:
- Shed roof (most common, easiest for DIY)
- Gable roof (more complex, better drainage)
Recommended pitch:
- Minimum 3:12 slope for shingles
- Minimum 1:12 slope for metal roofing
This ensures proper water runoff and prevents leaks.
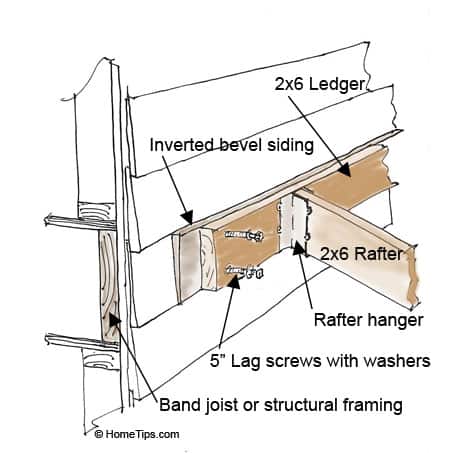
Step 2: Install the Ledger Board
The ledger board is the backbone of an attached porch roof.
How to do it correctly:
- Remove siding where the ledger will attach
- Install a waterproof membrane behind the ledger
- Secure ledger into house rim joist (not just siding)
- Use ½-inch lag bolts, spaced every 16 inches
⚠️ Never attach a ledger board only to sheathing.
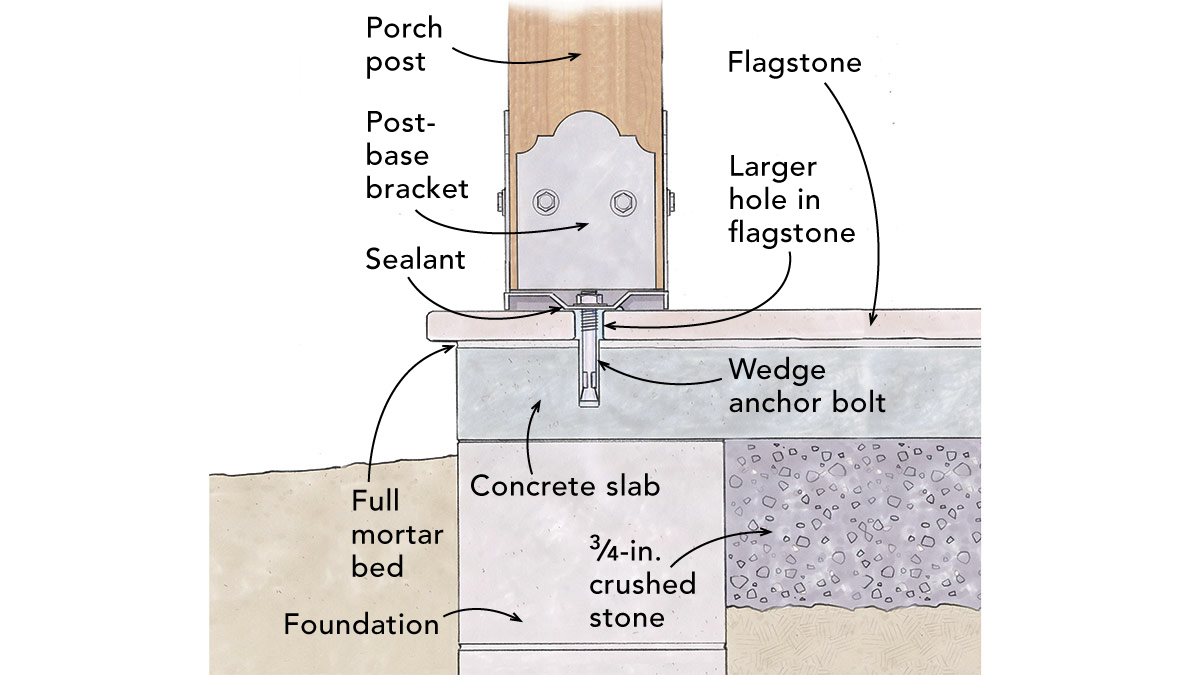
Step 3: Install Support Posts and Footings
Support posts carry vertical loads.
Concrete footing specs (typical):
- Diameter: 12–18 inches
- Depth: Below frost line (varies by state, often 30–48 inches)
- Cure time: 24–48 hours before loading
Install post anchors into wet concrete or with expansion bolts after curing.
Step 4: Frame the Rafters
Rafters connect the ledger board to the front beam.
Rafter spacing:
- Standard: 16 inches on center
Best practices:
- Cut birdsmouth joints carefully
- Use metal hurricane ties
- Double-check level and alignment
📐 A misaligned rafter can cause uneven load distribution and future sagging.
Step 5: Add Roof Sheathing and Waterproofing
- Install ½-inch exterior-grade plywood
- Leave ⅛ inch gap between sheets for expansion
- Cover with underlayment or waterproof membrane
This layer protects against moisture infiltration.
Step 6: Install Roofing Material
Choose roofing that matches your home:
- Asphalt shingles (most common)
- Standing seam metal (durable, modern look)
Install flashing where porch roof meets house wall—this is the most critical leak-prevention step.
Pros and Cons of an Attached Porch Roof
| Advantages | Disadvantages |
|---|---|
| Strong structural support | Requires wall penetration |
| Lower material cost | Permit often required |
| Cleaner visual design | Mistakes can cause leaks |
| Easier drainage integration | Less flexible layout |
Common Mistakes to Avoid
- Skipping flashing installation
- Attaching ledger board to siding
- Incorrect roof pitch
- Ignoring local snow load codes
- Using untreated lumber outdoors
🚫 These errors are responsible for most porch roof failures reported by home inspectors.
How Much Does It Cost to Build a Porch Roof Attached to a House?
Average US cost (2025 estimates):
- DIY materials: $1,500 – $3,500
- Professional installation: $4,000 – $8,000
Costs vary by:
- Roof size
- Material choice
- Labor rates
- Permit fees
FAQ: How To Build A Porch Roof Attached To House
Q1: Can I build a porch roof myself without experience?
Yes, if the design is simple (shed roof) and you follow code requirements carefully. Structural attachments must be precise.
Q2: What is the best roof pitch for an attached porch roof?
A 3:12 pitch is ideal for shingles. Metal roofing can go lower but must meet manufacturer specs.
Q3: How long does it take to build a porch roof?
DIY projects typically take 3–7 days, depending on weather and experience level.
Q4: Do porch roofs add home value?
Yes. Real estate studies show covered porches can increase perceived home value by up to 8%, especially in suburban markets.
Q5: Can a porch roof be attached to brick houses?
Yes, but it requires masonry anchors and extra flashing. Professional guidance is recommended.
Conclusion
Learning how to build a porch roof attached to house gives you more than shelter—it adds comfort, functionality, and long-term value to your home. With proper planning, the right materials, and careful installation, this project is achievable even for motivated beginners.
If this guide helped you, share it with friends or on social media—you might help someone else build their dream porch too.
Leave a Reply