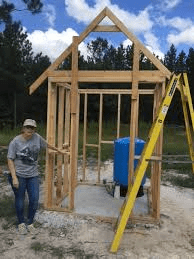
When it comes to protecting your well, one of the most important considerations is building a durable and functional roof for the well house. Many homeowners prefer a removable single pitch roof design, as it provides both weather protection and convenient access to the well for maintenance.
If you’ve been wondering how to build a removable single pitch well house roof, this guide will walk you through the process step-by-step. From planning and materials to construction and finishing touches, we’ll cover everything you need to know to build a roof that’s practical, sturdy, and easy to remove when needed.
Read too: Hail Damage Roof Repair: Essential Guide to Restoring Your Home’s Protection
Why Choose a Removable Single Pitch Well House Roof?
A single pitch roof, also known as a shed roof, has a simple sloping design that allows rain, snow, and debris to run off easily. Adding a removable function makes it even more practical. Here are some benefits:
- Easy access: You can remove the roof to access the well pump, pressure tank, or piping.
- Weather protection: Shields the well components from rain, snow, and UV exposure.
- Cost-effective: Simple design means fewer materials and lower building costs.
- DIY-friendly: Single pitch roofs are among the easiest roof styles to build, even for beginners.
- Customizable: Can be built to match your landscape or painted to blend with your home’s style.
Tools and Materials You’ll Need
Before you start, gather all necessary tools and materials. Building a removable roof doesn’t require heavy machinery, but precision and planning are key.
Tools
- Tape measure
- Carpenter’s square
- Circular saw or hand saw
- Drill with screwdriver bits
- Hammer
- Level
- Safety gear (gloves, goggles, dust mask)
Materials
- Pressure-treated lumber (2x4s or 2x6s) for framing
- Exterior-grade plywood or OSB for roof decking
- Corrugated metal panels or asphalt shingles for roofing
- Hinges or removable fasteners (lag bolts, wing nuts, or carriage bolts)
- Galvanized nails and screws
- Weather-resistant sealant or paint
Planning Your Roof Dimensions
When planning how to build a removable single pitch well house roof, start with accurate measurements:
- Measure the well house base: Most well houses are between 3×3 ft to 4×4 ft.
- Decide on slope: A slope of at least 3:12 (3 inches rise for every 12 inches of run) is recommended for water drainage.
- Overhangs: Extend the roof at least 6–12 inches past the walls to protect the sides from rain splash.
Tip: Sketch out your design before cutting lumber to avoid costly mistakes.
Step-by-Step Guide: How To Build A Removable Single Pitch Well House Roof
Now let’s dive into the actual building process.
Step 1: Build the Roof Frame
- Cut your rafters (2x4s or 2x6s) to match the length and slope you planned.
- Use cross braces to stabilize the frame.
- Construct a rectangular frame that matches the well house dimensions.
Step 2: Create the Pitch
- To achieve the slope, cut the front rafters slightly shorter than the back ones.
- Alternatively, attach a wedge-shaped riser on one side to tilt the roof naturally.
Step 3: Attach Decking
- Secure plywood or OSB panels on top of the frame with galvanized nails.
- Make sure the panels overhang slightly for better water runoff.
Step 4: Install Roofing Material
- For metal roofing, lay down corrugated panels and secure them with roofing screws.
- For shingles, apply roofing felt, then install shingles starting from the bottom edge and working upward.
Step 5: Add Removable Fasteners
This is where the roof differs from a permanent design:
- Use hinges at the back so the roof can swing open like a lid.
- Or, use lag bolts with wing nuts on each side, allowing you to lift the entire roof off when needed.
Step 6: Seal and Protect
- Apply exterior paint or sealant to protect the wood.
- Pay special attention to joints and edges, where water tends to seep in.
Safety Tips When Building
- Always wear safety glasses when cutting wood or metal.
- Use pressure-treated lumber to prevent rot.
- Ensure the roof is not too heavy; you should be able to lift or swing it open without strain.
- If using hinges, add a locking mechanism to prevent strong winds from blowing the roof open.
Cost Estimate for Building a Removable Single Pitch Well House Roof
The cost of this project depends on the size of your well house and chosen roofing materials:
- Framing lumber: $40 – $80
- Plywood decking: $30 – $60
- Roofing material (metal panels or shingles): $50 – $150
- Fasteners and hinges: $20 – $50
- Sealant/paint: $20 – $40
Total estimated cost: $160 – $380, depending on materials.
This makes it a budget-friendly project compared to hiring a contractor.
Design Variations and Ideas
If you’re comfortable with customization, here are some ways to improve your design:
- Insulated roof panels: Prevents freezing in cold climates.
- Skylight or vent: Allows light and air circulation.
- Removable panels: Instead of lifting the whole roof, design it with removable sections.
- Lightweight materials: Use polycarbonate sheets instead of wood for easier lifting.
Long-Term Maintenance
A well-built removable roof can last for years with basic care:
- Inspect hinges and fasteners annually.
- Repaint or reseal wood every 2–3 years.
- Clean off leaves, snow, and debris regularly.
- Lubricate hinges to prevent rusting.
Final Thoughts
Learning how to build a removable single pitch well house roof is a practical project that saves money, protects your water supply, and adds convenience for future maintenance. By using durable materials and thoughtful design, you can create a roof that withstands weather while remaining easy to remove whenever access to the well is required.
Whether you choose a hinged design or a fully lift-off option, the key is to balance strength with functionality. With careful planning and DIY effort, you’ll have a reliable roof that serves your home for years.
Leave a Reply