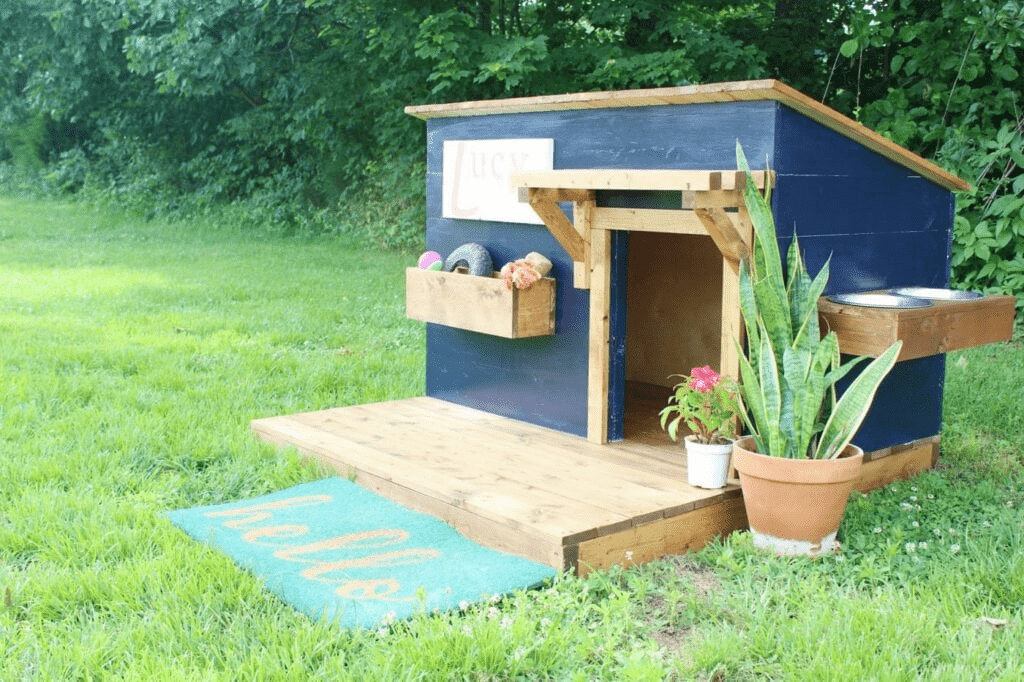
Building a dog house is a rewarding project for any pet owner. A sturdy, weatherproof, and comfortable home protects your furry friend from rain, wind, and extreme temperatures. One of the most practical roof designs for a dog house is a slanted roof, also known as a shed-style or single-pitch roof. If you’re wondering how to build a slanted roof on a dog house, this guide will provide step-by-step instructions, material recommendations, and tips to ensure your dog’s new home is both functional and attractive.
Read too: Is It Reasonable to Ask the Seller to Replace the Roof?
How To Build A Slanted Roof On A Dog House: Understanding the Basics
A slanted roof is a simple, effective choice for dog houses because it allows water to drain off easily and minimizes the risk of leaks. Unlike gable roofs that have two slopes, a slanted roof has a single slope from the front to the back or side to side. The main benefits include:
- Efficient Water Drainage
Rain or snow slides off easily, keeping the interior dry and reducing maintenance needs. - Simple Construction
Fewer cuts, angles, and components make this roof design ideal for beginners and quick builds. - Cost-Effective
Requires less material than more complex roof styles, saving money while still providing durability. - Modern and Functional Appearance
The minimalist design gives the dog house a clean look while maximizing interior space.
Understanding these benefits will help you design a roof that is both practical and visually appealing.
Materials You’ll Need
Before starting your build, gather the necessary materials to construct a durable slanted roof:
- Plywood or Wooden Boards: For the roof panels
- 2×2 or 2×4 Lumber: For the roof frame and supports
- Roofing Material: Asphalt shingles, corrugated metal sheets, or waterproof roofing felt
- Screws or Nails: Galvanized to prevent rust
- Wood Glue (Optional): For extra stability
- Paint or Weatherproof Sealant: To protect the wood
- Hinges (Optional): If you want a roof that opens for easy cleaning
Having all materials ready before starting ensures a smoother construction process and a stronger, longer-lasting roof.
Step 1: Planning the Roof Slope and Dimensions
The first step is determining the size and slope of your roof. The slope is important for drainage and overall comfort. Recommended slope angles for a dog house slanted roof:
- Mild Slope (10°–20°): Suitable for areas with light rain
- Moderate Slope (20°–30°): Ideal for most climates to ensure water flows off easily
- Steep Slope (30°–45°): Best for regions with heavy rain or snow
Measure the width and length of your dog house to calculate the size of the roof panels. Keep in mind that the front wall should be taller than the back wall to create the slope.
Step 2: Building the Roof Frame
The roof frame provides support for the panels and ensures the slant is consistent. Here’s how to build it:
- Cut Lumber to Size: Cut 2×2 or 2×4 lumber to fit the width of the dog house.
- Attach the Front and Back Rafters: Secure the taller rafter to the front wall and the shorter rafter to the back wall.
- Add Cross Supports: Install horizontal supports between rafters to reinforce the frame and prevent sagging.
- Check the Angle: Use a level or protractor to ensure the slope is even across the entire roof.
A sturdy frame is essential to keep the roof stable and withstand wind, rain, or curious pets.
Step 3: Installing Roof Panels
Once the frame is complete, add the roof panels:
- Cut Panels to Fit the Frame: Use plywood or wooden boards that slightly overhang the edges for extra protection.
- Secure Panels: Nail or screw the panels into place on the frame. Use glue for added stability if desired.
- Ensure Proper Overhang: The overhang prevents rain from dripping directly onto the dog house walls.
This step forms the base of the slanted roof and prepares it for waterproofing.
Step 4: Waterproofing the Roof
Keeping your dog dry is the primary purpose of the roof. Steps for waterproofing include:
- Apply Roofing Felt or Underlayment: Place a layer over the panels to prevent water from seeping through.
- Install Roofing Material: Shingles, metal sheets, or corrugated panels are suitable choices.
- Seal Edges and Joints: Use flashing or sealant to close any gaps where water could enter.
A well-waterproofed roof ensures your dog’s house remains dry and comfortable in all weather conditions.
Step 5: Painting and Finishing
After the roof is installed, add protective finishes:
- Weatherproof Paint: Protects wood from moisture and UV damage
- Optional Ventilation Holes: Small openings allow airflow without compromising protection
- Decorative Touches: Paint the roof a different color or add designs for a personalized look
Finishing touches enhance both durability and aesthetics.
Optional: Adding a Hinged Roof
A hinged roof allows easy access for cleaning and maintenance:
- Install Hinges: Attach hinges along one side of the roof to allow it to open like a lid.
- Add a Latch: Secure the roof when closed to prevent pets from lifting it.
- Test Movement: Ensure smooth operation without damaging the structure.
A hinged roof is especially useful for dog houses that need frequent cleaning or inspection.
Tips for a Successful Slanted Roof
- Use Pressure-Treated Lumber: Prevents rotting and extends lifespan
- Angle the Roof Correctly: Ensure water drains away from the house, not toward the entrance
- Check for Sharp Edges: Sand or cover edges to protect your pet from injury
- Reinforce for Heavy Weather: Add extra bracing if you live in an area with strong winds or heavy rain
Following these tips ensures your dog house roof is safe, durable, and functional.
Advantages of a Slanted Roof on a Dog House
- Water Drainage: Reduces water accumulation and prevents leaks
- Simple Construction: Easier and quicker to build than gable roofs
- Increased Interior Space: Taller front wall allows more headroom for pets
- Modern Appearance: Sleek, minimalist design fits any backyard aesthetic
A slanted roof combines practicality, ease of construction, and visual appeal, making it a top choice for dog owners.
How To Build A Slanted Roof On A Dog House: Final Thoughts
Building a dog house with a slanted roof is a practical and rewarding project. By following the steps outlined—planning the slope, constructing a sturdy frame, installing panels, waterproofing, and finishing—you can provide a safe and comfortable home for your dog.
Whether you are a beginner or experienced DIYer, a slanted roof is an ideal design choice due to its simplicity, durability, and functional benefits. Adding optional features like a hinged roof or decorative finishes enhances usability and aesthetics.
With careful planning and quality materials, your dog’s new house will be weather-resistant, easy to maintain, and a welcoming space for your furry friend.

Leave a Reply