Adding a carport to your home is a practical way to protect vehicles from the elements while improving curb appeal. A gable roof carport attached to the side of a house provides excellent drainage, durability, and aesthetic appeal. If you are wondering how to build gable roof carport on side of house, this guide will provide a comprehensive step-by-step approach, from planning and materials to construction and finishing touches.
How To Build Gable Roof Carport On Side Of House: Understanding the Basics
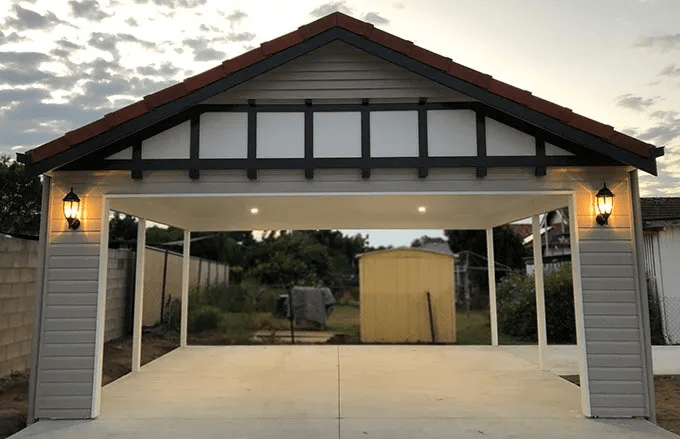
A gable roof features two sloping sides that meet at a central ridge, forming a triangular profile. This type of roof is ideal for a carport because it provides efficient water runoff, accommodates snow in colder climates, and offers structural strength.
Read too: Is It Reasonable to Ask the Seller to Replace the Roof?
Benefits of a Gable Roof Carport
- Efficient Drainage: Sloping sides allow rainwater and snow to drain quickly.
- Durability: Provides structural stability against wind, rain, and snow loads.
- Aesthetic Appeal: Complements various home architectural styles.
- Spacious Interior: Higher roof clearance allows for larger vehicles or storage.
- Versatility: Can be attached to the side of a house or built as a free-standing structure.
Understanding these advantages helps homeowners plan a functional and visually appealing carport.
Materials You Will Need
Before starting construction, gather the necessary materials for building a gable roof carport:
- Lumber: Pressure-treated 4×4 posts for supports, 2×6 or 2×8 boards for rafters and framing
- Plywood or OSB Sheets: For roof decking
- Roofing Material: Asphalt shingles, metal panels, or corrugated sheets
- Concrete: For securing posts in the ground
- Nails or Screws: Galvanized to resist corrosion
- Roof Flashing and Sealant: For waterproofing edges and joints
- Roof Ventilation (Optional): Ridge vents for airflow
- Tools: Hammer, saw, level, measuring tape, drill, ladder
Having all materials and tools ready before starting ensures a smoother construction process and reduces delays.
Step 1: Planning and Design
Before construction, plan your gable roof carport carefully:
- Determine Location: Choose a side of the house that allows easy vehicle access and complies with local building codes.
- Measure Space: Ensure adequate clearance for cars, typically 12–16 feet wide and 18–20 feet deep.
- Check Local Regulations: Obtain any necessary permits and ensure compliance with setback and height requirements.
- Decide Roof Pitch: Standard gable roof pitch ranges from 4:12 to 8:12, depending on aesthetics and drainage needs.
Proper planning ensures your carport is functional, safe, and meets all legal requirements.
Step 2: Preparing the Site
Site preparation is essential for a stable carport foundation:
- Clear the Area: Remove grass, debris, and obstacles.
- Mark Post Locations: Use stakes and string to outline the footprint of the carport.
- Level the Ground: Ensure a flat surface to prevent structural issues and uneven post installation.
A well-prepared site simplifies post installation and ensures structural integrity.
Step 3: Installing Support Posts
Support posts form the backbone of your gable roof carport:
- Dig Holes for Posts: Typically 2–3 feet deep to secure posts below frost line in cold climates.
- Set Posts in Concrete: Place 4×4 pressure-treated posts into holes, check for plumb, and pour concrete.
- Allow Concrete to Cure: Wait at least 24–48 hours for concrete to set before proceeding.
Secure, vertical posts provide a solid framework for the carport roof.
Step 4: Framing the Gable Roof
With posts in place, construct the roof frame:
- Install Ridge Beam: Connect the tops of the posts with a central ridge beam for support.
- Attach Rafters: Cut and attach rafters at the desired pitch, connecting them to the ridge beam and top plates of posts.
- Add Collar Ties: Reinforce the rafters with horizontal ties to prevent spreading under load.
- Ensure Level and Alignment: Use a level and measuring tape to maintain symmetry.
Accurate framing ensures a stable and properly aligned gable roof.
Step 5: Adding Roof Decking
Once rafters are installed, add roof decking:
- Lay Plywood or OSB Sheets: Start from the bottom and work upward, securing each sheet to rafters.
- Overlap Edges: Ensure proper overlap to prevent leaks.
- Check Flatness: Verify all panels are flush and aligned before proceeding.
Roof decking forms a solid base for your roofing material.
Step 6: Installing Roofing Material
Proper roofing protects your carport from weather elements:
- Install Underlayment: Lay roofing felt or waterproof membrane over decking.
- Add Flashing: Seal edges, joints, and areas where the roof meets the house wall.
- Install Shingles or Metal Panels: Follow manufacturer instructions for nails and spacing.
- Seal and Inspect: Ensure all seams and edges are properly sealed to prevent leaks.
A well-installed roof ensures durability and long-term protection for vehicles.
Step 7: Optional Features and Finishing Touches
Enhance your carport with additional features:
- Gutters and Downspouts: Direct rainwater away from the house and foundation.
- Side Panels or Lattice: Add partial walls for wind protection or aesthetic purposes.
- Lighting: Install outdoor-rated fixtures for visibility at night.
- Paint or Stain: Protect wood posts and trim while enhancing visual appeal.
These finishing touches improve functionality, aesthetics, and longevity of your carport.
Tips for a Successful Gable Roof Carport
- Choose Quality Lumber: Pressure-treated or rot-resistant wood ensures durability.
- Check Local Weather Loads: Reinforce rafters for areas with heavy snow or strong winds.
- Maintain Proper Overhang: Protect walls and vehicles from rain splash.
- Use Temporary Supports: Stabilize rafters and beams during construction for safety.
Following these tips ensures your carport is strong, functional, and safe.
Advantages of a Gable Roof Carport on Side of House
- Enhanced Protection: Shields vehicles from rain, snow, and sun.
- Aesthetic Integration: Blends with home architecture for visual appeal.
- Increased Durability: Gable roof design resists weather elements better than flat roofs.
- Additional Space: High ceiling allows storage of bikes, ladders, or larger vehicles.
A gable roof carport attached to the side of a house combines functionality, durability, and aesthetics.
How To Build Gable Roof Carport On Side Of House: Final Thoughts
Building a gable roof carport on the side of your house is a practical and rewarding project. By following the steps outlined—planning, site preparation, post installation, roof framing, decking, roofing material, and finishing touches—you can create a durable, functional, and visually appealing carport.
A properly constructed gable roof carport protects vehicles, enhances property value, and complements the overall architecture of your home. With careful planning, quality materials, and attention to detail, homeowners can enjoy a long-lasting structure that combines both functionality and curb appeal.

Leave a Reply